 John Mata Jr.
.
February 21, 2023
.
c10
John Mata Jr.
.
February 21, 2023
.
c10
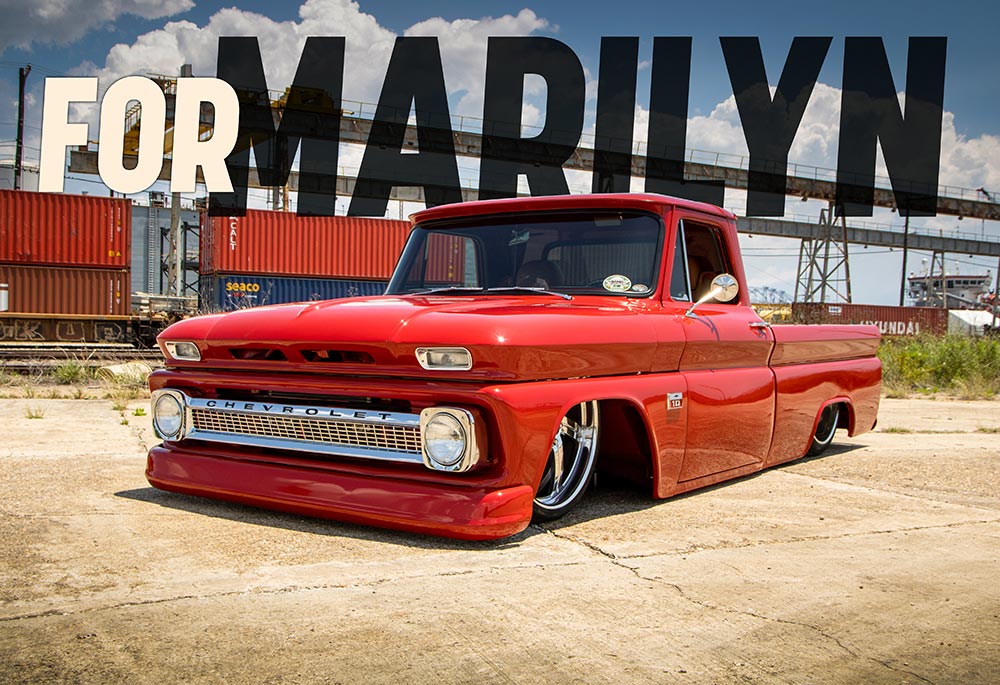
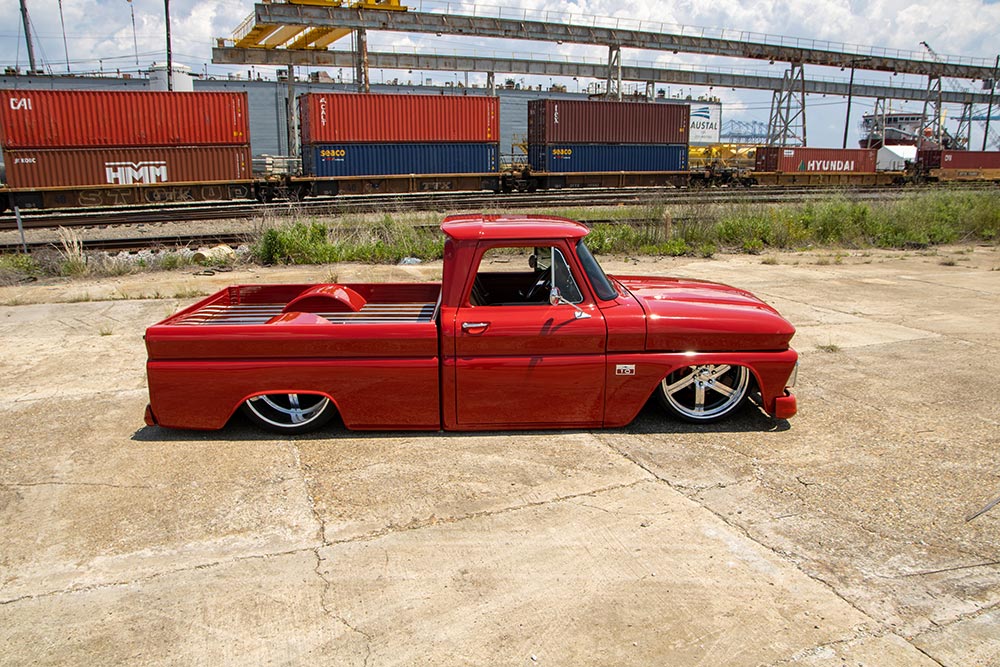
Starting a new C10 truck project is always an exciting time, but some builds are just a little more meaningful than others. Billy Lane and his son Billy Lane Jr. of Marrero, Louisiana, started on their ’66 Chevy C10 soon after they purchased it back in October 2017. The two looked at the truck as a good opportunity to spend some quality father/son time together, but little did they know just what would end up fueling them to get the truck finished as quickly as they could.
In August 2018, Billy Sr.’s mother, Marilyn, was diagnosed with stage 4 pancreatic cancer. With so many things up in the air for her during this time, one of her wishes was for her son and grandson to complete the truck project they had set out to accomplish. Unfortunately, Marilyn passed away in January 2019 while the build was still in progress, which set a fire underneath the two Billys to work even harder on the C10 to build a completed show truck that their lost loved one would be proud of.
The guys had a bold plan right out of the gate, which was to take on as much of the labor on their own as they could—well, as much as they felt capable of finishing with good results. While a plan like that does have the potential of going south real fast, Billy and Billy Jr. kept the ship sailing steady as they made their way through the entirety of the four-year process, which naturally began at ground level.
“The guys had a bold plan right out of the gate, which was to take on as much of the labor on their own as they could…”

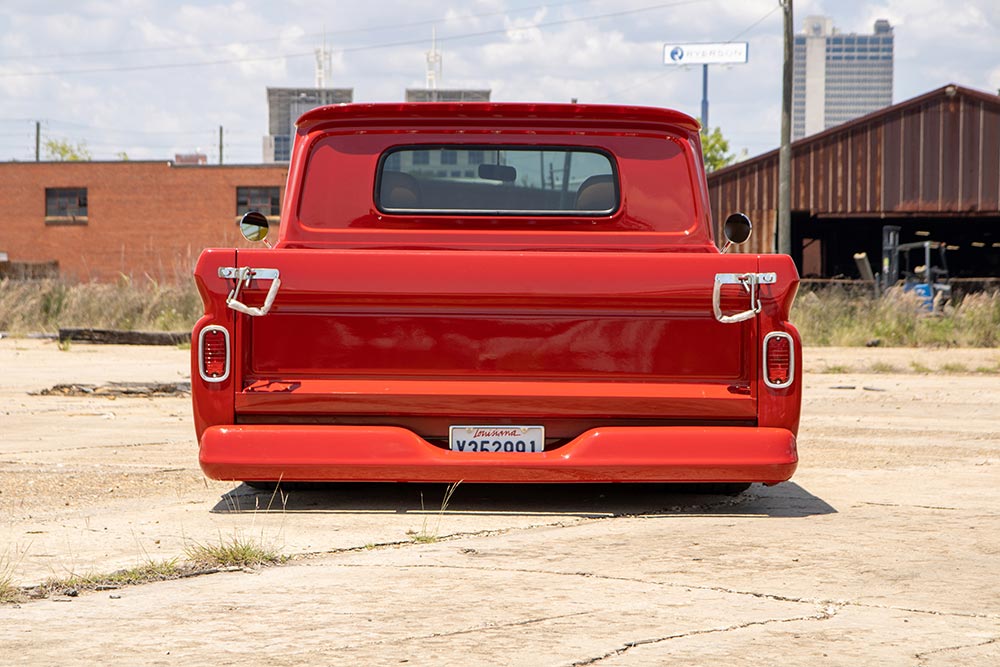
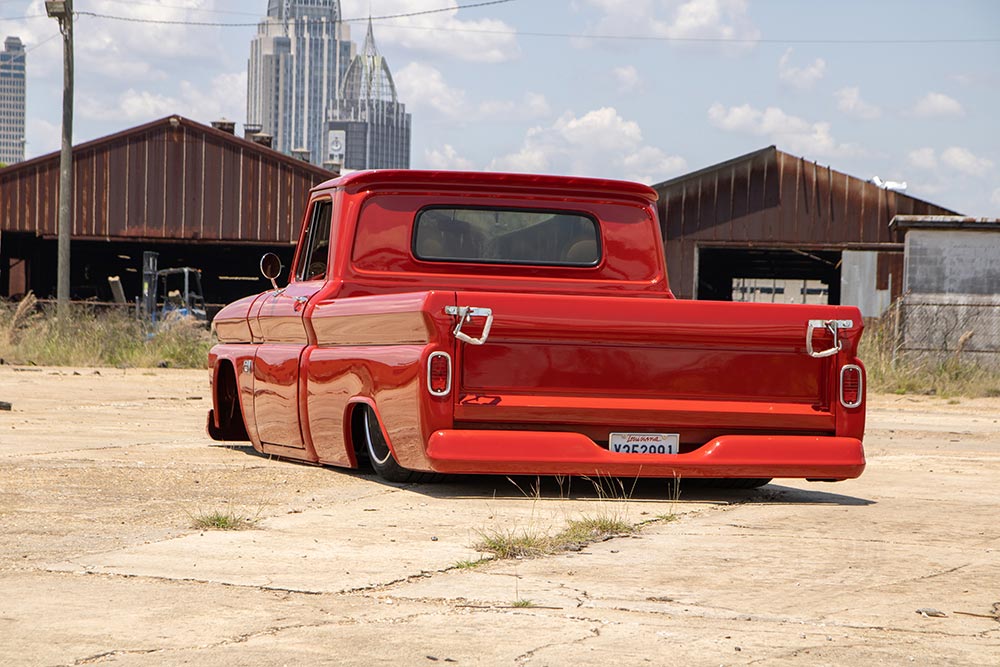
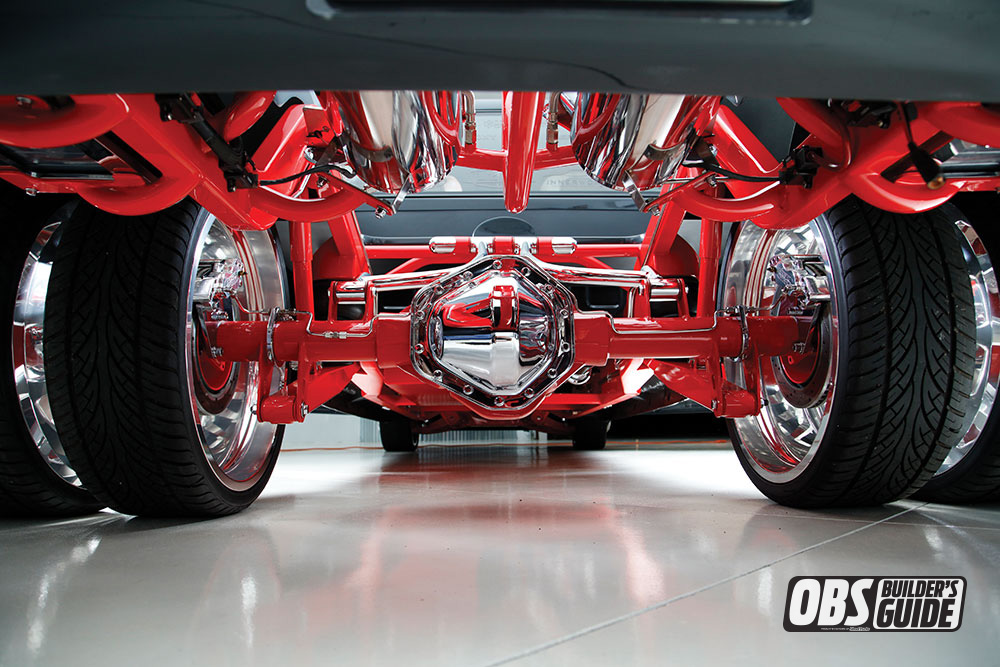
The fellas had already pictured their C10 resting on the pavement, and to make that happen, they began building a full 2×4 frame for the truck. Putting the air-ride system together proved to be pretty straightforward, as the guys added custom control arms to the new frame, assembled a 2-link setup for the rear, and plumbed the entire network of compressors and Air Lift ’bags with stainless steel hard lines for good measure.
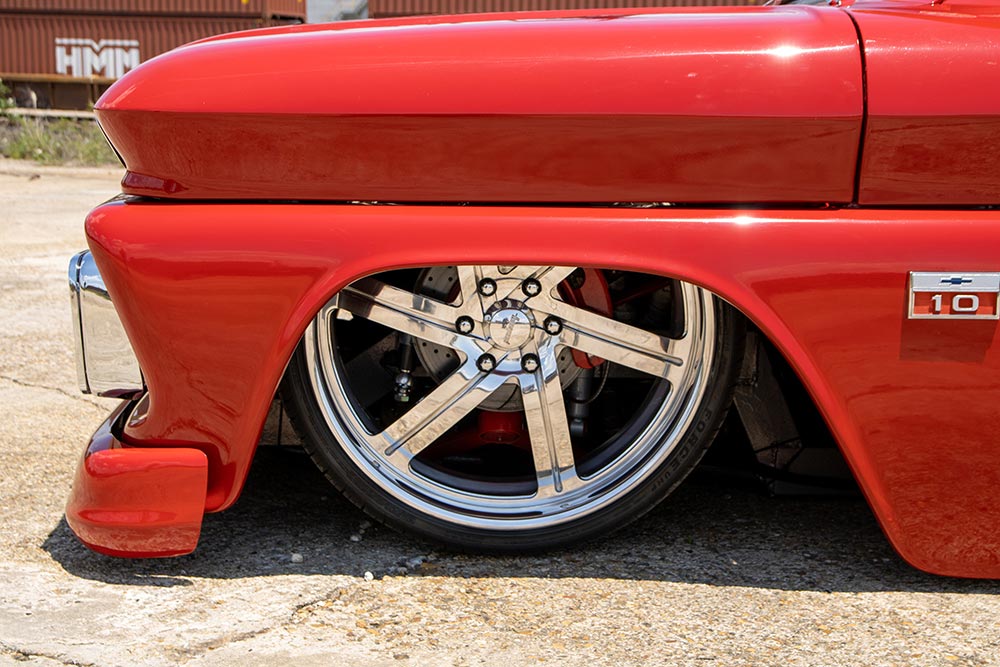
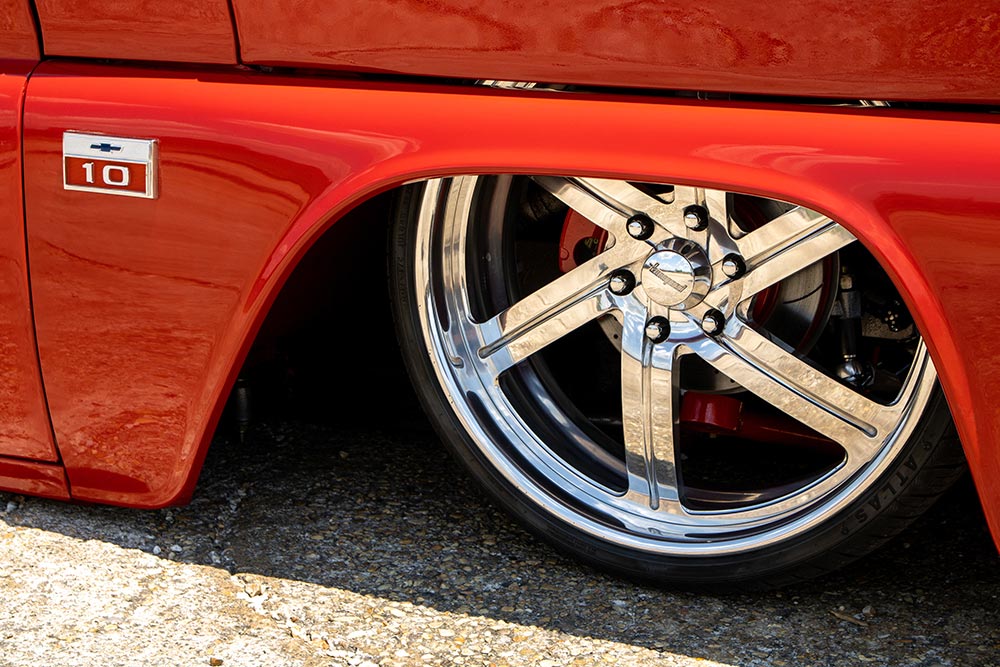
The guys had access to a 2003 Silverado parts donor and were able to utilize the front and rear disc brakes, along with a Wilwood master cylinder to handle the C10’s stopping power. To complete the rolling chassis, the guys began to shop around for the perfect size and model wheels that would later complement the C10’s timeless appearance. After an exhaustive search, a foursome of 24-inch Bonspeed Sweep wheels proved to be the most visually striking. To properly cover the oversize billets (including the two rear 15-inch-wide wheels), Pirelli P Zero tires were selected due to their good looks, size range, and all-season ultra-high performance.
“The guys actually have a certain proclivity when it comes to the color red, but nothing but GM Victory Red in particular would do in this case.”
Next, the Lane boys felt it was the right time to address the truck’s source of horsepower and torque. Since they wouldn’t be using the ’66’s original rundown engine, a ’70 496ci big block Chevy mill (as well as the matching transmission) typically found in SS Chevelle models was chosen for its sheer power and adaptability with the C10. While Billy and Billy Jr. were hoping to get their own hands on as much of the build as possible, they felt it best to outsource this portion of the project to a local shop, Phil’s Performance. The transplant engine was not only tuned-up to tip-top shape, it was also loaded with a healthy selection of aftermarket performance add-ons to increase its street prowess.
While the engine was being prepared for installation, the guys had already dived into the bodywork required to get the truck even remotely ready for paint. They were in deep, that’s for sure, as there wasn’t a single panel that was without substantial rust issues. This is where the guys hit the largest speed bump in the build’s progress but also where they were forced to learn a lot about the patching process. The work was tedious, but also endlessly satisfying as the father and son duo was able to identify the problem areas and utilize newfound skills to whip the truck back into shape.
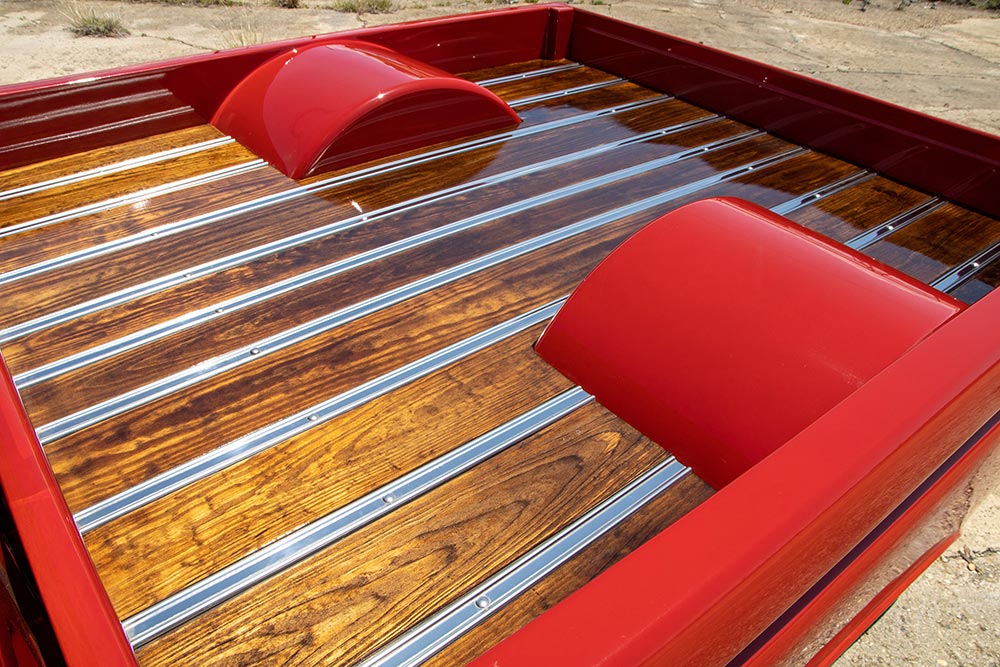
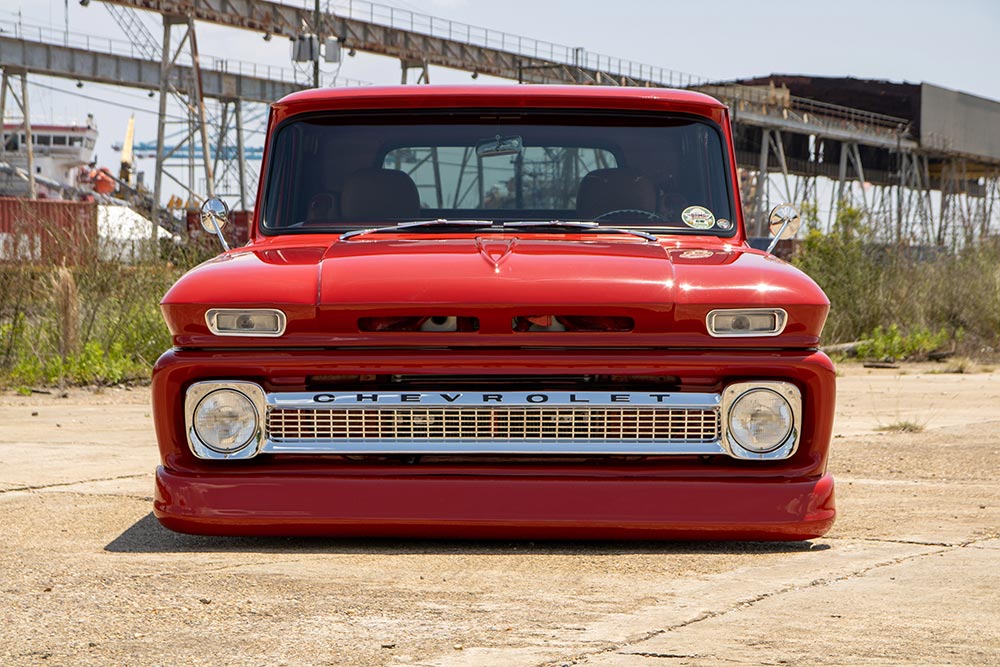
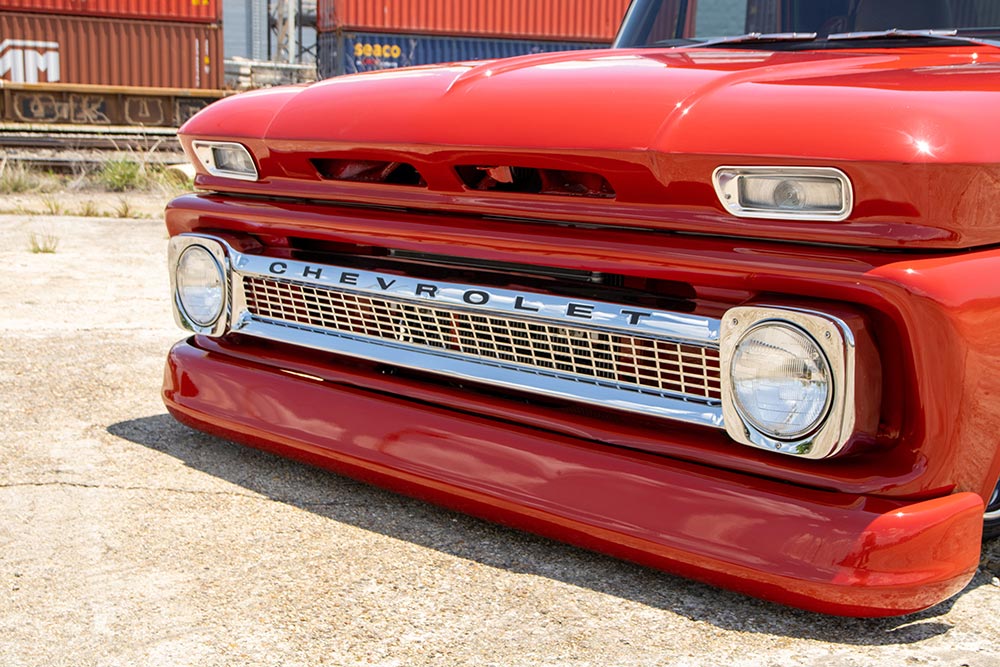
Billy and Billy Jr. poured a lot of combined man-hours into not only straightening the C10’s exterior panels, but also restyling them where they saw fit. The guys shaved off what they felt was necessary in order to gain a smoother, more streamlined appearance. Custom rear tubs were then fabricated to properly house the wide rear wheel/tire combo in fashion. Soon enough, the Lanes began planning to have the truck painted by Jonathan Moya, but there was never any question about what color the truck would be: the hue of choice had been red right from the start. The guys actually have a certain proclivity when it comes to the color red, but nothing but GM Victory Red in particular would do in this case.
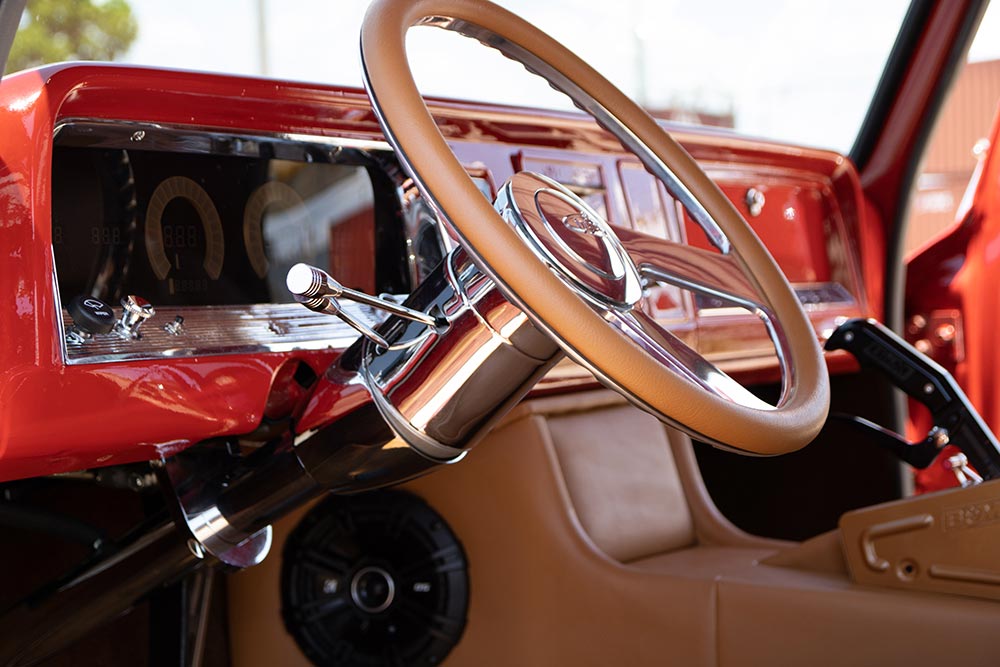
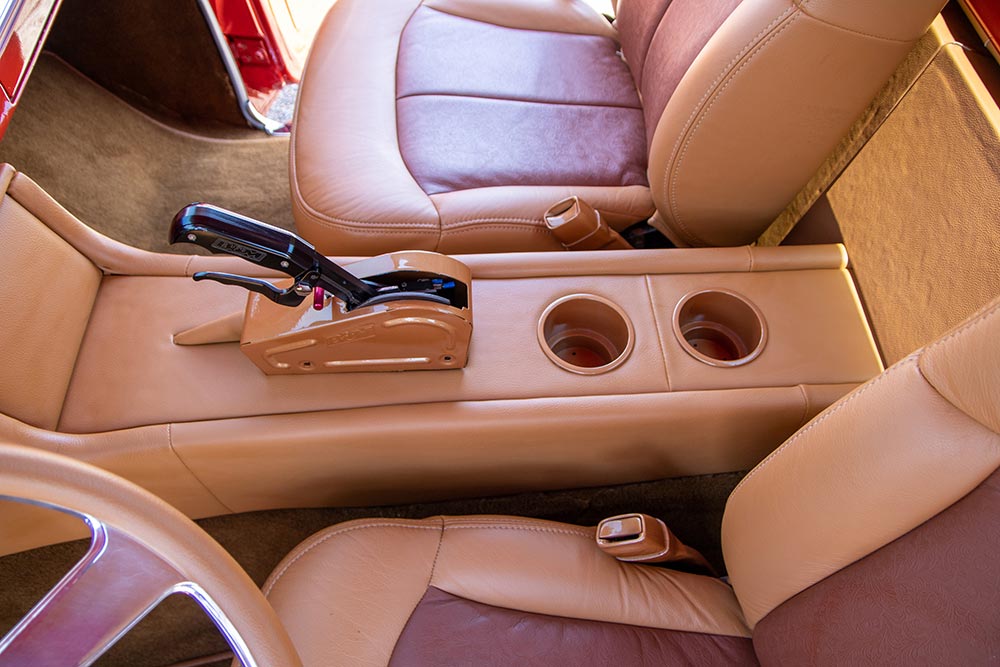
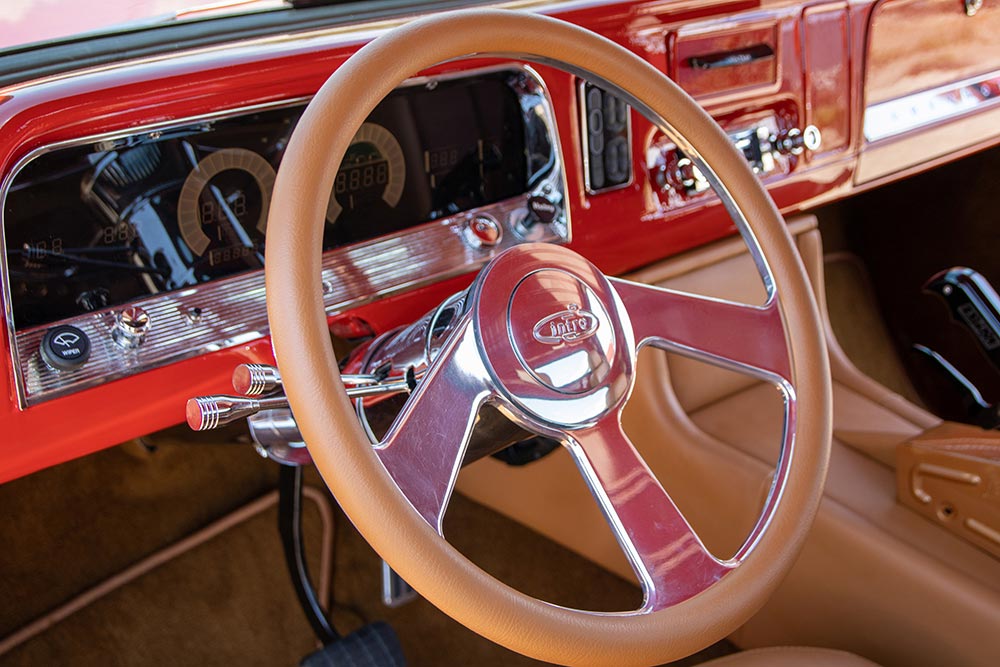
While the guys were making very steady progress on their C10 project, they pushed to get the truck done to debut at the 2021 Battle in Bama show. That donor ’03 Silverado the guys were able to get their hands on proved to still be handy, as they plucked the bucket seats from it and covered them in autumn-colored, western-themed leather upholstery from Katzkin. The cab was then stuffed with a ton of high-end amenities in the way of Intellitronix gauges, a vintage-style head unit, speakers and subs, as well as an Intro steering wheel and an AccuAir switch box mounted in the dash.
Billy and Billy Jr. did meet their deadline, and successfully showed the truck they dedicated to their mother and grandmother. While the build wasn’t completed overnight, the fact that they completed the lion’s share of the labor with their own hands says a lot about their dedication to creating a quality end result. The two have made a lot of great memories together and have something tangible to show for their years of hard work. They can sit behind the wheel, fire up the engine, and take their Chevy out for a spin whenever they feel like it. While a fistful of money can purchase a completed truck of this caliber, the father/son experience of building it from scratch is simply invaluable. The sentimental equity that this C10 has is worth its weight in solid gold.
OWNER
Billy Lane/Billy Lane Jr.
1966 CHEVY C10
MARRERO, LOUISIANA
Engine
Chassis & Suspension
Wheels, Tires & Brakes
Body & Paint
Interior & Stereo
How much does it cost to buy and install various components for a C10 truck project?
Revamping a Chevy C10 truck involves several aftermarket components, each contributing to the overall cost. Here’s a detailed look at the total expenditure you can expect when buying and installing various parts for your project.
Prices are subject to rounding and do not include potential labor costs for installation, shipping fees, or state taxes. Be sure to account for these additional expenses when budgeting your C10 truck project.
What is included in the parts list for building a dirt-cheap supercharged V-8 C10 truck?
Building a supercharged V-8 C10 truck on a budget? Here’s a comprehensive parts list that covers all the essentials you’ll need:
Approximate total for all parts: $8,156
This parts list ensures you have everything needed to build a supercharged V-8 C10 truck without breaking the bank. Happy building!
What additional components might you need when installing a supercharger on a Chevy C10 truck?
When you’re installing a supercharger on your Chevy C10 truck, there are several additional components you might need to ensure a smooth and effective setup:
By preparing these additional components ahead of time, you can streamline your installation process and avoid potential setbacks.
How can you build a supercharged V-8 C10 Chevy truck for under $8,500?
Transforming a vintage C10 Chevy truck into a powerful, supercharged beast doesn’t have to drain your bank account. Here’s a comprehensive guide to building your dream truck for under $8,500.
First, you need the base vehicle. A used 1968 Chevy C10 can typically be found for around $2,500. Once you’ve got your truck, focus on the essentials:
Next, enhance the basic systems of your truck to make it roadworthy:
With approximately $4,000 left in your budget, it’s time to add some serious power:
Here’s a summarized parts list and the corresponding costs:
Part Description Approximate Cost 1968 Chevy C10 $2,500 Control Arms $530 Brakes $70 Front and Rear Shocks $100 Exhaust Kit $300 Radiator & Thermostat $390 142/144 Supercharger Kit $2,900 600-cfm Carburetor $800 Fan Spacer & Lower Pulley $200 Total $7,790 #### Final TouchesWith the remaining budget, consider replacing minor items like the water outlet, valve cover gaskets, and temperature sender. These components typically cost under $50 each and can enhance overall reliability.
For under $8,500, you can build a supercharged V-8 C10 Chevy truck by carefully selecting affordable parts and focusing on essential repairs and upgrades. This budget-conscious approach ensures you get the performance and look you desire without overspending.
Why is a 600-cfm supercharger double-pumper carburetor recommended for a supercharged small-block engine?
A 600-cfm supercharger double-pumper carburetor is an excellent choice for a supercharged small-block engine for several reasons:
This type of carburetor excels in providing efficient fuel delivery throughout the engine’s operating range. By using a four-barrel design, it can effectively manage the additional fuel demands imposed by a supercharger.
One of the key features includes a boost-reference port. This port connects the power valve directly to the base manifold via a vacuum hose. As a result, it adjusts the power valve according to the boost level, ensuring optimal air-fuel ratios under varying conditions. Without this feature, the power valve might stay open, leading to an overly rich fuel mixture and causing the engine to underperform.
The double-pumper mechanism is designed to provide additional fuel by using mechanical secondaries. This makes it ideal for high-performance applications where immediate throttle response and increased power output are crucial. In a supercharged setup, this helps in maintaining the right balance of air and fuel, especially when the engine is under load.
These carburetors are built to withstand the extra pressure demands of a supercharged engine. The incorporation of precision-engineered parts ensures reliable performance. This means fewer adjustments and more consistent performance over time, which is vital for those looking to maximize the longevity and reliability of their engine system.
In summary, a 600-cfm supercharger double-pumper carburetor is recommended for a supercharged small-block engine because it provides efficient fuel delivery, features a boost-reference port for optimal air-fuel ratio adjustments, and has a robust design suited for high-performance applications. These factors collectively contribute to improved engine performance, making it a worthwhile investment for any supercharged setup.
What are some of the cheapest control-arm and disc-brake swap options for a 1967-1970 C10 Chevy truck?
When looking to upgrade your 1967-1970 C10 Chevy truck, replacing the control arms can be a great first step. Here are some budget-friendly options:
Switching from drum to disc brakes can greatly improve your truck’s braking performance. Here are some economical options:
Upgrading your 1967-1970 C10 Chevy truck with new control arms and disc brakes doesn’t have to break the bank. With options ranging from stock replacements to performance upgrades, you can enhance your truck’s handling and braking performance affordably.
How can you supercharge a 283/327 Chevy C10 truck?
Supercharging your 283/327 Chevy C10 truck can significantly boost its performance and curb appeal. Here’s a streamlined guide to get you started without breaking the bank.
First, ensure your truck’s basic systems—suspension, brakes, and exhaust—are in good working condition. Once that’s sorted, let’s dive into the supercharging process.
One of the most straightforward and effective ways to supercharge your Chevy C10 is by installing a blower. For small-block Chevy engines, a supercharger that’s easy to bolt on and compatible with both stock and HEI-swapped distributors fits best. Whether you have a short or long water pump, there are options available to suit your setup.
Choosing the right carburetor is critical. A supercharger often pairs well with a 600 cfm carburetor, which provides adequate air-fuel mixture even under boosted conditions. Opt for a model with a boost-reference port to keep the power valve in check, which helps manage the air-fuel ratio effectively and prevents unnecessary fuel consumption.
Installing a supercharger and the right carburetor combination can add around 100 horsepower to your engine. This modification can typically be completed over a weekend if you have all the necessary parts and tools.
Here’s a quick checklist of components you’ll need for the installation:
By following these steps, you’ll be able to supercharge your 283/327 Chevy C10 truck efficiently and enjoy a significant performance boost.
What are the benefits of factory ram’s-horn manifolds on a Chevy C10’s 283ci engine?
The factory ram’s-horn manifolds on a Chevy C10’s 283ci engine offer several advantages. Here’s a breakdown of why they are beneficial:
In summary, choosing to retain the factory ram’s-horn manifolds on a Chevy C10’s 283ci engine combines performance, durability, and ease of service, making it a smart choice for both enthusiasts and everyday drivers.
Why should you consider a 1967-1972 Chevy C10 truck for a project car?
Are you dreaming of a classic project car but worried about high costs? Consider the 1967-1972 Chevy C10 truck. Here’s why:
In summary, a 1967-1972 Chevy C10 truck offers a blend of affordability, performance, and classic appeal, making it an ideal choice for your next project car.
How can you install an exhaust system on a C10 truck?
Installing a new exhaust system on your Chevy C10 truck can enhance performance and give your ride a fresh, roaring sound. Here’s a step-by-step guide to help you through the process.
Before starting, make sure you have all necessary materials and tools on hand:
Ensure you have a clean, flat workspace. Lifting the truck with jack stands will provide easy access to the undercarriage. Safety is paramount, so make sure the truck is secure before you start working underneath it.
If your truck has an existing exhaust system, remove it completely. This includes any mufflers, tailpipes, and downpipes. If there are no exhaust components present, you’re ready to move on to the next step.
Attach the new downpipes to the exhaust manifolds or headers. These downpipes will serve as the starting point for the new exhaust system. Make sure the connections are secure and tighten them with the appropriate hardware. No welding is necessary if you’re using a bolt-on system.
Next, connect the 2 ¼-inch exhaust piping to the downpipes. Run the piping along the original exhaust route toward the rear of the truck. Attach it to the truck body using the included brackets and clamps, ensuring everything is properly aligned and secure.
Connect the 2 ¼-inch mufflers to the exhaust piping. Ensure the center-in and offset-out connections are properly aligned for optimal performance. Secure the mufflers with clamps to prevent any rattling or movement.
Route the tailpipes to their factory positions at the rear of the truck. Make any necessary adjustments to achieve the desired alignment and secure them with the provided brackets and clamps.
Before finalizing the installation, check all connections for potential leaks. Ensure that all clamps are tightened, and the system is secure. Start the engine and listen for any unusual sounds indicating a loose connection.
Once you’re satisfied with the installation, carefully lower the truck from the jack stands. Clean up any tools and materials, and take a moment to double-check your work.
Your C10 truck should now have a robust and efficient exhaust system, improving both performance and sound. Enjoy the enhanced driving experience!
What should you inspect under the truck for potential problems?
Inspecting the underside of a truck is crucial for identifying potential issues. Here are the key areas to focus on:
By thoroughly checking these areas, you can better assess the truck’s condition and avoid potential pitfalls.
What should you check for when inspecting a used C10 truck?
When evaluating a used C10 truck, it’s essential to perform a thorough inspection to avoid ending up with a problematic vehicle. Here’s a comprehensive checklist to guide you through the process:
By following this detailed inspection guide, you can make a more informed decision and potentially save thousands in repair costs down the road.
What potential issues should you look for during a test drive of a C10 truck?
When testing a C10 truck, there are several key areas to scrutinize to ensure you’re making a sound investment.
By keeping these points in mind, you can better assess the condition of a C10 truck and make a more informed purchasing decision.
What are the risks of buying a vehicle in primer?
Purchasing a vehicle that is only primed but not painted might seem like a minor detail, but it can lead to several significant issues.
Primer can conceal underlying problems like rust, poor bodywork, or previous accidents. Without a proper paint job, you’ll have no way of knowing what’s lurking beneath the surface.
Primer isn’t as durable as paint. It doesn’t offer protection against elements like rain, snow, and UV rays. This means the car is more susceptible to damage, which can lead to expensive repairs in the long run.
A primed vehicle is less appealing to potential buyers. They may question the reasons behind the lack of paint and assume there are hidden problems. This could significantly reduce the vehicle’s resale value.
If the vehicle is still under warranty, having it only in primer can lead to complications. Some manufacturers or dealers might refuse to honor warranties since the vehicle is not in its complete, factory-finished state.
By understanding these risks, you can make a more informed decision and avoid potential pitfalls when buying a vehicle in primer.
Why is it important to let the truck run while inspecting it?
Letting the truck run while inspecting it is crucial for several reasons. First, it allows you to observe how the vehicle performs when it’s idling. This can help identify issues like overheating, which might not be apparent during a quick test drive. It’s especially important to see if the truck can maintain a stable temperature without moving.
Second, running the truck helps you check the oil pressure when the engine is warm. Oil pressure can drop as the engine heats up, signaling potential engine wear or other mechanical problems.
By running the engine, you can also test all the controls. Flip switches, turn dials, and ensure that everything from the lights to the HVAC is working correctly. Wiring and HVAC issues are notoriously expensive to fix, so identifying these problems early can save significant costs in the long run.
Keeping the truck running during an inspection provides a comprehensive understanding of its current state, potentially saving you from costly repairs down the road.
What are the advantages of looking for a C10 truck outside large urban areas?
When it comes to hunting for a C10 truck, exploring beyond major metropolitan areas can offer several advantages:
Rural areas, particularly in the Western United States, often sport climates that are favorable for vehicle preservation. Less exposure to harsh conditions like road salt and dense traffic can mean better-maintained trucks.
Numerous trucks have been circulated within farming and rural communities. These areas tend to have a higher concentration of older models that have been well-kept for agricultural use, making them prime locations for finding C10 trucks.
Most vehicle search apps feature a radius setting that can extend your search to about 100 miles from a specified zip code. By selecting a mid-sized city with surrounding rural areas—like Fresno, California—you can cast a wide net that includes both accessible urban areas and expansive rural regions. This approach maximizes your chances of finding a well-preserved truck.
Urban areas often come with a higher demand for vintage trucks, which can drive up prices. Rural sellers, on the other hand, might be more inclined to offer vehicles at lower prices, especially if the truck has been primarily used for farming and is no longer needed.
Rural areas are less picked-over than urban markets, which means a greater variety of options might be available. You might discover unique features or models that have been overlooked by urban buyers.
By focusing your search outside large urban centers, you can uncover hidden gems that offer great value and well-preserved condition, increasing the likelihood of finding the ideal C10 truck.
How can you find a cheap used Chevy C10 truck?
Finding a well-priced Chevy C10 truck involves a bit of strategy and patience. Here’s a step-by-step guide to help you on your quest:
Avoid major urban centers where prices tend to be higher. Instead, focus on rural areas, especially in regions known for their dry climates, which help preserve vehicles. Use search tools with radius features to broaden your scope. For example, search within a 100-mile radius of a city surrounded by farming communities.
Leverage online platforms like Craigslist, eBay Motors, and Facebook Marketplace to find listings. Set up alerts for new listings that match your criteria to stay ahead of the competition.
When you find a promising prospect, bring along a friend who can offer a critical viewpoint. Have the seller refrain from starting the vehicle before your arrival. This allows you to listen for issues like rod knocks or poor oil pressure during a cold start. Inspect for signs of smoke from valve guides, and let the truck idle to check for overheating or oil pressure drops.
Test all the electrical components, including switches and dials. HVAC and wiring issues can be costly, so ensure everything functions properly. During a test drive, pay close attention to steering stability and any unusual noises from the transmission. Check the suspension for any issues, such as worn control arms or missing shocks.
Get under the truck and look for anything unusual. This could include makeshift fixes, signs of drug storage, or structural damage. Check for frame cracks, missing components, and leaks in the drivetrain. Look for evidence of past collisions, as these can indicate deeper problems.
Avoid trucks covered in primer, as this can hide underlying issues. Opt for vehicles with original paint, even if aged, to get an accurate idea of the body’s condition.
By following these steps, you’ll be well-equipped to find a reliable and affordable Chevy C10 truck. Happy hunting!
What is the Weiand 142/144 supercharger and how does it benefit a small-block Chevy engine?
When looking to boost the performance of a small-block Chevy engine, the Weiand 142/144 supercharger emerges as a top choice. This supercharger is a straightforward bolt-on component that integrates seamlessly with either a stock distributor or an HEI-swapped distributor. Additionally, it is compatible with both short and long water pumps, making it a versatile upgrade.
The installation of the Weiand 142/144 supercharger is relatively straightforward and can typically be completed within a weekend. This makes it accessible even for those who may not have extensive mechanical experience.
With just around $4,000 invested in the basic systems of your truck, including suspension, brakes, and exhaust, adding the Weiand 142/144 supercharger is a cost-effective way to achieve substantial performance improvements without the need for extensive modifications.
The Weiand 142/144 supercharger is a powerful and efficient upgrade for small-block Chevy engines. Its ability to significantly increase horsepower, improve throttle response, and optimize fuel delivery makes it an attractive option for those looking to enhance their vehicle’s performance and appeal.
What are some methods for tucking exhaust pipes so they are not visible on a 1967 C10 step side truck?
When modifying a 1967 C10 step side truck, one popular challenge is making the exhaust pipes as discreet as possible. Here are some effective methods to achieve a clean, hidden exhaust look:
By applying these methods, you can effectively tuck the exhaust pipes of your 1967 C10 step side truck, achieving a sleek appearance without compromising functionality.
How can exhaust pipes be run through the rear quarter panel of a 1967 C10 step side truck?
Running exhaust pipes through the rear quarter panel of a 1967 C10 step side truck requires careful planning and execution to ensure both aesthetic appeal and functional performance. Here’s a guide on how to achieve this:
By strategically planning the placement and ensuring precision during installation, you’ll enhance both the look and performance of your 1967 C10 step side truck with a custom-fitted exhaust system.
What are some exhaust routing ideas for a 1967 C10 step side truck?
When considering exhaust routing options for your 1967 C10 step side, there are several creative and effective setups to explore. Here’s a roundup of popular configurations to inspire your project:
A fashionable choice is to route the exhaust through the rear quarter panel. This can be done either before or after the rear tires, providing a sleek look. You’ll need to decide if the pipes should stay visible or blend into the bodywork. This option requires precise cutting and fitting, especially if you’re running larger pipes like 3″.
Considerations:
For a more sporty appearance, consider having the exhaust exit on the sides, just before the rear tires. This setup creates an aggressive look and is easier to execute with smaller pipes, such as 2.5″.
Considerations:
Routing the exhaust directly to the back of the truck provides a classic look. This is less visually intrusive and functional for those aiming for a cleaner aesthetic under the truck.
Considerations:
A modern and tidy option is routing the exhaust underneath but close to flush with the bottom of the step. This approach minimizes visibility and ensures nothing hangs below the body line for optimal ground clearance.
Considerations:
For those with complex suspensions or high horsepower engines, opting for a mandrel-bent stainless steel exhaust system might be necessary. This method allows for smoother curves and reduced back pressure, tailored to fit around customized suspensions.
Considerations:
Choose an exhaust routing method that mirrors your style while considering your truck’s modifications and horsepower needs. Whether opting for a bold side exit or a subtle rear exit, each method has its own set of challenges and aesthetic appeals. Before complete installation, seek professional advice to ensure a seamless fit and function for your C10 step side.
What are some examples of custom exhaust modifications done by truck enthusiasts?
Truck enthusiasts often take pride in customizing their exhaust systems for improved performance and aesthetics. Here are some notable examples of how they modify their setups:
One popular modification is the use of angled tailpipes. For instance, a truck might feature 2.5-inch pipes that kick out at a 30-degree angle. This setup can include stainless steel exhaust tips cut at a 45-degree angle, ensuring they align flush with the bottom of the truck’s step. This design allows for a sleek look while maintaining efficient exhaust flow.
Some enthusiasts opt for larger exhaust pipes, such as a 3-inch system, which is considered if the truck is equipped with a high-performance engine, like those producing over 600 horsepower. While a 3-inch pipe offers more airflow, its installation can be more challenging due to routing difficulties. Skilled customization can overcome these challenges, especially when working around custom suspension systems.
Another popular choice is to route the exhaust system to exit at the rear of the truck. This setup is often preferred for a clean aesthetic and to direct exhaust gases away from the side panels. Although more intricate to install, especially in vehicles with customized suspensions like a TCI setup, the result is often worth the effort for enthusiasts seeking a balanced mix of style and function.
Some truck owners invest in mandrel-bent exhaust systems. This modification ensures smooth bends in the pipes, minimizing restrictions and improving exhaust flow. These systems are particularly beneficial for those with complex suspension arrangements or when a stock setup complicates straightforward installation.
In the world of custom trucks, the exhaust system is more than a necessity; it’s a chance to showcase craftsmanship and achieve optimal performance. Whether through angled tips, larger diameters, or precise bends, these modifications reflect personal preference and engineering skill.
What are the benefits and challenges of using 3″ exhaust pipes on a 1967 C10 step side truck?
When considering exhaust systems for your 1967 C10 step side truck, opting for a 3-inch exhaust pipe can have both benefits and drawbacks. Understanding these can help you make an informed decision based on your specific needs and goals.
Deciding whether to use a 3-inch exhaust for your 1967 C10 depends largely on your power goals and how you plan to use the truck. For high-performance builds, the benefits can outweigh the challenges. However, for moderate builds, sticking with a smaller diameter could offer a more cost-effective and simpler solution.
What are some user experiences and preferences for exhaust setup on classic trucks like the 1967 C10 step side?
When it comes to upgrading the exhaust system on classic trucks like the 1967 C10 step side, enthusiasts share a variety of experiences and preferences. The ultimate choice often hinges on performance goals, aesthetic appeal, and practical considerations. Here’s a breakdown of what some truck owners have found effective:
2.5-inch Pipes:
For most setups, a 2.5-inch exhaust system is a popular choice. If you’re working with an engine producing around 450-530 horsepower, this size offers sufficient flow without overcomplicating the routing. Owners find this setup not only cost-effective but also easier to manage through the truck’s underbody, especially with stock suspensions.
3-inch Pipes:
While 3-inch pipes can handle higher horsepower (typically above 600 hp), they are considered overkill for anything below that threshold. Many truck owners have observed that these larger pipes significantly increase costs and present more routing challenges. They also note that unless you’re an experienced fabricator, navigating these pipes through the undercarriage can be daunting. Nonetheless, some enthusiasts are up for the challenge and prefer this size for future-proofing their vehicles as they continue to upgrade power output.
Through the Rear Quarter Panel:
A common aesthetic preference involves routing pipes through the rear quarter panel, either just before or after the tire. Some owners appreciate this location for its sleek, integrated look.
Out the Back:
Others advocate for running the exhaust entirely out the back. This method is often seen as a cleaner and more traditional approach, avoiding any visible pipes along the sides of the vehicle.
Custom Suspension:
If you’re adding custom elements like a Total Cost Involved (TCI) rear suspension, be prepared for added complexity. Enthusiasts who have incorporated performance suspensions often opt for a stainless mandrel-bent setup to accommodate the non-standard suspension components while maintaining a tidy appearance and maximizing clearance.
Tucked Design:
Regardless of the routing path, many owners aim for a tucked exhaust design that minimizes visible piping and maintains the classic lines of the truck. This is seen as a mark of a well-executed build and avoids detracting from the vehicle’s iconic profile.
Overall, choosing an exhaust setup for a 1967 C10 step side truck combines aesthetic preferences with practical and performance considerations. Whether you favor a tucked, discrete appearance or an exposed, bold look, the key is balancing your truck’s power needs with the complexity you’re prepared to tackle. Each choice brings its own set of rewards and challenges, as shared by fellow vintage truck enthusiasts.
How do different types of rear suspension systems, such as leaf springs, influence exhaust system design?
When designing an exhaust system for a vehicle, the type of rear suspension plays a crucial role in shaping the setup. Here’s how different suspension types, like leaf springs, can affect your exhaust design:
Each suspension type requires careful consideration of clearance, complexity, and adjustments. Leaf springs offer simplicity and ease, while coil springs and independent rear suspension demand more intricate design approaches. Air suspension systems require versatile exhaust routing to match their height adjustability. Understanding these influences is essential for developing an efficient, high-performance exhaust system.
How do different exhaust pipe sizes, such as 2.5″ and 3″, affect the performance and cost for a classic truck?
Choosing the right exhaust pipe size for your classic truck can significantly impact both performance and cost. Here’s a breakdown of how the 2.5″ and 3″ exhaust systems can affect your build:
For classic truck enthusiasts, unless your engine is pushing past the 600-horsepower mark, investing in a 2.5″ exhaust system is usually the practical and economical choice. It provides sufficient performance benefits without the added cost and complexity of a 3″ system.
How might modifications to suspension systems, like TCI Engineering, impact exhaust routing options?
When you modify a vehicle’s suspension system, particularly with advanced setups from companies like TCI Engineering, it inevitably influences your exhaust routing options.
Ultimately, aligning your exhaust system with your modified suspension is about balancing enhanced vehicle performance with practicality. By choosing the right materials and professional services, you can achieve an exhaust routing solution that complements your high-performance suspension system without compromising on functionality.
Why might someone choose a 2.5″ exhaust system over a 3″ one for a truck with less than 600hp?
When deciding between a 2.5″ and a 3″ exhaust system for your truck, several factors come into play, especially if your vehicle produces less than 600 horsepower. Here’s a breakdown of why a 2.5″ system might be the optimal choice:
Choosing the right exhaust system is not just about size but about understanding how it fits with your vehicle’s performance needs and your personal preferences. For those operating with less than 600 horsepower, the 2.5″ system offers a well-rounded, efficient, and cost-effective solution.
C10 Builders Guide
Chris Hamilton . May 14, 2020
C10 Builders Guide
Chris Hamilton . May 04, 2020
Department
Travis Noack . August 06, 2021
c10
streettrucks . October 15, 2020

c10
Chris Hamilton . February 21, 2022
c10
STREET TRUCKS STAFF . December 05, 2022

Share Link