 Melissa Anderson
.
September 26, 2023
.
C10 Builders Guide
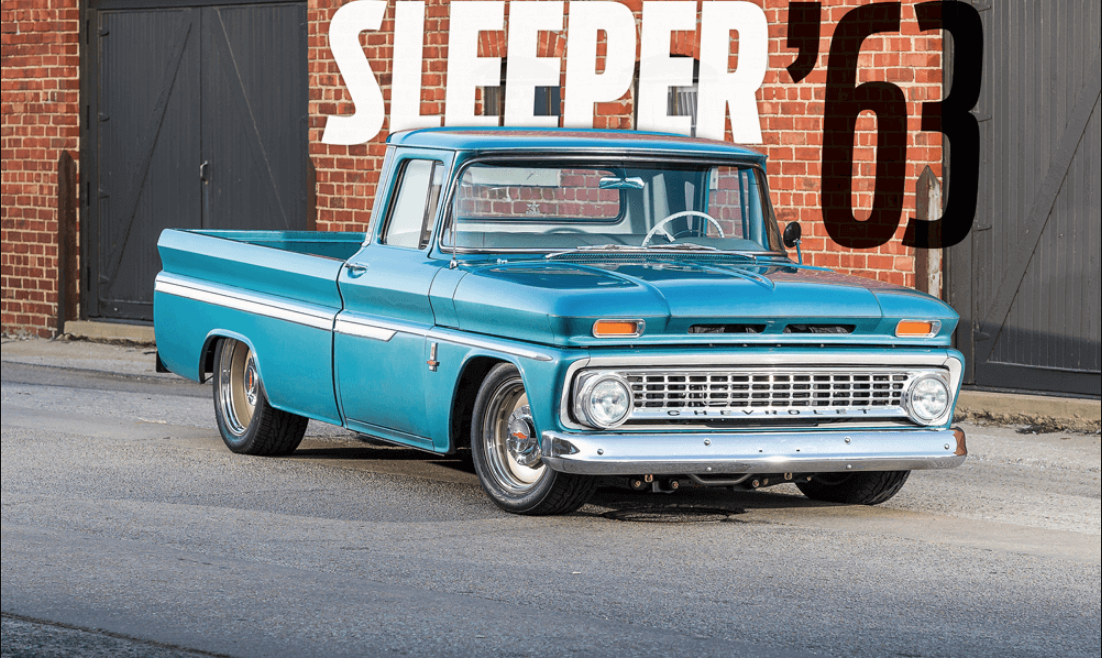
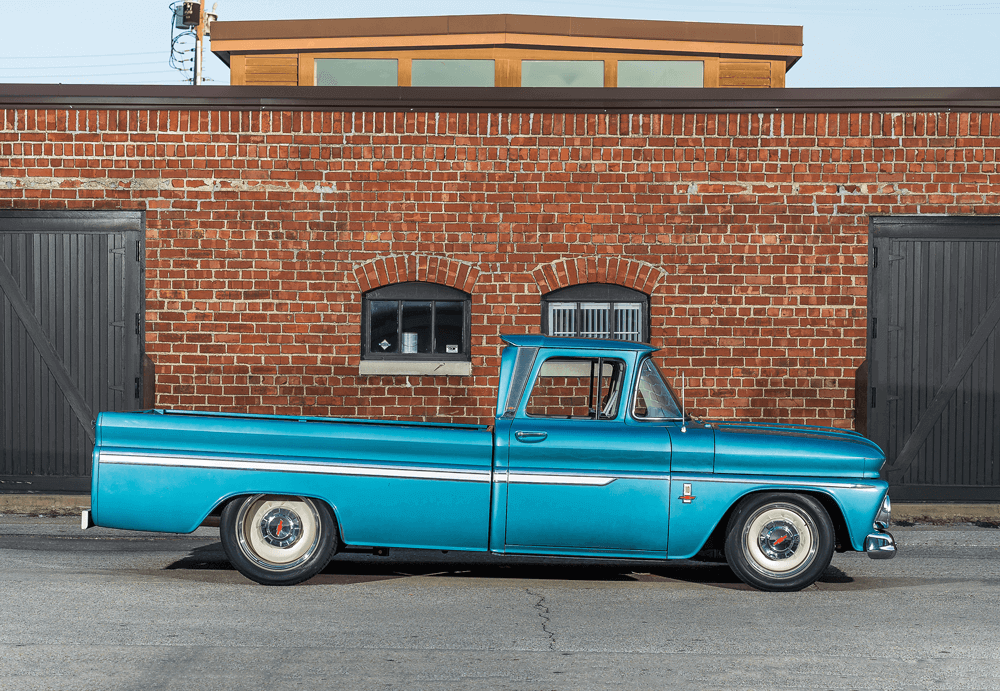
Jeff Breault, an investment advisor out of Kansas, shows that he knows exactly where to spend his time and money through his ’63 Chevrolet C-10. The Chevy truck clearly shows the experience Jeff has behind him, with several vehicles modified and 15 years of skin in the game. Mixing classically clean style with modern performance, it’s impossible not to acknowledge the careful balancing act achieved by his C-10 build.
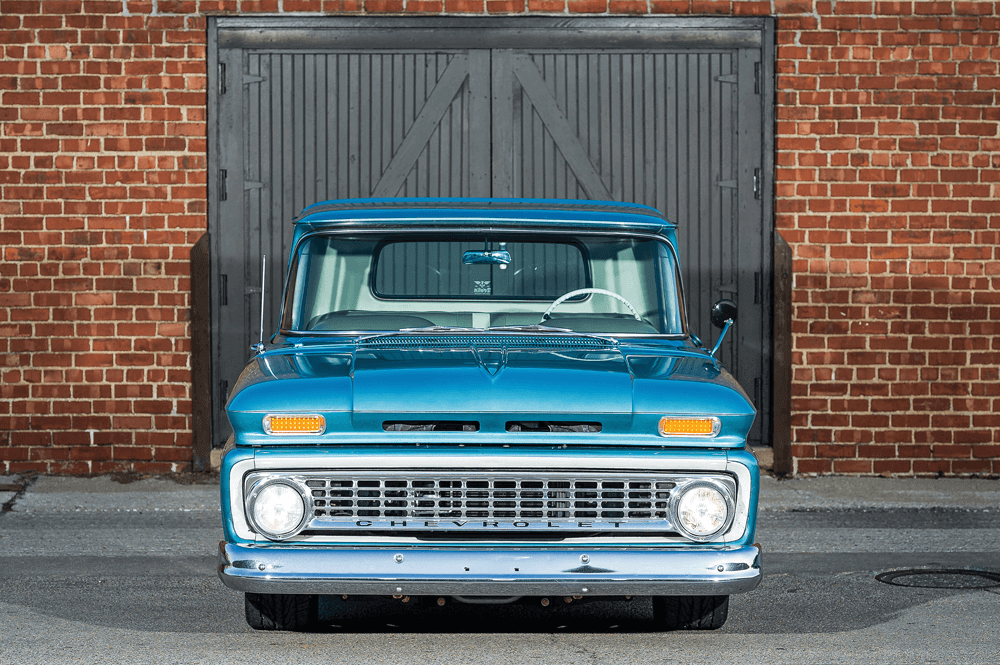
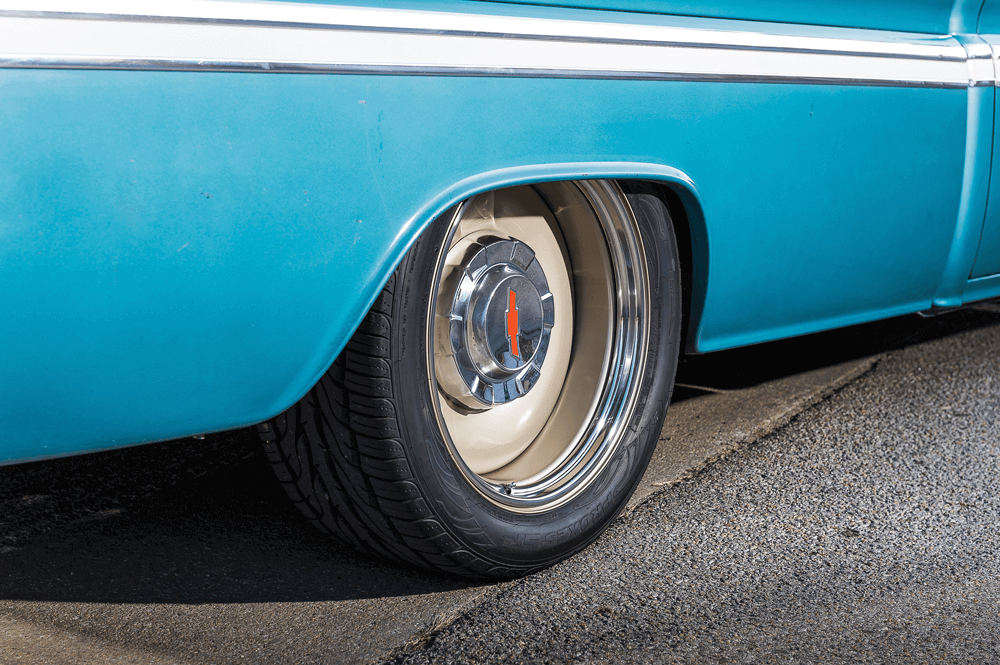
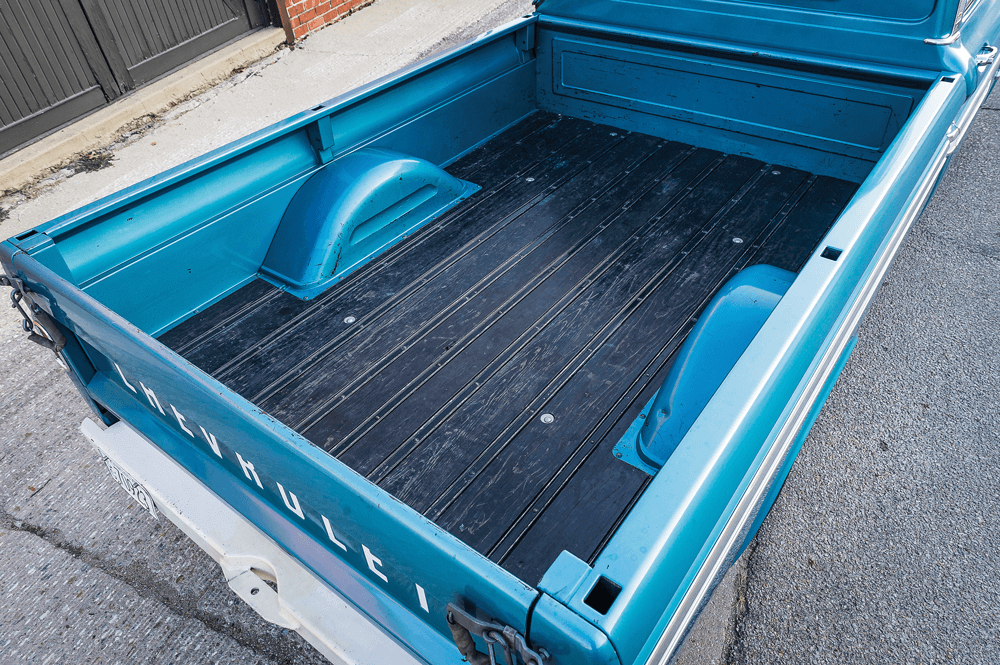
On the exterior, the Chevy still hails from humble factory beginnings with its nearly untouched body and iconic blue paint job, complete with detailing along the side and “Chevrolet” emblazoned across the tailgate. Upgrades are instead seen in smaller additions like the Detroit Steel wheels wrapped in Toyo Proxes. Even these changes clearly fit the build with their clean lines and bow tie accents. Other additions on the exterior remain superficial, limited to paint touch-ups under the hood as well as new headlights and taillights.
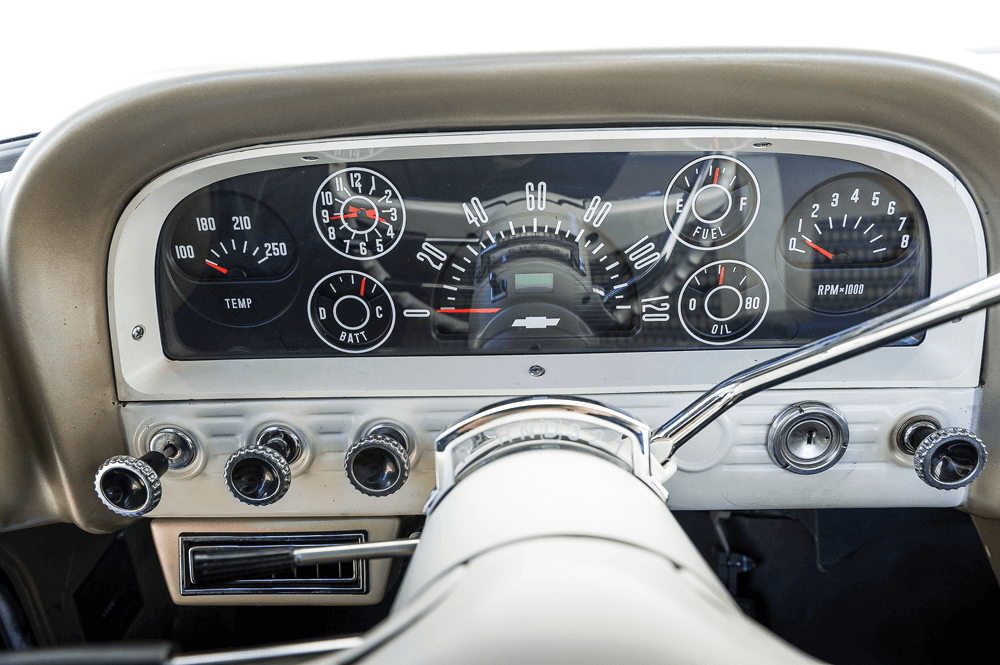
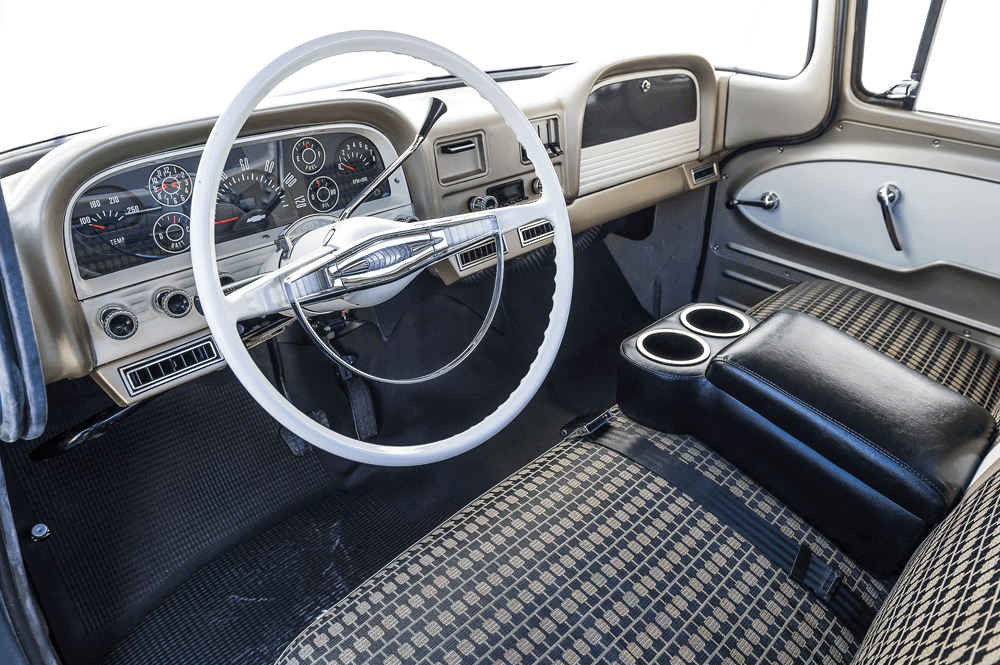
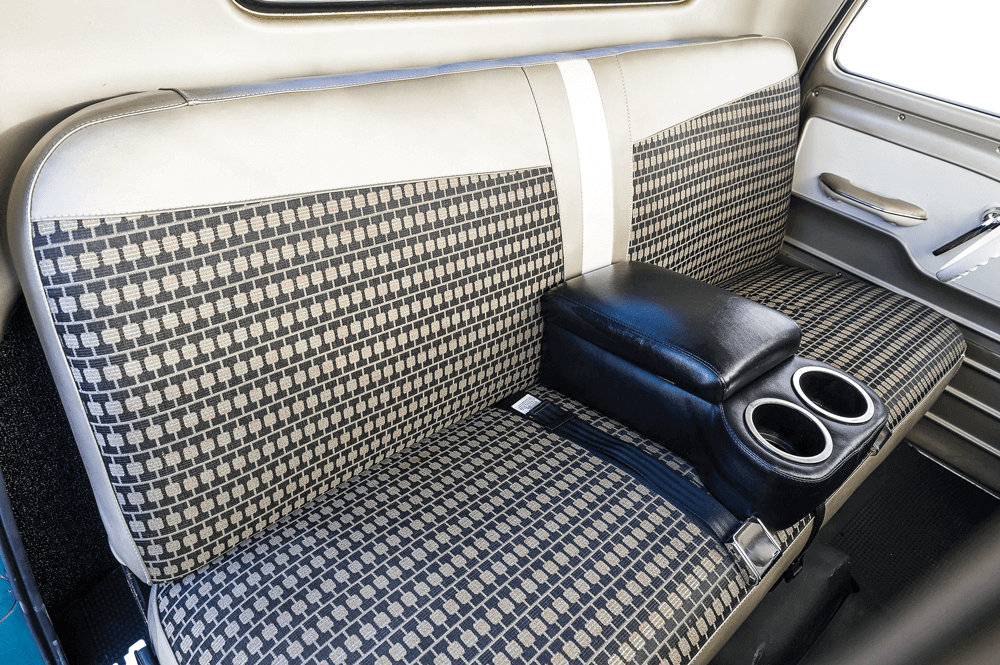
A close look at the interior, with its original upholstery, makes it clear that Jeff has worked hard to keep true to the C-10’s iconic style. Though the cab features upgrades all its own—with a full JL Audio setup, Vintage Air system and custom Redline Gauge Works gauges gracing the dash—the true surprises start with a look under the hood.
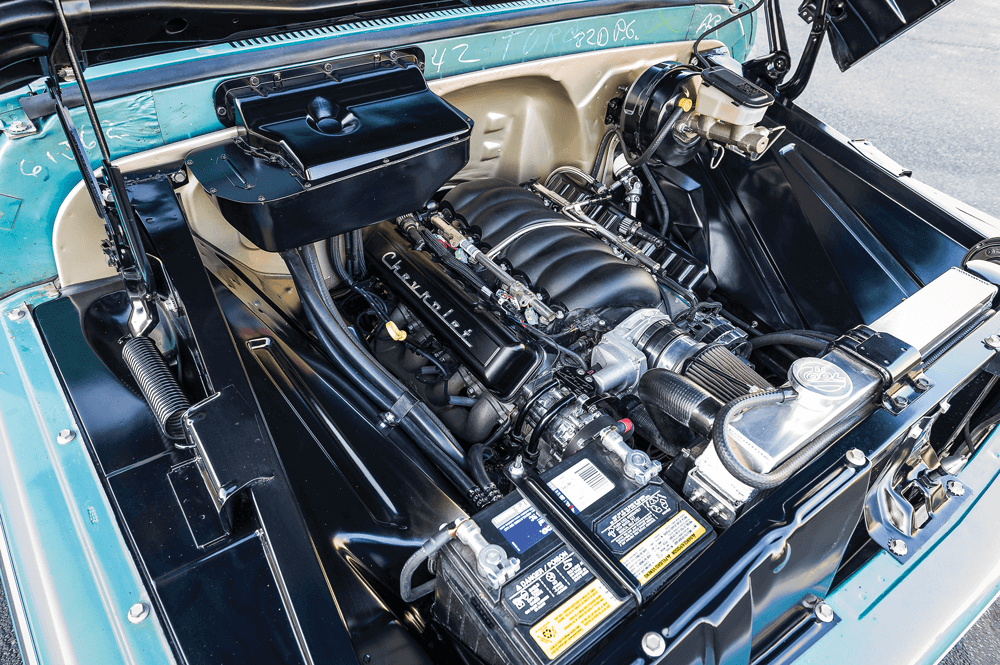
Perhaps the centerpiece of this ’63 build, the Chevy starts off strong with an LS engine swap putting out 525 hp. A Don Hardy Race Cars camshaft works the LS3 for all it’s worth. A long list of new parts carries this level of performance throughout the build with dual 11-inch cooling fans, Be Cool radiator, Melling oil pump and Edelbrock water pump all in place to keep the C-10 running smoothly. Other additions include a Cloyes timing chain, PowerMaster 140A alternator, PAC-1218X springs, K&N universal air cleaner, Billet Specialties Chevrolet script valve covers and TruTrac black anodized accessory drive system. Even the exhaust setup has been updated with Hooker LS cast-iron exhaust manifolds, custom 3-inch stainless crossover pipe, Vibrant Streetpower muffler and Vibrant Ultra Quiet resonator.
To meet that same level of modern performance in the suspension, a Roadster Shop Spec Series Chassis with Wilwood disc brakes give the ’63 a serious foundation while the TruTrac limited-slip differential ensures results where the tires meet the pavement. The Chevy features a 3.89 gear ratio, as well as a triangulated four-bar rear suspension setup and Strange S Series 8-inch rearend. As Jeff himself said, the ’63 Chevy C-10 “has the original feel that a 55-year-old truck should until you hit the gas pedal!”
With the goal of creating “a badass truck,” it’s easy to say that this Chevy is the picture of success. Impressive for how well-preserved the factory pieces remain, this truck came to Jeff with 34,000 miles already logged. At first glance, the ’63, with its original paint, body and bench, seems to have earned the name Earl—given by Jeff, no doubt, as a nod to the Chevy’s respectable age of 55 years. Yet a closer look shows that this C-10 has more kick than many new cars on the market, cementing the truck’s status as a sleeper; this powerhouse blends the best of Chevy style and performance. Though the daily driver has only racked up more miles in the years since that first measure, the changes Jeff has made ensure the C-10 still has miles left to go.
BUILD SPECS
OWNER
Jeff Breault
1963 Chevrolet C-10
Wichita, KS
ENGINE
CHASSIS & SUSPENSION
WHEELS & TIRES
BODY & PAINT
INTERIOR & STEREO
What specific parts were replaced with new sheet metal?
We upgraded several key components with brand-new sheet metal. First, we installed a new steel bed floor. Next, we added fresh bedsides and a front panel for added stability. The wheelwells and tailgate were also replaced to ensure a cohesive look. Finally, we swapped out the fenders, grille, and hood to complete the transformation into a gleaming new fleetside short box.
Why was new sheet metal chosen over repairing the original parts?
Repairing the original parts would have been a time-consuming task involving extensive work with hammers, dollies, and body filler. Instead, choosing new sheet metal provided a more efficient solution. Using fresh replacement panels for the fenders, grille, and hood not only saved countless hours but also ensured a better fit and finish. Thus, new sheet metal was chosen to streamline the restoration process and achieve superior results.
What challenges were encountered during the bodywork phase?
Challenges Encountered During the Bodywork Phase
Despite starting with mostly new metal, achieving the ideal panel gaps required meticulous adjustments. The alignment process was labor-intensive, necessitating precise cuts, welds, and rework to ensure a uniform appearance.
To smooth out imperfections and attain an even surface, body filler was essential. This step is critical for a polished finish but demands patience and precision. If you need a detailed guide on this technique, numerous resources are available to help.
Sanding was a significant hurdle, taking much longer than visuals might suggest. It involved hours upon hours of methodical effort to perfect the truck’s exterior. This tedious process is unavoidable if you aim for a flawless result, and it’s certainly an aspect that cannot be rushed.
The level of manual labor involved often goes unnoticed. Frequent clean-up was necessary as the workers found themselves enveloped in clouds of dust daily. Persistent effort finally led to a surface ready for painting, highlighting the importance of thorough preparation in bodywork.
In summary, the bodywork phase is not a swift or easy task. It requires detailed attention, a variety of skills, and a substantial commitment of time, making the end result all the more rewarding.
What considerations were made when choosing the paint for the truck?
When selecting the paint for the truck, a few key considerations guided the decision-making process.
The primary goal was to create a functional and dependable vehicle. A satin charcoal metallic finish under a glossy white top was chosen not just for its aesthetic appeal, but also for its practical benefits. The flat paint option allows the truck to retain a rugged look, making it less nerve-wracking to use regularly without the fear of constant maintenance.
Flat paint significantly reduces the time and effort required for bodywork, final finishing, and color sanding. This choice eliminated the need for several hundred extra hours of meticulous preparation, making the project more manageable and efficient.
The flat finish offers a highly durable coating, reducing the worry of scratching or damaging the surface during regular use. This resilience means you can handle everyday tasks without the constant fear of ruining the pristine appearance.
Lastly, the visual impact was a major factor. The flat finish enhances the classic lines of a ’67-’72 truck, especially when paired with a two-tone color scheme. The combination of satin charcoal and glossy white creates a striking contrast that enhances the vehicle’s overall look.
In summary, the paint choice was influenced by practical considerations, time and labor efficiency, durability, and aesthetics, creating a balance between functionality and visual appeal.
What is the timeline for completing the truck before SEMA 2023?
As of today, we have a strict deadline of three weeks to get our truck completed for the SEMA 2023 show. Currently, the truck is disassembled into myriad parts, creating a challenging but exciting project timeline.
Here’s a breakdown of our completion plan:
With meticulous planning and round-the-clock efforts, we are confident we can meet this ambitious timeline. Keep an eye on our progress as we rev up for SEMA 2023!
How did the project team feel about seeing the truck painted for the first time?
The project team was overjoyed when they finally saw their previously neglected and weathered C10 truck in a fresh coat of paint. This moment sparked a wave of emotions, mixing nostalgia with a sense of achievement as they reflected on the journey from dilapidation to restoration. Every brush stroke of new color symbolized the hard work and dedication that transformed the truck from its humble beginnings into a revitalized beauty.
Why is it important to test-fit sheet metal before final assembly?
Test-fitting sheet metal before final assembly is a crucial step in any restoration or custom build. Here are a few key reasons why:
In summary, test-fitting sheet metal is an essential practice that ensures a high-quality build, prevents costly mistakes, and ultimately guarantees a better-finished product.
What was the process of test-fitting the new sheet metal parts?
Before diving into the bodywork, it was crucial to ensure that every piece of new sheet metal was a perfect fit. We dedicated a full day in the shop, meticulously aligning and test-fitting each component to catch any potential issues early.
The outcome was promising—no major issues, and the truck looked incredible even at this preliminary stage. This process is an essential practice in any restoration or customization project, allowing us to visualize the end result and make any necessary corrections before committing to the final assembly.
How was body filler used in the bodywork process?
Before body filler could be applied, even new metal panels required meticulous work to perfect the gaps and ensure the surfaces were ready for paint. This entailed a mix of slicing, dicing, and welding to achieve the correct panel alignment.
Body filler was essential to achieving a flawlessly straight finish. The process started by applying the filler over the prepared metal surfaces. It was spread evenly with a spreader, filling any dents, gaps, or imperfections in the panels. Once applied, it hardened fairly quickly, enabling further refinement.
The next crucial step involved shaping the hardened filler. This meant extensive sanding. Using various grits of sandpaper, the filler was sanded down to blend seamlessly with the surrounding metal. The goal was to create a smooth, even surface that looked and felt straight. This stage required patience and precision.
Achieving a perfect finish often necessitated multiple rounds of application and sanding. Each layer of filler corrected smaller imperfections, progressively refining the surface. The repetitive process ensured that the panels were impeccably straight and ready for the next phase of the bodywork.
Body filler played a pivotal role in transforming imperfect panels into sleek, straight surfaces ready for paint. The labor-intensive process of applying, sanding, and reapplying the filler was crucial in ensuring a high-quality finish. Despite the seemingly straightforward steps, it demanded attention to detail and a significant investment of time.
What were the color choices for the truck’s final paint job?
For the truck’s final paint job, we opted for a striking yet practical combination. The primary color is a custom-mixed satin charcoal metallic, which provides a bold yet understated look. This pairs perfectly with a gleaming gloss white top, creating a classic two-tone effect that enhances the truck’s vintage lines.
In conclusion, the custom satin charcoal metallic and gloss white top were chosen for their aesthetic appeal, practicality, and low maintenance, perfectly balancing form and function.
Why was a flat paint finish chosen over a gloss finish?
Choosing a flat paint finish over a gloss finish can have several practical and aesthetic benefits, particularly when it comes to maintaining and using the vehicle. Here’s why a flat paint finish might be the better option:
In summary, opting for a flat paint finish can be more practical for regular use, easier to maintain, and it delivers a unique aesthetic that’s both durable and stylish. This makes it an excellent choice for those who value functionality and character over showroom shine.
How was the original truck box condition, and what was done to replace it?
The original truck box was in poor condition, suffering from extensive damage and wear. Years of use had left the sheet metal bashed, dented, and nearly unrecognizable. The truck had endured a hard life, with previous owners seemingly hitting everything in sight. Such deterioration is hardly surprising given the truck’s budget-friendly $500 price tag.
To address this, a complete overhaul was undertaken. Instead of trying to salvage the heavily damaged original box, a decision was made to replace it entirely with new parts. The project began by securing a fresh steel bed floor, new bedsides, a front panel, wheel wells, and a tailgate.
In no time, the truck was equipped with a durable and visually appealing new box, restoring both its functionality and aesthetic appeal.
What steps were taken to restore the sheet metal on the 1968 C10 truck?
Through these methodical steps, the 1968 C10 truck was restored to its former glory with precision and care.
What was the process for selecting and applying the paint color and finish on the C10?
When choosing the perfect paint for the C10, the goal was clear: blend classic appeal with eye-catching brilliance. Byron aimed for a retro vibe with a twist, leading to a collaborative brainstorming session on the ideal color scheme.
The entire process underscores the precision and creativity involved in crafting a distinctive look that marries tradition with a modern twist.
How was the body of the C10 customized and what trim was added?
The C10’s body underwent a meticulous transformation starting with reassembly to fit custom moldings, giving the truck a high-end appearance. Despite being a base model, it was enhanced with premium trim components that truly elevated its overall look.
These thoughtful modifications not only boosted the truck’s aesthetic appeal but also added a touch of sophistication to the classic C10 design.
How did the choice of wheels and tires contribute to the overall look of the C10?
The selection of wheels and tires played a crucial role in enhancing the classic appearance of the C10. Equipped with 15-inch chrome wheels styled to resemble originals, they feature distinctive Spider caps, which accentuate the period-specific aesthetic of the vehicle.
These wheels are paired with Diamond Back whitewall radial tires that mimic the look of classic bias-ply tires. The sizes, 7.10R15 at the front and 10.00R15 at the rear, contribute to a balanced stance that emphasizes both vintage appeal and functionality.
Moreover, the front tires boast a 3-inch whitewall, while the rear tires have a slightly wider 3.25-inch whitewall. This subtle variation adds an extra touch of elegance and authenticity, completing the vehicle’s retro charm. Together, these elements provide the C10 with a sturdy and stylish look, ensuring it makes a statement whether cruising down city streets or navigating rural roads.
What customizations were made to the bed of the C10, including the gas filler and wood planks?
The C10’s bed underwent several unique modifications to enhance both its aesthetic appeal and functionality. The standout feature is the incorporation of high-quality oak bed planks, which are elegantly secured by stainless steel strips. These components ensure the structure is both durable and visually appealing.
The oak is beautifully finished with a layer of Old Master’s spar varnish, maintaining its natural appearance without any added stain, offering a timeless and classic look.
For a seamless design, the gas filler cap has been ingeniously integrated into one of the bed boards. This design choice ensures that the cap sits flush with the wooden surface, promoting a sleek and streamlined appearance. Beneath this lies a relocated 19-gallon aluminum gas tank, cleverly positioned under the bed to optimize space and maintain the truck’s iconic silhouette.
Another custom element is the incorporation of “Chevrolet” script callouts embedded into the stainless trim along the bedsides. This detail not only provides a nod to the vehicle’s heritage but also adds a layer of sophistication and customization to the overall build.
What challenges did Byron face during the initial restoration process of his C10?
Byron encountered several hurdles during the initial restoration of his C10. Initially, he handed over his vehicle to a specialist, expecting the work to take just a few weeks. However, this timeline dragged on for far longer than anticipated, stretching into several years. The delay was so significant that Byron found himself needing to purchase another C10 just to have something to drive in the meantime. Eventually, fed up with the prolonged process, he decided to take matters into his own hands. Byron reclaimed his truck along with all the disassembled parts, bringing everything back home to tackle the project himself.
What makes Byron Loucks’ 1963 C10 stand out from other pickup trucks in Central Pennsylvania?
Byron Loucks’ 1963 C10 isn’t just any pickup truck cruising the streets of Central Pennsylvania; it exudes a uniqueness that turns heads and captures attention. What sets it apart is its seamless fusion of classic hot rod aesthetics with a touch of modern engineering, a combination rarely seen in the local truck scene.
Loucks envisioned this vehicle with a distinctive twist, moving away from the conventional and predictable designs. The vintage charm is further amplified by its captivating flakey golden paint, which not only adds to its visual appeal but also highlights its meticulous craftsmanship.
Underneath this classic exterior lies a suite of contemporary features that enhance performance and handling, ensuring it’s not just a showpiece but also a powerhouse on wheels. This blend of old-school allure and modern functionality ensures Loucks’ C10 stands out, offering a perfect balance of style and substance.
How did Tom Bortner contribute to the restoration and customization of Byron’s C10?
Byron faced a daunting task with his collection of disassembled truck parts and needed an expert hand for a proper restoration and customization. That’s where Tom Bortner, a man with a vintage approach and deep knowledge of car restoration, came into play.
Tom began by addressing the foundation of the C10: the frame. He added a C-notch frame kit to make space for an upgraded rear suspension setup. Byron assisted in preparing the frame, which was then coated in a durable epoxy paint. For the front suspension, Tom installed drop spindles and lowering springs, ensuring the truck had the perfect stance. At the rear, he further enhanced the suspension with larger lowering springs and an adjustable track bar, improving both the look and functionality of the truck.
Safety and aesthetics were balanced with precision when Tom incorporated a disc brake kit, providing the truck with improved stopping power. After the mechanical systems were in place, he reassembled the main body components to accommodate high-end trim, elevating the truck’s original base model look.
Tom wasn’t just about sticking to the script; he added creative modifications such as smoothing the tailgate and crafting seamless drip rails. This blend of functionality and flair was essential to fulfilling Byron’s vision.
Attention then turned to the truck’s exterior finish. Tom collaborated with Byron to select a dramatic yet timeless color scheme. They experimented with several shades on extra panels until they settled on a striking combination of gold flake with a creamy white accent. Tom meticulously prepared the truck’s body, applying multiple coats of specialized paint and clear finishes to ensure a dazzling sheen under sunlight.
Inside the cab, Tom maintained a mid-’60s aesthetic with a twist, mirroring the exterior’s flake-laden design on the dash. He restored original components like the gauge panel and steering column, infusing them with a uniform color palette. The custom upholstery, executed by an expert, featured a harmonious blend of white vinyl with gold accents, matching the truck’s exterior theme.
Tom’s craftsmanship didn’t stop at just the visible aesthetics. In the bed, oak planks and stainless strips were installed to create an elegant yet functional area. The centerpiece was a countersunk fuel filler tab, offering a sleek finish and improved utility.
Through his expert craftsmanship and eye for detail, Tom Bortner played a pivotal role in turning Byron’s disassembled dream into a cohesive, street-ready masterpiece, breathing new life and character into the C10.
What was the final outcome of the C10 build, and how was it received at the Nats East show?
After hitting the open road, Byron’s meticulously crafted C10 quickly became the talk of the town. The team worked tirelessly, beating their deadline by just a couple of days to ensure it was ready for the Nats East show in York.
Once at the event, the reaction was overwhelming. Spectators flocked around the truck, admiring its exceptional paintwork and overall craftsmanship. It was an unexpected level of attention—especially for the humble Byron, whose focus had been on perfecting the build rather than seeking the spotlight. This outpouring of admiration clearly showcased the success and craftsmanship of their project.
How did Byron acquire his 1963 C10, and what condition was it in when he purchased it?
Byron set out on a mission to find a reliable C10 that could serve as his daily driver while he worked on it gradually. His search led him to a nearby town, where he discovered a 1963 model up for grabs. Typical of a Pennsylvaniatruck, this one had some rust, but it wasn’t excessive. Interestingly, it had once been a hot rod and featured a complete drivetrain borrowed from a Chevy Laguna. Despite the age and some cosmetic wear, the truck ran smoothly, which was a key factor in Byron’s decision to buy it.
What personal significance did the completed C10 hold for Byron Loucks?
For Byron Loucks, completing the C10 was far more than just a mechanical project; it was an emotional journey with deep personal significance. The motivation behind the build was rooted deeply in his desire to honor his father’s memory. Byron’s father had instilled in him a passion for cars, nurturing his love for automotive craftsmanship from a young age.
Although Byron aimed to keep the truck a secret in hopes of surprising his dad with the finished masterpiece, his father unfortunately passed away before seeing the final result. In the end, the completed truck became a tribute to his father’s influence, embodying both the shared passion they had for cars and the lasting bond they shared through that shared interest.
Why did Byron Loucks choose a first-generation Chevy C10 over a second-generation model?
When it comes to classic trucks, Byron Loucks has a clear preference. His attraction to the first-generation ChevyC10, produced between 1960 and 1966, boils down to personal taste. Byron appreciates the sleek, graceful lines that define these early models, favoring their timeless elegance over the bolder, more angular designs of the second generation from 1967 to 1972. To him, it’s these subtle curves and the classic aesthetic that set the first-generation apart, offering an appeal that Squarebody enthusiasts might miss. It’s not just about the era but an appreciation for the design language that resonates more strongly with Byron.
What engine and drivetrain components were used in the C10, and what performance upgrades were made?
Perhaps the centerpiece of this ’63 build, the Chevy starts off strong with an LS engine swap putting out 525 hp. A Don Hardy Race Cars camshaft works the LS3 for all it’s worth. A long list of new parts carries this level of performance throughout the build:
Other additions include a Cloyes timing chain, PowerMaster 140A alternator, and PAC-1218X springs. A K&N universal air cleaner, Billet Specialties Chevrolet script valve covers, and a TruTrac black anodized accessory drive system add both function and style under the hood.
Even the exhaust setup has been updated with Hooker LS cast-iron exhaust manifolds. A custom 3-inch stainless crossover pipe, Vibrant Streetpower muffler, and Vibrant Ultra Quiet resonator contribute to a deep, throaty rumble that matches the truck’s robust performance.
Handling the power delivery is a reliable transmission that ensures smooth shifting, feeding into a rear end capable of transmitting the engine’s formidable power to the wheels effectively.
This comprehensive build is a testament to combining classic styling with modern performance, ensuring the C10 not only looks the part but moves with unmatched authority.
What specific exhaust components were used, and how were they modified?
The truck includes shorty headers, a custom stainless steel exhaust, and polished glass pack mufflers for a distinctive sound.
What transmission and rear end were used, and what modifications were made?
A TH350 transmission, rebuilt and upgraded, works with a Chevy 10-bolt rear end featuring 3.73 gears.
What cooling components were installed to manage engine temperature?
A high-flow water pump was added to maintain optimal temperature, especially in summer heat.
What specific intake and carburetor were used?
An Edelbrock Performer intake and a 600-cfm carburetor were utilized.
Was the engine rebuilt, and what were the upgrades?
Yes, the engine underwent a rebuild with mild performance enhancements.
What specific engine was used in the build?
The build features a 400 cubic inch small block Chevy engine.
What is the origin of the drivetrain?
The drivetrain was sourced from a mid ’70s Chevy Laguna S-3.
What modifications were made to the C10’s chassis and suspension?
To meet that same level of modern performance in the suspension, a Roadster Shop Spec Series Chassis with Wilwood disc brakes give the ’63 a serious foundation while the TruTrac limited-slip differential ensures results where the tires meet the pavement. The Chevy features a 3.89 gear ratio, as well as a triangulated four-bar rear suspension setup and Strange S Series 8-inch rearend. As Jeff himself said, the ’63 Chevy C-10 “has the original feel that a 55-year-old truck should until you hit the gas pedal!”
The transformation of the C10’s chassis and suspension begins with precision. A meticulous upgrade includes a custom C-notch frame modification, allowing for enhanced clearance and stability. To ensure a sleek stance, 2-inch drop spindles are paired with lowering springs, further refined by removing an additional half-coil for exact height adjustment.
Up front, the suspension is bolstered by a combination of drop spindles and tailored springs, while the rear benefits from a sophisticated setup with 5-inch lowering springs. An adjustable track bar is introduced for optimal wheel alignment and handling. This comprehensive approach guarantees the truck maintains its classic charm while delivering modern performance.
To complement these modifications, a disc brake conversion is seamlessly integrated, offering superior stopping power. A master power brake system upgrade ensures that every corner is approached with confidence and control.
This blend of classic design and contemporary engineering creates a driving experience that stays true to its roots yet exceeds expectations on the road.
How was the interior of the C10 designed to match the exterior theme?
A close look at the interior, with its original upholstery, makes it clear that Jeff has worked hard to keep true to the C-10’s iconic style. Though the cab features upgrades all its own—with a full JL Audio setup, Vintage Air system, and custom Redline Gauge Works gauges gracing the dash—the true surprises start with a look under the hood.
The interior design mirrors the exterior’s vibrant personality. Skinned with a paint job that echoes the truck’s outer flair, the dash seamlessly blends into the overall aesthetic. The original steering column and wheel were meticulously restored and given a fresh coat of paint to match the exterior’s Cameo White, ensuring visual continuity.
Moreover, the seat upholstery is a stunning reflection of the truck’s theme. Crafted with the original seat frames, the seats are upholstered in white vinyl with eye-catching gold metal flake pleats. This design choice not only pays homage to the C-10’s classic roots but also ensures that when sunlight streams through the windows, the interior truly pops, resonating with the truck’s bold exterior.
What specific gauges or instruments are included to monitor the vehicle’s performance?
Moon gauges and a tachometer were installed to keep track of vital vehicle statistics, ensuring the driver can monitor performance effectively.
How does the interior interact with external conditions (e.g., sunlight)?
The interior design is crafted to catch the sunlight, creating a vibrant effect that complements the vehicle’s exterior when illuminated.
Who was involved in the interior work, and what was their contribution?
John Sterner from Statler’s Auto Upholstery in Gettysburg, Pennsylvania, played a key role by upholstering the bench seats, adding a touch of expert craftsmanship to the interior.
What materials and design choices were used for the upholstery?
The upholstery is crafted from white vinyl with gold metal flake pleats, echoing the vehicle’s paint scheme while utilizing the original seat frame for authenticity.
How does the interior color scheme relate to the exterior?
The interior color scheme mirrors the exterior with a consistent use of flakey paint and Cameo White, ensuring a seamless transition between the outside and inside of the vehicle.
What restoration work was done on the 1963 Chevy C10?
The 1963 Chevy C10 underwent a meticulous, frame-off restoration between 1990 and 1993. This comprehensive rebuild involved several key modifications and enhancements.
This restored Chevy C10 has evidently stood the test of time, retaining its charm and craftsmanship as it changed hands among classic car enthusiasts.
How was the bed of the 1963 Chevy C10 modified?
The bed of the 1963 Chevy C10 underwent several custom modifications. It features a thin aluminum interior, which has been skillfully bead-rolled for added texture and durability. The design is minimalist, with only a few visible rivets, maintaining a sleek aesthetic. A standout feature is the removable center panel, providing easy access to the shocks and rearend for maintenance or adjustments. The owner has taken the extra step of polishing these customizations to enhance the truck’s overall shine and elegance.
How can one get assistance in restoring an old vehicle like the 1963 Chevy C10?
Restoring a classic vehicle like the 1963 Chevy C10 can be an incredibly rewarding journey. Whether you’re a seasoned car enthusiast or a newcomer to the vintage automobile scene, getting expert assistance can make the process much smoother.
Working with professionals who understand the intricacies of a 1963 Chevy C10 can transform your vintage project from a dream to a reality, bringing new life to a classic piece of automotive history.
What other features and information are notable about the 1963 Chevy C10?
A Clean Custom 1963 Chevrolet C-10 Sleeper ’63
Jeff Breault, an investment advisor out of Kansas, shows that he knows exactly where to spend his time and money through his ’63 Chevrolet C-10. The Chevy truck clearly shows the experience Jeff has behind him, with several vehicles modified and 15 years of skin in the game. Mixing classically clean style with modern performance, it’s impossible not to acknowledge the careful balancing act achieved by his C-10 build.
On the exterior, the Chevy still hails from humble factory beginnings with its nearly untouched body and iconic blue paint job, complete with detailing along the side and “Chevrolet” emblazoned across the tailgate. Upgrades are instead seen in smaller additions like the Detroit Steel wheels wrapped in Toyo Proxes. Even these changes clearly fit the build with their clean lines and bow tie accents. Other additions on the exterior remain superficial, limited to paint touch-ups under the hood as well as new headlights and taillights.
For those interested in the nitty-gritty of the build, the Chevy features a 2 1/2″ Flowmaster exhaust with Ceramic coated headers, ensuring both performance and durability. Despite being lowered 8″, the truck remarkably retains a smooth ride, a testament to the careful engineering and balance achieved in its suspension system.
KEEPING TRUE TO THE ORIGINAL CAB, THE ’63 C-10 RETAINS A CLASSIC LOOK WHILE SEEING UPGRADES IN THE FULL JL AUDIO SOUND SYSTEM, CUSTOM REDLINE GAUGE WORKS GAUGES AND VINTAGE AIR SETUP.
A close look at the interior, with its original upholstery, makes it clear that Jeff has worked hard to keep true to the C-10’s iconic style. Though the cab features upgrades all its own—with a full JL Audio setup, Vintage Air system and custom Redline Gauge Works gauges gracing the dash—the true surprises start with a look under the hood.
THE DETROIT STEEL WHEELS ARE CHEVY THEMED ALL THE WAY, WITH THE UNMISTAKABLE BOW TIE LOGO OUT IN FULL FORCE.
Perhaps the centerpiece of this ’63 build, the Chevy starts off strong with an LS engine swap putting out 525 hp. A Don Hardy Race Cars camshaft works the LS3 for all it’s worth. A long list of new parts carries this level of performance throughout the build with dual 11-inch cooling fans, Be Cool radiator, Melling oil pump and Edelbrockwater pump all in place to keep the C-10 running smoothly. Other additions include a Cloyes timing chain, PowerMaster 140A alternator, PAC-1218X springs, K&N universal air cleaner, Billet Specialties Chevrolet script valve covers and TruTrac black anodized accessory drive system. Even the exhaust setup has been updated with Hooker LS cast-iron exhaust manifolds, custom 3-inch stainless crossover pipe, Vibrant Streetpower muffler and Vibrant Ultra Quiet resonator.
THIS CLASSIC TRUCK HIDES A POWERHOUSE OF AN ENGINE, COMPLETE WITH AN LS SWAP THAT PUMPS OUT 525 HP ALONE.
To meet that same level of modern performance in the suspension, a Roadster Shop Spec Series Chassis with Wilwood disc brakes give the ’63 a serious foundation while the TruTrac limited-slip differential ensures results where the tires meet the pavement. The Chevy features a 3.89 gear ratio, as well as a triangulated four-bar rear suspension setup and Strange S Series 8-inch rearend. As Jeff himself said, the ’63 Chevy C-10 “has the original feel that a 55-year-old truck should until you hit the gas pedal!”
With the goal of creating “a badass truck,” it’s easy to say that this Chevy is the picture of success. Impressive for how well-preserved the factory pieces remain, this truck came to Jeff with 34,000 miles already logged. At first glance, the ’63, with its original paint, body and bench, seems to have earned the name Earl—given by Jeff, no doubt, as a nod to the Chevy’s respectable age of 55 years. Yet a closer look shows that this C-10 has more kick than many new cars on the market, cementing the truck’s status as a sleeper; this powerhouse blends the best of Chevy style and performance. Though the daily driver has only racked up more miles in the years since that first measure, the changes Jeff has made ensure the C-10 still has miles left to go.
Has the truck’s ride height been modified?
Yes, the truck has been lowered by 8 inches, yet it maintains a comfortable ride.
What type of exhaust system does the truck have?
The truck is equipped with a Flowmaster exhaust system featuring ceramic-coated headers.
Share Link