 JEREMY RICE
.
August 20, 2020
.
Editor
While looking into chassis and suspension upgrades for our ’49 Chevy 3100 Advance Design pickup, we came across Robert Hertz from ADEngineering. There are several options out there for these trucks, from brand-new chassis to weld-in Mustang-II-style front cross members, and some people have even cut the front frame off and clipped them with Camaro or other Chevy-car-style front suspensions. Robert actually approached us to inform us of a chassis swap kit he produces for the 1947-55 first series pickups and Suburbans. We were definitely intrigued and started talking about using the kit for project Cindy.
After exchanging a few emails with Robert, we were sold on the chassis swap kit. The complete kit comes with everything we would need to swap the chassis, engine, transmission and steering. AD-Engineering has spent a lot of time perfecting the kit, both on the computer-generated plans as well as on vehicles. We selected the options we would need for our project and the parts were soon headed our way.
The kit from ADEngineering is designed to work with a standard cab long bed S-10 chassis. The 1982-93 model years are a bit easier to perform the swap with, but the 1994- 2005 will work just fine as well. The difference between the two model years is that the earlier versions are not boxed in as far back, making it easier to get to the new bolt locations. If we were to get a hold of a second-generation model we would have to drill access holes, but it’s still very doable. Luckily for us, we were able to track down a retired airport service truck. The truck had seen a lot of use, but it was never involved in an accident because it was always used inside the airport. This, combined with a visual inspection, assured us we would have a straight chassis with which to work.
SOURCES
LMC Truck
800.562.8782
LMCTruck.com
AD-Engineering
Ad-engineering.com


Why is the S10 frame recommended for a budget-friendly chassis swap?
The S10 frame is a popular choice for chassis swaps for several budget-friendly reasons:
Overall, these factors make the S10 frame an economical and practical choice for those looking to perform a chassis swap without breaking the bank.
What precautions should be taken when painting the chassis frame?
Painting a chassis frame involves several important steps to ensure safety and achieve the best results. Here’s how to prepare and execute the task effectively:
By following these guidelines, you can ensure a safer and more efficient painting process, maintaining both the quality of your work and your personal safety.
What is the purpose of a chassis swap for 1947-1955 first series AD Chevrolet trucks?
While looking into chassis and suspension upgrades for our ’49 Chevy 3100 Advance Design pickup, we came across Robert Hertz from ADEngineering. There are several options out there for these trucks, from brand-new chassis to weld-in Mustang-II-style front cross members, and some people have even cut the front frame off and clipped them with Camaro or other Chevy-car-style front suspensions. Robert actually approached us to inform us of a chassis swap kit he produces for the 1947-55 first series pickups and Suburbans. We were definitely intrigued and started talking about using the kit for project Cindy.
A chassis swap can transform your AD truck by enhancing ride quality and driving experience. One popular and budget-friendly option is using the S10 frame. Here’s why it’s a great choice:
After exchanging a few emails with Robert, we were sold on the chassis swap kit. The complete kit comes with everything we would need to swap the chassis, engine, transmission, and steering. AD-Engineering has spent a lot of time perfecting the kit, both on the computer-generated plans as well as on vehicles. We selected the options we would need for our project and the parts were soon headed our way.
Before embarking on a frame swap, consider whether a premade kit or custom fabrication suits your needs. Each option has its merits, but the S10 frame stands out for those prioritizing economy without compromising performance. This insight aligns with our goal of achieving an enhanced driving experience while managing costs effectively.
How accessible are parts for the swap?**
Parts for the S10 chassis swap are highly accessible. They can be sourced from auto parts stores or online platforms like eBay and Amazon, often with same-day availability, making the process convenient and straightforward.
What are the options for handling a swap?**
When considering a swap, there are several approaches: finding a suitable donor vehicle, opting for a premade kit, or fabricating your own parts. Experience with different suspension setups, like Mustang II crossmembers or Camaro subframes, can guide your choice based on budget and desired outcomes.
Which chassis is recommended for a swap and why?**
The S10 frame is highly recommended for a swap. This recommendation is based on the widespread availability of donor vehicles, the ability to repurpose many components, and the overall low cost associated with S10 parts.
Why perform a chassis swap?**
A chassis swap can significantly enhance the ride quality and driving experience of a vehicle. It is also a cost-effective solution due to the potential savings from using readily available and affordable donor parts.
What components should be replaced or installed before setting the truck body on the frame?
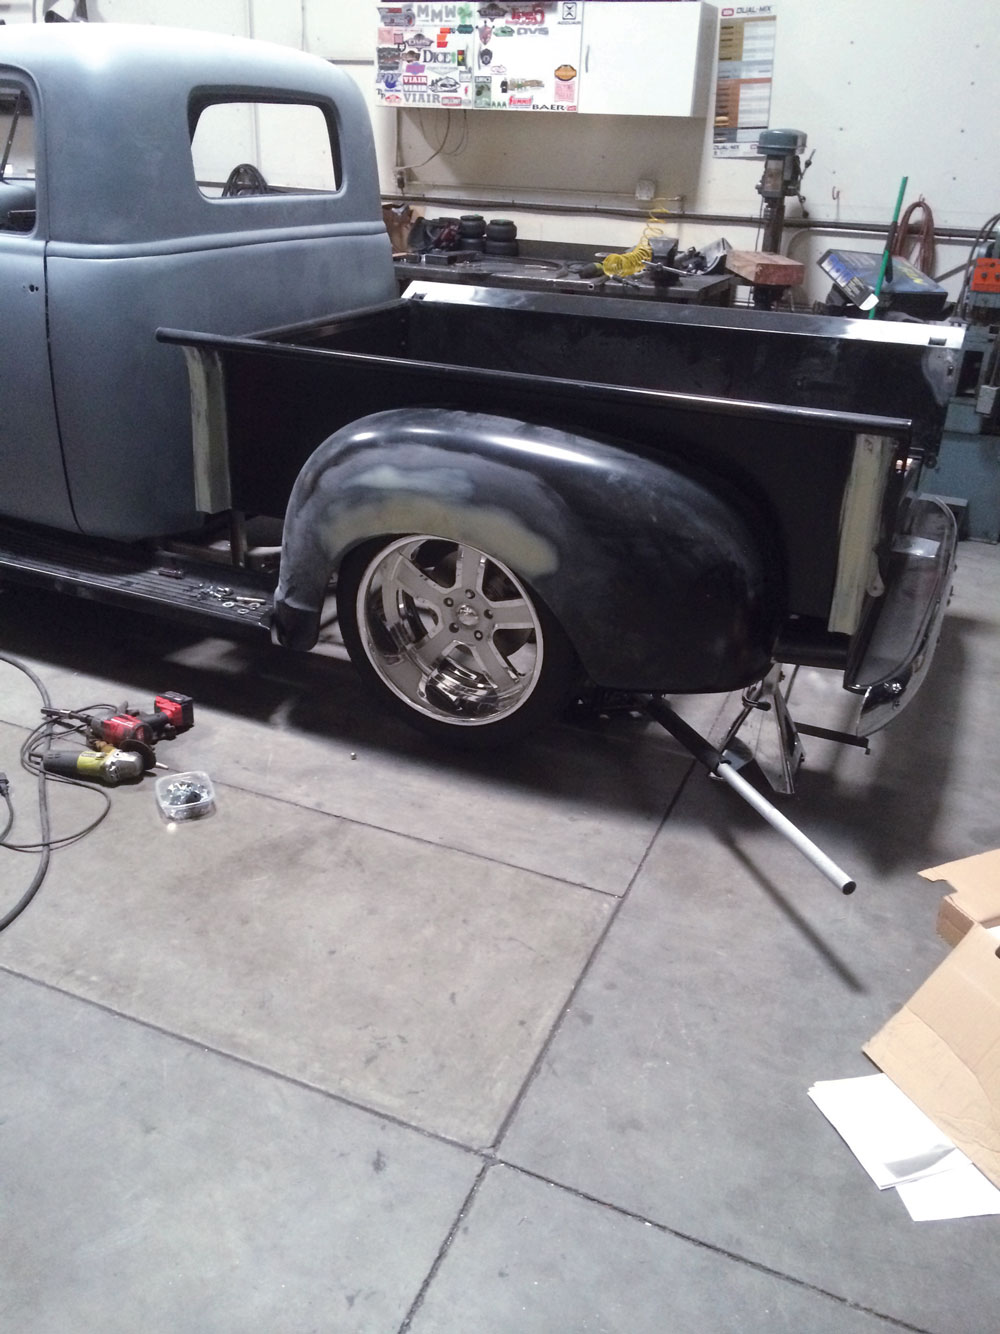
After only two days of work, one stripping the S-10 frame and one installing the new parts, we had ourselves a new chassis under project Cindy. We rolled the truck outside the shop to get a better look at our quick accomplishment. The following day was spent installing the body panels. Anyone who knows these trucks will vouch for how much work it takes to get all of the front sheet metal installed. It’s not an easy task, but we were able to get things installed and roughly lined up for the body shop to dial in.
Before setting the body on the frame, there are crucial components that need attention. We took the opportunity to replace the brake lines, ensuring they were fresh and reliable. With the body off, it was the perfect time to install new shocks and upgrade the front steering components. Access was a breeze, allowing us to fit lowering springs and spindles with ease.
We also made sure the gas tank was securely in place and ran new fuel lines to prevent any future issues. This preparation was essential for a smooth transition when mounting the body. It’s these foundational steps that set the stage for a successful project, making the challenging task of aligning the body panels just a bit easier.
Why is it advantageous to replace or install these components before setting the body on the frame?
Installing these components is more convenient when the body is not yet mounted, as it provides easier access to the necessary areas.
What specific components should be replaced or installed before setting the truck body on the frame?
Before placing the body on the frame, it’s advisable to address components like brake lines, shocks, front steering parts, lowering springs, spindles, the gas tank, and fuel lines.
What are the benefits of using these aftermarket kits?
These kits are designed to be bolt-on, simplifying the process by eliminating much of the guesswork and requiring only basic skills and tools.
What aftermarket kits are recommended for mounting a truck body onto a new frame?
The Henry Panza kit and the Code 504 kits are both recommended options for this purpose.
What are the advantages of using a regular cab longbed S10 as a donor truck?
The kit from ADEngineering is designed to work with a standard cab long bed S-10 chassis. The 1982-93 model years are a bit easier to perform the swap with, but the 1994-2005 will work just fine as well. The difference between the two model years is that the earlier versions are not boxed in as far back, making it easier to get to the new bolt locations.
When considering a donor truck, the regular cab longbed S10 stands out for several reasons:
By choosing a regular cab longbed S10, you not only streamline your project but also enjoy the flexibility of working with a vehicle that aligns seamlessly with the kit’s requirements. This ensures a smoother transition from donor to finished product, allowing for a more efficient and less stressful build process.
Why would someone prefer this configuration over others?
Many individuals are more comfortable with options that require minimal mechanical alterations, avoiding intimidating tasks like cutting and welding, which demand advanced skills and equipment.
What modifications are avoided by using this specific configuration?
This configuration allows you to bypass the often complex and technical tasks of shortening the vehicle or cutting and re-welding the frame.
Why is a regular cab longbed S10 advantageous as a donor?
Opting for a regular cab longbed S10 simplifies the process because it fits without needing significant alterations, making it an ideal choice for straightforward projects.
How should the body of the old truck be mounted onto the new S10 frame?
The last pieces included with the kit are for the running boards. We already installed the mounts along the sides of the frame rail, but now we are working on the running boards themselves. This allows for the new plates to slide into the running board. These plates are threaded to accept bolts, which will make mounting the running boards much easier.
To mount the old truck body onto the new S10 frame, we started by selecting a reliable aftermarket kit, like those from Henry Panza or Code 504. These kits are designed to be bolt-on, eliminating much of the guesswork and making the process accessible even with minimal skills and tools.
Two people, along with a hoist or forklift, can easily lift the cab onto the frame. Once it’s secured, we mounted the bed and installed the front end as a single complete piece. With coordination and a bit of teamwork, you can achieve a frame swap over a weekend.
After only two days of work—one stripping the S-10 frame and one installing the new parts—we had ourselves a new chassis under project Cindy. We rolled the truck outside the shop to get a better look at our quick accomplishment. The following day was spent installing the body panels.
Installing the body panels is no easy task, but anyone familiar with these trucks knows the effort it takes to get all the front sheet metal aligned. We managed to roughly line things up for the body shop to fine-tune later. Next, we set the bed on and jacked the wheel up in the wheel well to ride height, ensuring the rear wheel was centered in the rear fender.
It’s amazing how close the wheelbase between a ’49 Chevy pickup and an ’86 Chevy S-10 are. With all of the body panels mocked up and the new suspension installed, Cindy is on her way back to the body shop.
What is the estimated time required to complete the frame swap?
With focused work over two days and the help of a couple of friends, the frame swap can be accomplished within a weekend.
How many people are needed to mount the truck body onto the frame?
Typically, the task requires two people. This ensures that there is adequate assistance for lifting and aligning the components accurately.
What equipment is needed to lift and mount the truck body onto the frame?
To effectively lift and position the truck body onto the frame, you’ll need equipment like a hoist, a lift, or a forklift. These tools are essential for handling the heavy components safely.
What preparations should be made before mounting the body onto the frame?
Prior to placing the body onto the frame, ensure that you have replaced critical components such as brake lines, shocks, and front steering parts. Additionally, install lowering springs, spindles, the gas tank, and fuel lines to make the process smoother.
Which kits are recommended for mounting the old truck body onto the new S10 frame?
For a seamless installation, consider using either the Henry Panza kit or the code 504 kits. These are designed to be straightforward bolt-on solutions, reducing the complexity of the project.
What parts of the donor truck can potentially be reused in the chassis swap?
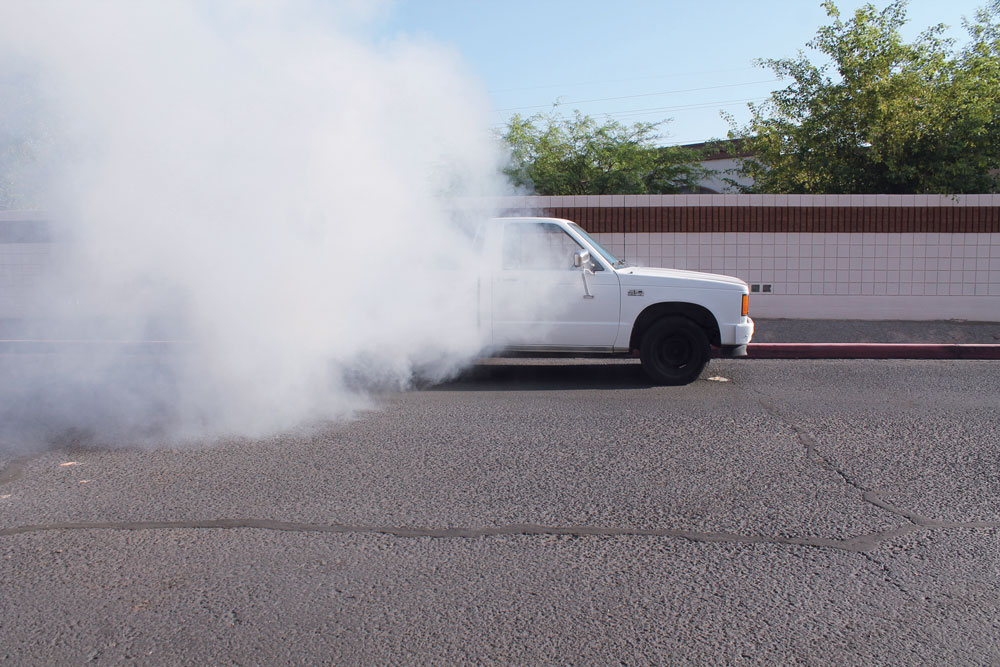
Here’s the donor truck. This 1986 standard cab long-bed S-10 was the perfect candidate for our chassis swap. We picked it up for $450 and it was still running and driving. It did have a blown head gasket, but that didn’t stop us from attempting to completely blow up the engine with a nice burnout.
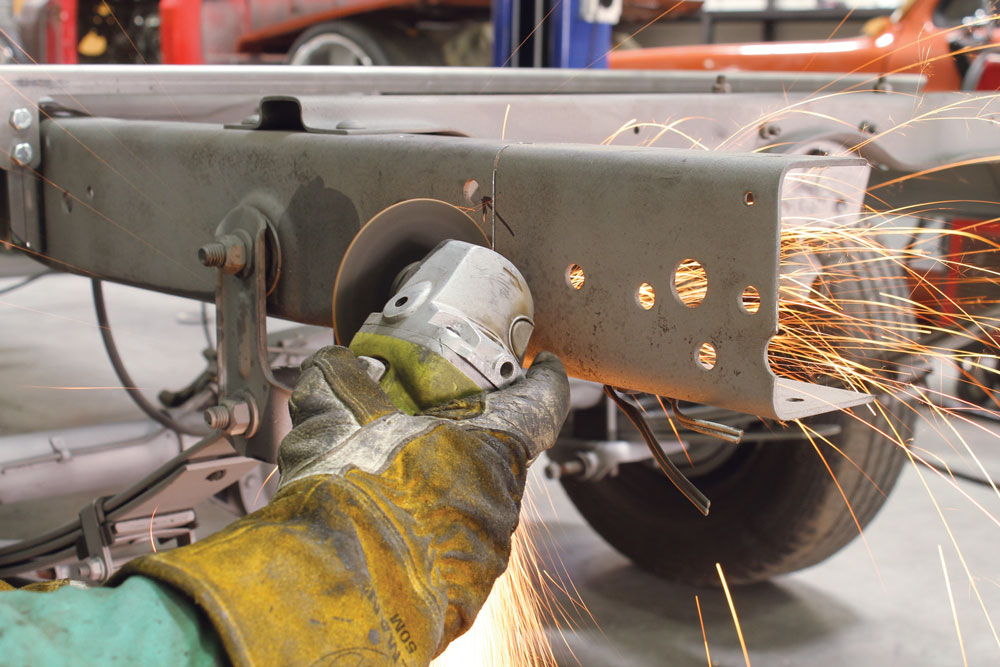
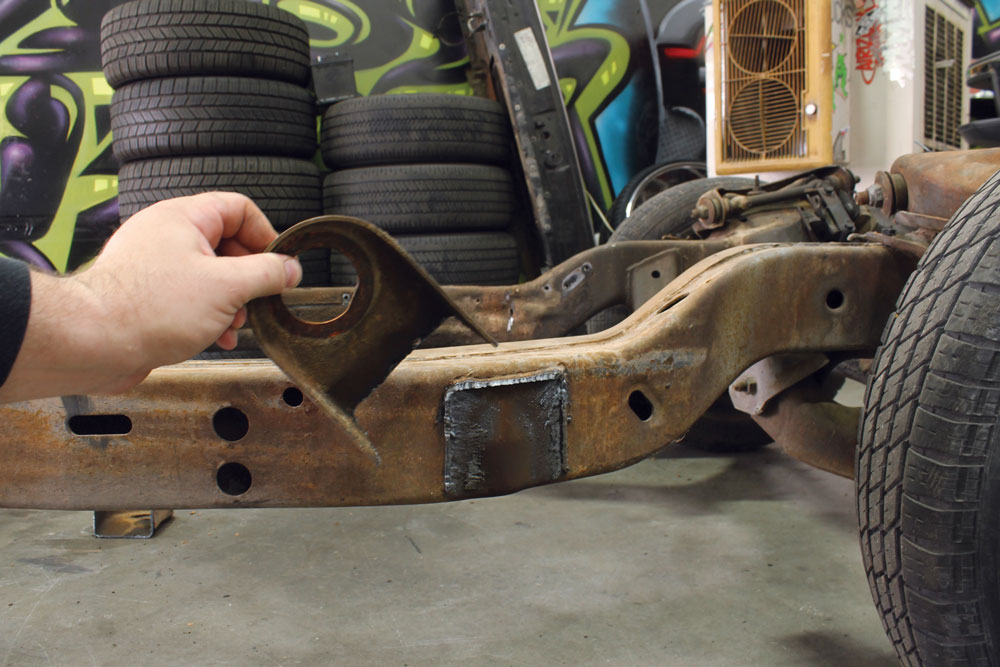
First, we stripped the donor truck down to a rolling chassis, and then we began prepping the frame for the new mounts. The rear cab mount and forward bed mount were the first to go. A plasma cutter made quick work of the bulk of the material. We then came back with a cut-off wheel to remove the smaller parts of the mount. Finally, we finished cleaning up the frame with a flap disc sander. The same process was performed on the front mounts as well. There’re also a couple of smaller items, like the rear bump stops, that can be removed at this time as well.
While this prep work was underway, we considered which components of the donor truck we might reuse. Potentially reusable parts include:
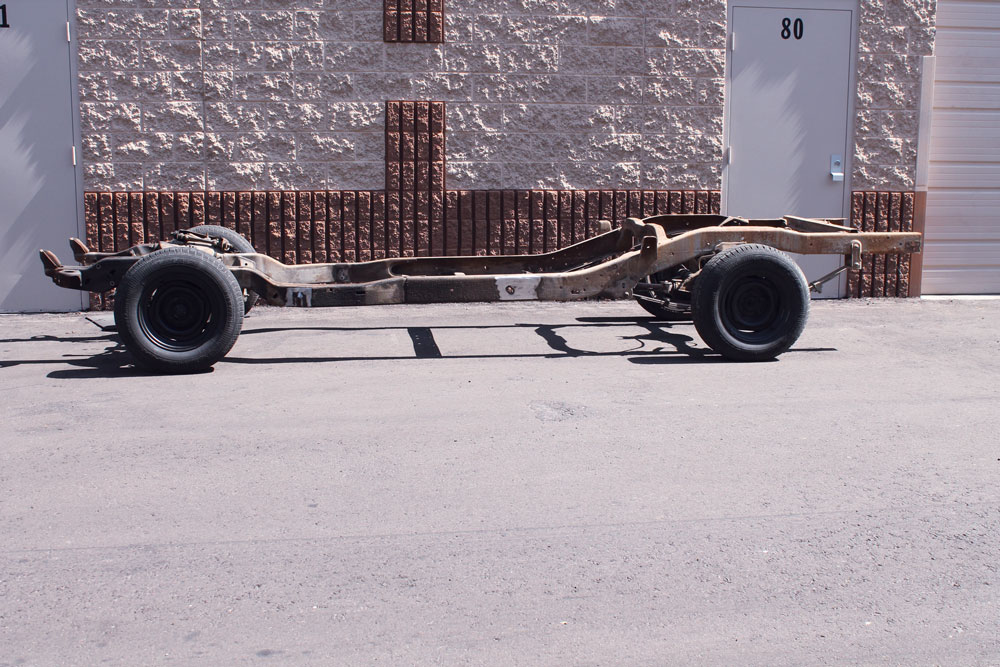
After a total of about five hours, here’s what we ended up with: the complete rolling chassis, cleaned up and ready for some new brackets and hardware.
This careful selection and preparation allow us to maximize the use of existing parts, saving both time and money while ensuring the build remains efficient.
Is it necessary to replace all parts during a chassis swap?
It is not mandatory to replace all parts during a chassis swap. While a complete replacement is common, the choice of which components to keep or discard is up to you, allowing for a personalized approach based on your needs and preferences.
Which parts of the donor truck can be reused?
You have the option to reuse several components from the donor truck, including the steering system, brake pedal and booster, gas tank, and even the stock exhaust if you’re maintaining the original S10 motor and transmission.
What are the key considerations when selecting a donor truck?
Here’s the donor truck. This 1986 standard cab long-bed S-10 was the perfect candidate for our chassis swap. We picked it up for $450, and it was still running and driving. It did have a blown head gasket, but that didn’t stop us from attempting to completely blow up the engine with a nice burnout.
When selecting a donor truck, there are several key considerations to keep in mind:
First, we stripped the donor truck down to a rolling chassis and began prepping the frame for the new mounts. The rear cab mount and forward bed mount were the first to go. A plasma cutter made quick work of the bulk of the material. We then came back with a cut-off wheel to remove the smaller parts of the mount. Finally, we finished cleaning up the frame with a flap disc sander. The same process was performed on the front mounts as well. There’re also a couple of smaller items, like the rear bump stops, that can be removed at this time as well.
After a total of about five hours, here’s what we ended up with: the complete rolling chassis, cleaned up and ready for some new brackets and hardware. The end result is a clean slate, prepared for the exciting steps yet to come in the transformation journey.
Are there any trucks to avoid?
Avoid trucks that have been in accidents resulting in frame damage, as it complicates the process with unnecessary repairs.
What are the benefits of older model trucks?
Older models, often referred to as “square bodies,” are less complex due to the absence of ABS and wheel speed sensors, making them easier to work with.
What is the cost range for acquiring a donor truck?
Expect to spend between $300 and $700 for either a frame or a complete truck, allowing for budgeting flexibility.
What modifications are required for the frame?
The frame will need about 6 inches cut from both the front and rear, simplifying the modification process without major reconstruction.
What is the ideal configuration for a donor truck?
An S10 regular cab with a long bed is considered the best option because it requires minimal frame alterations.
What is the process for cleaning, prepping, and painting the frame?
First, we stripped the donor truck down to a rolling chassis, and then we began prepping the frame for the new mounts. The rear cab mount and forward bed mount were the first to go. A plasma cutter made quick work of the bulk of the material. We then came back with a cut-off wheel to remove the smaller parts of the mount. Finally, we finished cleaning up the frame with a flap disc sander. The same process was performed on the front mounts as well. There’re also a couple of smaller items, like the rear bump stops, that can be removed at this time as well. After a total of about five hours, here’s what we ended up with: the complete rolling chassis, cleaned up and ready for some new brackets and hardware.
Once the mounts and other components are out of the way, it’s time to get the frame nice and clean. We typically start by applying a biodegradable degreaser; alternatives like Purple Power or Simple Green work well too. Spray the degreaser thoroughly, let it sit for a few minutes, then hose it off using a pressure washer to ensure all grime is removed.
With a spotless frame, the next step is to prep the surface for painting. Apply a metal prep solution, which will etch the surface slightly, creating a perfect base for the paint to adhere. This step is crucial for achieving a durable finish.
Now comes the moment you’ve been waiting for: painting the frame. I prefer hand brushing on the paint, even though it’s a bit more time-consuming. This method minimizes cleanup and yields excellent results. A word to the wise: wear rubber gloves and clothes you don’t mind getting dirty—this paint is notoriously difficult to remove.
Set aside a few hours for this task, maybe grab a buddy to help cover more ground. Typically, one thick coat will suffice, with some touch-ups at the end. By the time you’re done, you’ll have a beautifully prepped and painted frame ready for new adventures.
What steps are involved in dismantling the donor truck?
Here’s the donor truck. This 1986 standard cab long-bed S-10 was the perfect candidate for our chassis swap. We picked it up for $450 and it was still running and driving. It did have a blown head gasket, but that didn’t stop us from attempting to completely blow up the engine with a nice burnout.
Step 1: Gather Your Tools
To get started, you’ll need an array of tools – think sawzaws, grinding wheels, plasma cutters, and torches. Choose your weapon of destruction to make the dismantling process efficient and even a bit fun.
Step 2: Begin Stripping Down
First, we stripped the donor truck down to a rolling chassis. Undo all the body mounts, and remove bumpers, motors, and transmissions. Luckily, many donors already have these removed, saving a bit of effort. Next, unhook wires and cables attached to the body.
Step 3: Lift the Body Off the Frame
With everything detached, lift the body off the frame. This used to take us a couple of hours, but now, with practice and the right tools, it takes about 45 minutes with two people.
Step 4: Prepping the Frame
We began prepping the frame for the new mounts. The rear cab mount and forward bed mount were the first to go. A plasma cutter made quick work of the bulk of the material. We then came back with a cut-off wheel to remove the smaller parts of the mount. Finally, we finished cleaning up the frame with a flap disc sander. The same process was performed on the front mounts as well.
Step 5: Consider What to Keep or Replace
At this stage, remove everything you’re not going to use, getting the frame down to the bare rails with just the front suspension, rear suspension, steering, and rear end. You can choose to reuse components like the steering, brake pedal and booster, gas tank, and even the stock exhaust if retaining the S-10 motor and transmission. We usually replace all of that, but it’s your call on what to keep and ditch.
There’re also a couple of smaller items, like the rear bump stops, that can be removed at this time as well. After a total of about five hours, here’s what we ended up with: the complete rolling chassis, cleaned up and ready for some new brackets and hardware. Now you are ready for the next step.
What is the ultimate goal of the dismantling process?
The objective is to reduce the frame to its bare rails, leaving only the essential components like the front and rear suspensions, steering, and rear end intact.
What parts can potentially be reused from the donor truck?
Parts such as the steering system, brake pedal and booster, gas tank, and even the stock exhaust can be reused, particularly if the original motor and transmission are kept.
How long does the dismantling process typically take?
With experience and the right equipment, the dismantling process can be completed in about 45 minutes.
What is the general order of operations for dismantling a donor truck?
The process generally involves undoing body mounts, removing bumpers, extracting motors and transmissions, disconnecting wires and cables, and finally lifting the body from the frame.
What tools can be used for dismantling a donor truck?
Tools such as reciprocating saws, grinding wheels, plasma cutters, and torches are commonly used for dismantling.
How can one find a suitable donor truck for a chassis swap?
Here’s the donor truck. This 1986 standard cab long-bed S-10 was the perfect candidate for our chassis swap. We picked it up for $450 and it was still running and driving. It did have a blown head gasket, but that didn’t stop us from attempting to completely blow up the engine with a nice burnout.
Before we dive into the technical details, let’s talk about how to find your donor truck. Start by scouring platforms like Craigslist and Facebook Marketplace. These are treasure troves for finding potential candidates. The ideal donor is any year S10 regular cab longbed since this configuration requires minimal modifications. You won’t have to shorten the frame, avoiding the hassle of cutting and rewelding.
Expect to pay anywhere from $300 to $700 for a frame or a complete truck. Some folks part out the body parts to break even, while others, like us, prefer to scrap everything and strip the truck down to the bare frame. For simplicity, older models—often referred to as square bodies—are preferable because they lack complex systems like ABS or wheel-speed sensors.
First, we stripped the donor truck down to a rolling chassis and then began prepping the frame for the new mounts. The rear cab mount and forward bed mount were the first to go. A plasma cutter made quick work of the bulk of the material. We then came back with a cut-off wheel to remove the smaller parts of the mount. Finally, we finished cleaning up the frame with a flap disc sander. The same process was performed on the front mounts as well.
There’re also a couple of smaller items, like the rear bump stops, that can be removed at this time as well. After a total of about five hours, here’s what we ended up with: the complete rolling chassis, cleaned up and ready for some new brackets and hardware.
When choosing a donor truck, avoid those with frame damage. With plenty of options available, there’s no need to tackle the challenge of straightening a bent frame. Choose wisely, and your project will be off to a smooth start.
What can I do with the parts I don’t need from the donor truck?
You can choose to sell the unneeded parts to recoup some of the costs or scrap them if they have no resale value, focusing on keeping the essential parts for your project.
What condition should I avoid when selecting a donor truck?
Avoid trucks with frame damage, as repairing or straightening a damaged frame can add unnecessary complexity and cost to your project.
What should I consider when looking at older truck models?
Older truck models are easier to work with because they often lack advanced features like ABS or wheel speed sensors, making them simpler to modify for a chassis swap.
How much should I expect to pay for a donor truck?
The cost for a suitable donor truck typically ranges between $300 and $700, depending on its condition and completeness.
Why is the S10 regular cab longbed recommended?
This specific configuration is recommended because it minimizes the need for extensive modifications, like cutting and welding the frame, which can be complex for those unfamiliar with such tasks.
What type of truck should I look for as a donor?
The ideal donor truck is any year S10 that has a regular cab and a long bed, as this configuration requires the least amount of modification for a chassis swap.
Where can I find a donor truck for my project?
You can search for a donor truck on online marketplaces like Craigslist and Facebook Marketplace, which are popular platforms for finding used vehicles.
How does an S10 frame swap compare to retaining the stock frame in terms of project complexity and timeline?
Project Complexity:
Undertaking an S10 frame swap is a complex endeavor that demands considerable modifications. It is far from a straightforward “bolt-on-and-go” procedure. The challenges stem from the need to adapt various components and ensure compatibility between the frame and the existing setup. This task requires a substantial skill set and patience, making it more suitable for seasoned DIYers or those ready to invest plenty of time in learning and executing custom adjustments.
On the other hand, retaining the stock frame simplifies the process significantly. It allows for a more traditional restoration approach where modifications are minimal, and compatibility isn’t a major issue. If your original frame is in decent condition and you’re aiming for a classic restoration, maintaining the stock frame might be the easier choice.
Timeline Considerations:
When it comes to timeline, patience is key for an S10 frame swap. Due to its complexity, this project typically means your vehicle will be off the road until the swap is fully completed. It’s not feasible to drive the vehicle in stages throughout the transformation process, which can extend the downtime significantly.
Conversely, sticking with the stock frame allows for more flexibility. You can upgrade or restore your vehicle in phases, potentially working on it over the winter or during extended periods, without entirely losing its drivability for extended times. This step-by-step progress can make the project less overwhelming and allows for driving and enjoyment between sessions.
Conclusion:
Choosing between an S10 frame swap and retaining the stock frame hinges on your goals, skills, and timeline preferences. For those looking for a custom approach and prepared for high complexity, an S10 swap offers significant opportunities for modification. However, if simplicity and gradual progress appeal to you, preserving the stock frame might be the path that maintains your sanity and offers incremental satisfaction.
What are the experiences of those who have completed an S10 frame swap on their vehicles?
Completing an S10 frame swap can be a rewarding yet demanding project. Those who have gone through the process often highlight the considerable effort involved to achieve a satisfactory result. Unlike some online listings that suggest a “quick and easy” conversion, the truth is far more complex.
Some enthusiasts suggest sticking with the stock frame and installing a Mustang II cross member for an easier build. Additionally, using aftermarket rear spring kits to mount a different rear end can streamline the process, potentially wrapping up the chassis work over a weekend.
Despite the challenges, there is a consensus that the project should be enjoyable. If it’s not, it might be a sign you’re in the wrong hobby. The sense of accomplishment once completed is often well worth the effort invested.
Whether you choose to tackle an S10 frame swap or explore other methods, the journey can be as satisfying as the destination.
What are the benefits of keeping the original frame versus performing an S10 frame swap?
Benefits of Keeping the Original Frame vs. Performing an S10 Frame Swap
In conclusion, the choice between maintaining the original frame or opting for an S10 frame swap depends largely on your project goals and skill level. Keeping the original may be simpler and quicker, while a frame swap offers modern benefits but demands more expertise and time.
What considerations should be made when selecting rear ends for vintage trucks?
Choosing the right rear end for your vintage truck can significantly impact its performance and compatibility. Here’s what you need to consider:
By focusing on these factors, you can ensure that your vintage truck maintains its classic appeal while benefiting from modern improvements in performance and safety.
How might the Camaro rear end fit a vintage truck and why is it a popular choice?
When considering a rear end swap for a vintage truck, the Camaro rear end often emerges as a popular choice. This preference stems from its compatibility, performance benefits, and accessibility.
Choosing a Camaro rear end for a vintage truck isn’t just about compatibility; it’s about elevating the vehicle’s overall capabilities and enjoying enhanced performance characteristics.
What are the advantages of using a Mustang II front end on a vintage truck?
Upgrading a vintage truck with a Mustang II front end can transform both its performance and ease of maintenance. Here’s why enthusiasts often choose this setup:
Upgrading to a Mustang II front end on your vintage truck can be an exciting journey, blending classic aesthetics with modern capabilities.
What is the potential value of a complete rolling frame with a good running engine and rebuilt brake system?
The value of a complete rolling frame with a good running engine and a rebuilt brake system can vary, but generally, it may be worth a few hundred to a few thousand dollars depending on several factors.
In summary, while a basic offer might start reasonably low, potential buyers, particularly enthusiasts, might be willing to pay a premium for a desirable frame that promises minimal restoration effort.
How can one add a retro-looking cruise control system to an older vehicle?
Are you looking to give your vintage truck a nostalgic touch while adding the convenience of cruise control for those long Kansas highways? Here’s how you can achieve that retro vibe with a practical upgrade.
There are numerous aftermarket kits designed to fit older vehicles. Look for those offering a classic aesthetic, such as metal levers or knobs, that enhance the vintage charm of your truck.
Selecting a retro-styled cruise control not only maintains your truck’s nostalgic appearance but also enhances the driving experience by reducing fatigue on long stretches of road. It combines the charm of yesteryears with modern-day convenience, making your drives more enjoyable.
By carefully choosing the right kit, you can add both style and comfort to your vintage vehicle without compromising its classic appeal.
What are the available resources or guides for someone undertaking an S10 frame swap for the first time?
“After exchanging a few emails with Robert, we were sold on the chassis swap kit. The complete kit comes with everything we would need to swap the chassis, engine, transmission, and steering. AD-Engineering has spent a lot of time perfecting the kit, both on the computer-generated plans as well as on vehicles. We selected the options we would need for our project and the parts were soon headed our way.
For those new to an S10 frame swap, it’s essential to understand that this isn’t a weekend project. However, with the right resources and planning, it can be incredibly rewarding. Here’s what you need to know:
With this comprehensive approach, the swap process becomes much more manageable, transforming your project from a daunting task into an achievable goal.”
What remaining tasks will need to be completed after the initial swap?
Post-swap tasks involve electrical work, fuel tank mounting, brakes, radiator relocation, engine and transmission installation, shift linkage, and running fuel and brake lines, all of which could take a few months to finalize.
What modifications might be necessary?
Modifications include re-drilling bolt patterns to ensure compatibility between the rear axle and front components, depending on selected parts.
What options are available for specific components?
Options include frame blasting and painting, and choices for rear axles such as the Explorer 8.8 or the Camaro/Firebird, with considerations for lug patterns and availability.
How should one prepare for the swap?
Preparation involves organizing all necessary parts ahead of time to efficiently mount the AD cab, box, front clip, and steering onto the S10 frame, ideally completing this in a day with thorough pre-arrangement.
What kind of guidance is available for first-timers?
First-timers can receive step-by-step guidance, including pictures and tips, to help navigate the complexities of an S10 frame swap.
What are the challenges associated with an S10 frame swap for a vintage truck?
While looking into chassis and suspension upgrades for our ’49 Chevy 3100 Advance Design pickup, we came across Robert Hertz from ADEngineering. There are several options out there for these trucks, from brand-new chassis to weld-in Mustang-II-style front cross members, and some people have even cut the front frame off and clipped them with Camaro or other Chevy-car-style front suspensions. Robert actually approached us to inform us of a chassis swap kit he produces for the 1947-55 first series pickups and Suburbans. We were definitely intrigued and started talking about using the kit for project Cindy.
After exchanging a few emails with Robert, we were sold on the chassis swap kit. The complete kit comes with everything we would need to swap the chassis, engine, transmission and steering. AD-Engineering has spent a lot of time perfecting the kit, both on the computer-generated plans as well as on vehicles. We selected the options we would need for our project and the parts were soon headed our way.
The kit from ADEngineering is designed to work with a standard cab long bed S-10 chassis. The 1982-93 model years are a bit easier to perform the swap with, but the 1994-2005 will work just fine as well. The difference between the two model years is that the earlier versions are not boxed in as far back, making it easier to get to the new bolt locations. If we were to get a hold of a second-generation model we would have to drill access holes, but it’s still very doable. Luckily for us, we were able to track down a retired airport service truck. The truck had seen a lot of use, but it was never involved in an accident because it was always used inside the airport. This, combined with a visual inspection, assured us we would have a straight chassis with which to work.
Here’s the donor truck. This 1986 standard cab long-bed S-10 was the perfect candidate for our chassis swap. We picked it up for $450 and it was still running and driving. It did have a blown head gasket, but that didn’t stop us from attempting to completely blow up the engine with a nice burnout.
First we stripped the donor truck down to a rolling chassis, and then we began prepping the frame for the new mounts. The rear cab mount and forward bed mount were the first to go. A plasma cutter made quick work of the bulk of the material. We then came back with a cut-off wheel to remove the smaller parts of the mount. Finally, we finished cleaning up the frame with a flap disc sander.
While this process sounded straightforward, it’s crucial to remember that frame swaps require precision and an understanding of fabrication. Without proper alignment, mounting the cab, front fenders, radiator core support, front bumper, running boards, bed, and rear bumper could become incredibly challenging. Moreover, issues such as choosing the right gas tank for the S10 frame or ensuring the radiator clears the steering box can pose significant hurdles.
The same process was performed on the front mounts as well. There’re also a couple of smaller items, like the rear bump stops, that can be removed at this time as well. After a total of about five hours here’s what we ended up with: the complete rolling chassis, cleaned up and ready for some new brackets and hardware.
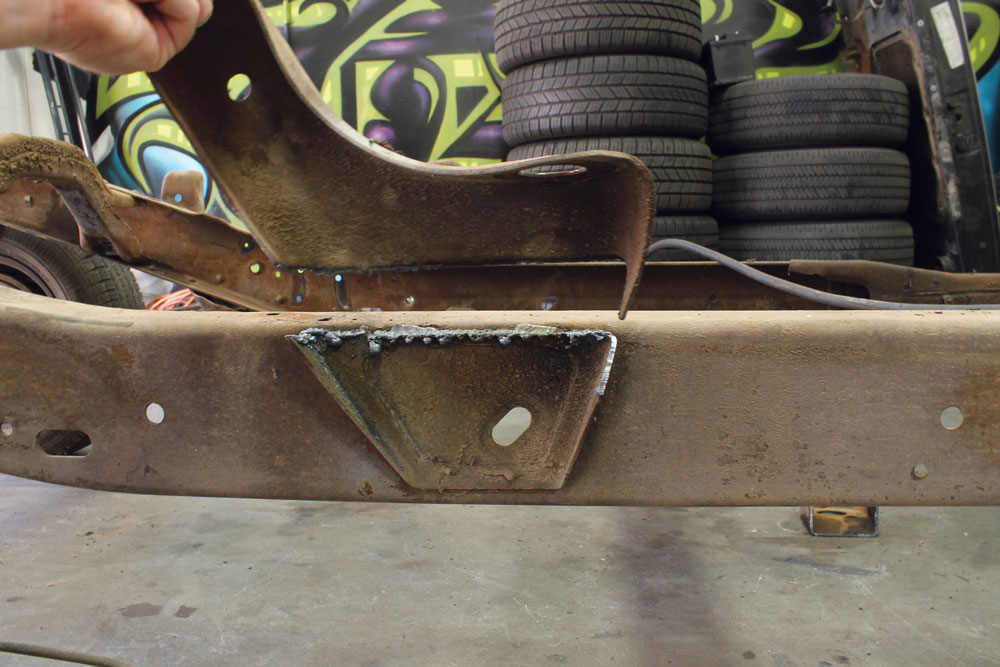
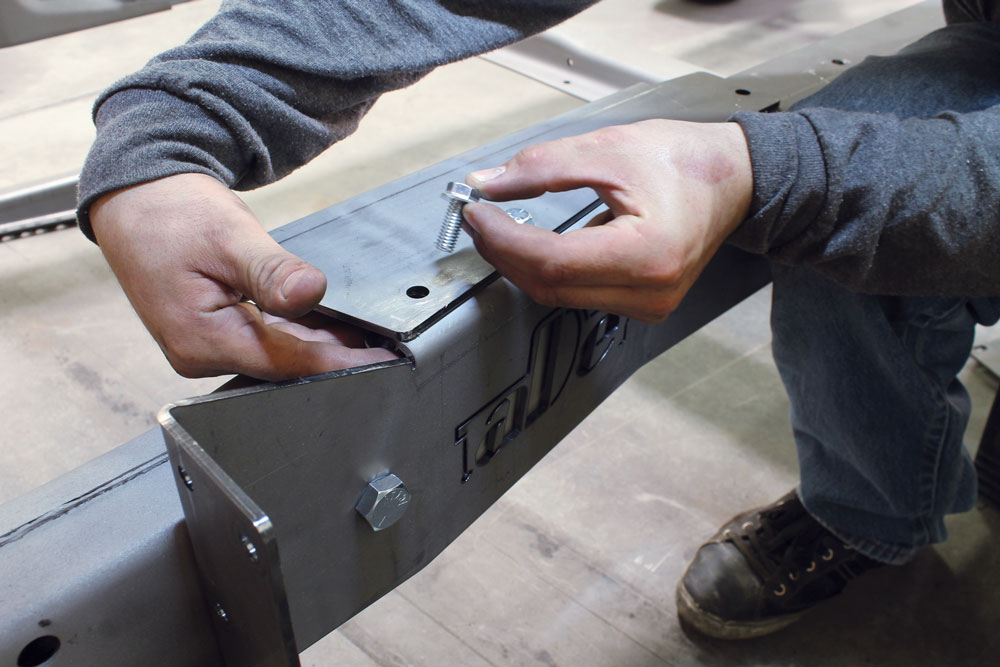
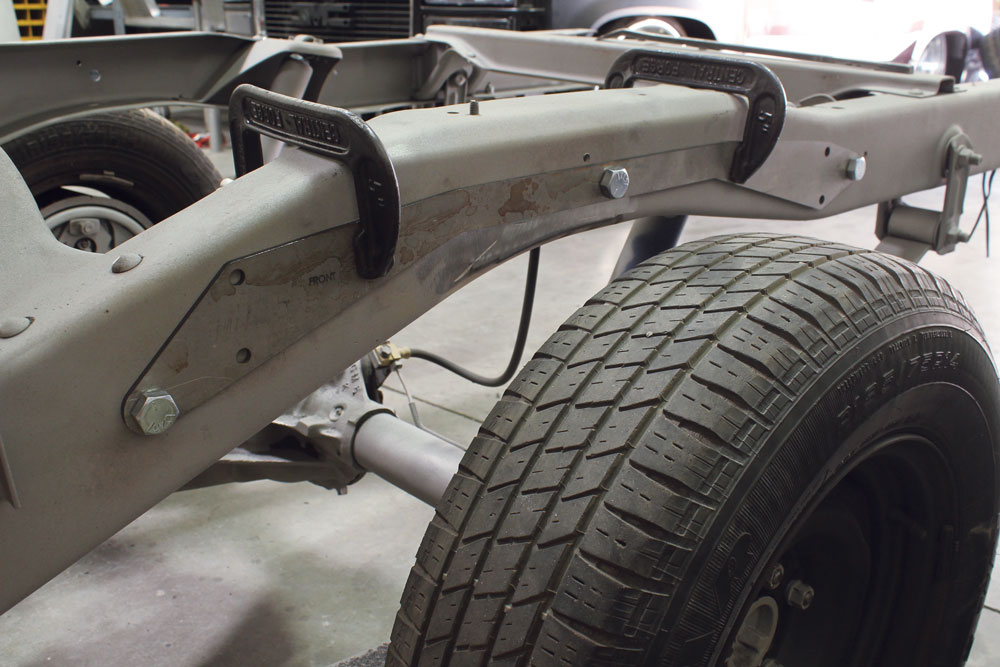
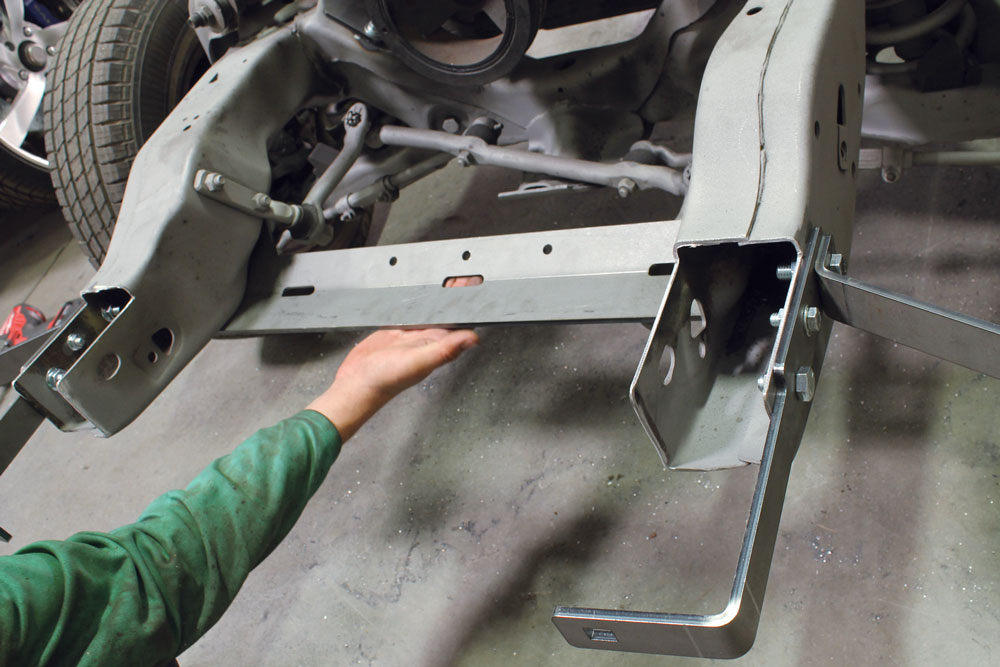
The main bracket for the chassis swap almost completely covers the side of the frame rail. The piece is held against the side of the frame rail and three bolts secure it to the frame through factory S-10 frame holes.
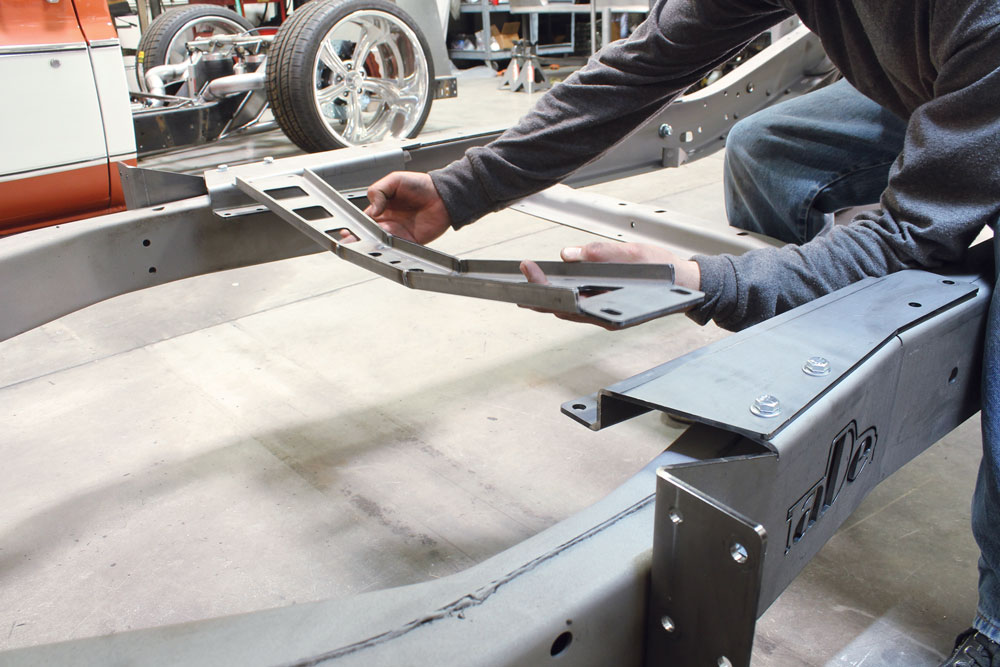
Next up, we set the transmission cross member mounts in place and loosely bolted up the forward two bolts. The transmission cross member was placed between the mounts and loosely bolted in place. Once we had the three pieces bolted together and aligned properly, we drilled the rearward two holes through the mount and the top of the frame rails. The loosely installed bolts were then tightened, locking the transmission cross member in place.
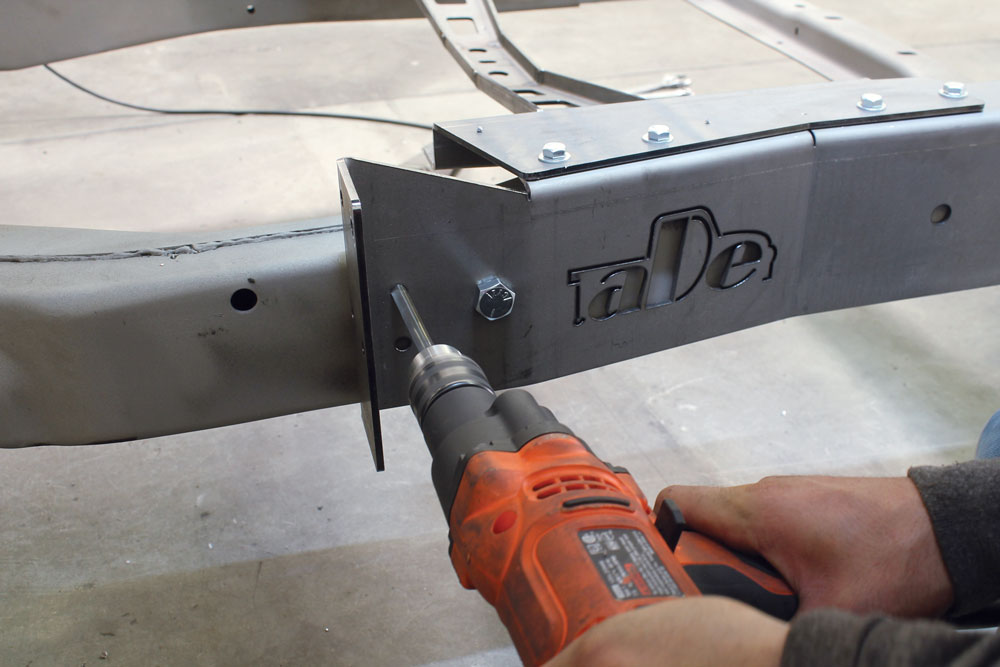
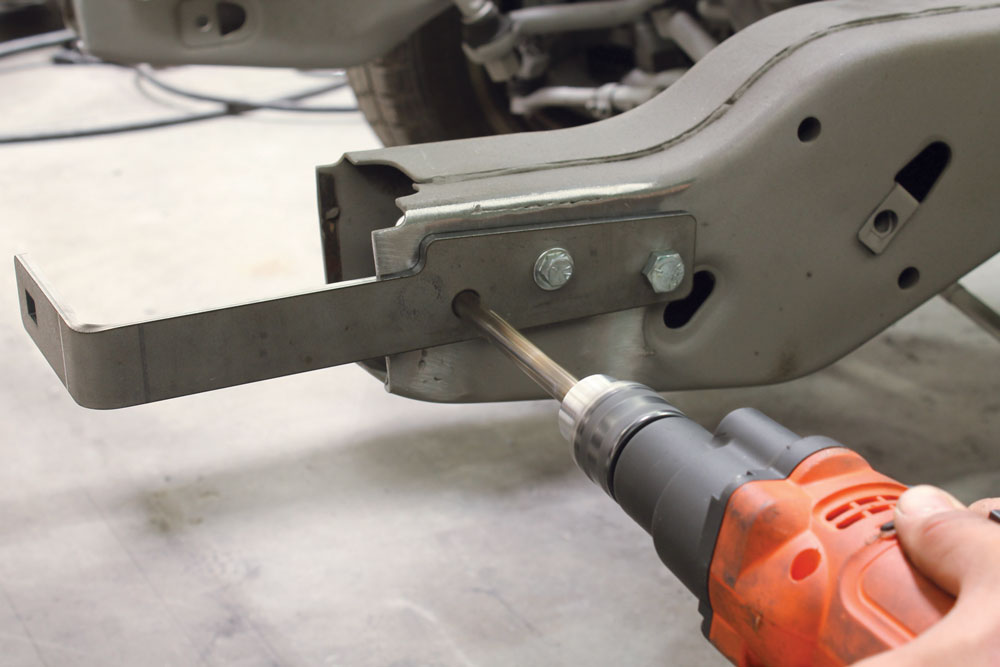
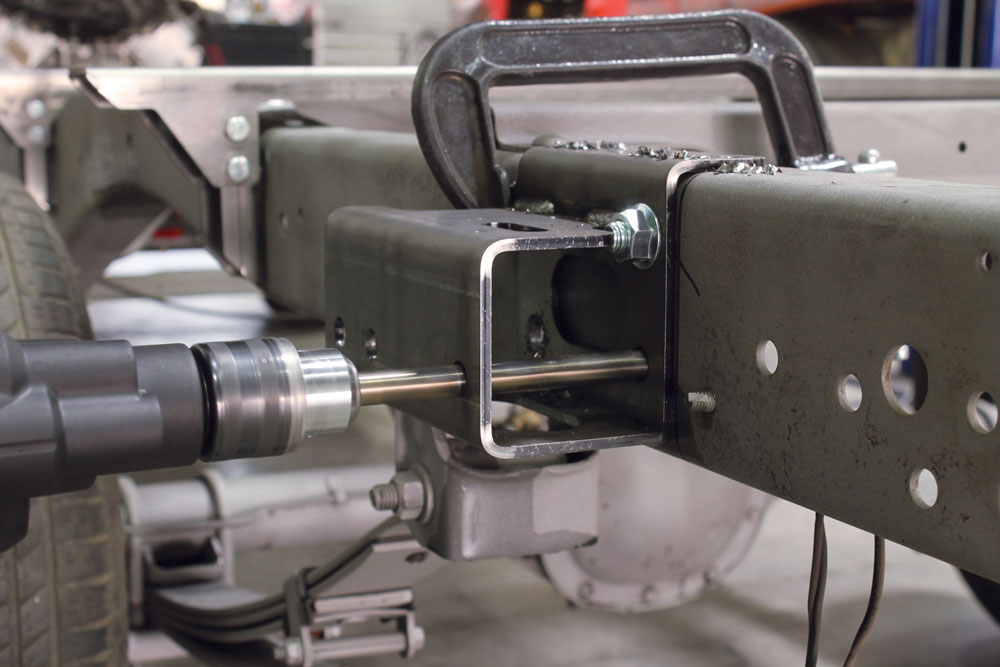
Moving towards the front end of the main bracket, we drilled new holes in the frame for the front running board mounts. The running board mount was then bolted in place with the two bolts that pass through the S-10 frame rails. These bolts were probably the most difficult part of the installation. Make sure you have someone with long skinny arms that can get their hands far enough up the opening of the frame to hold a wrench on the back of the bolt. If you don’t have someone like that to help you out, you could drill an access hole for a socket on the boxed section of the frame.
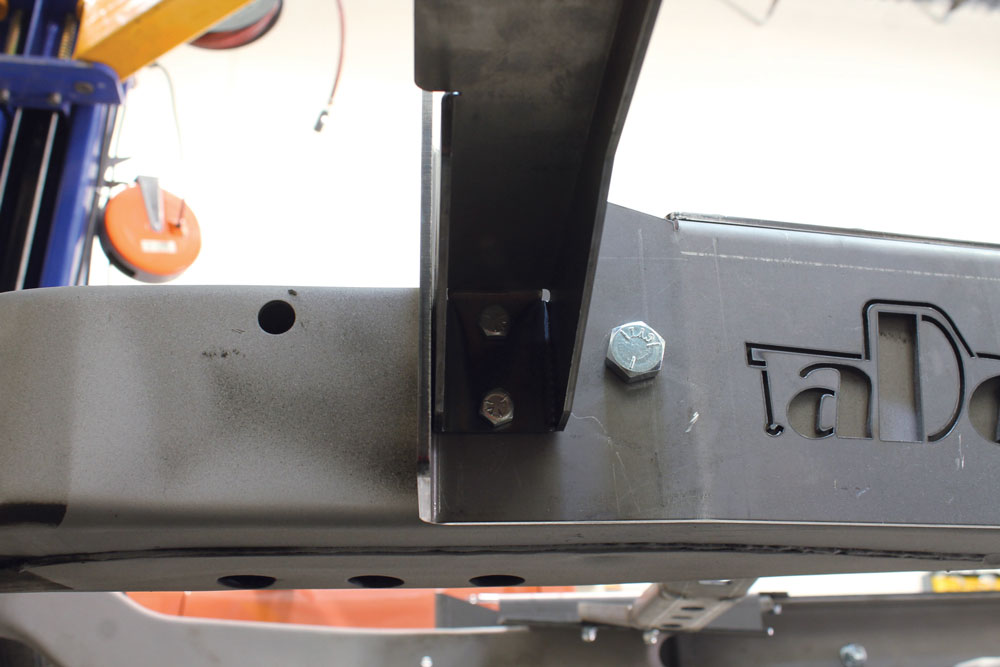
The front cab mount shares a couple of bolts with the running board mount. We were impressed with how these pieces fit together even though we were mounting several pieces together at once.
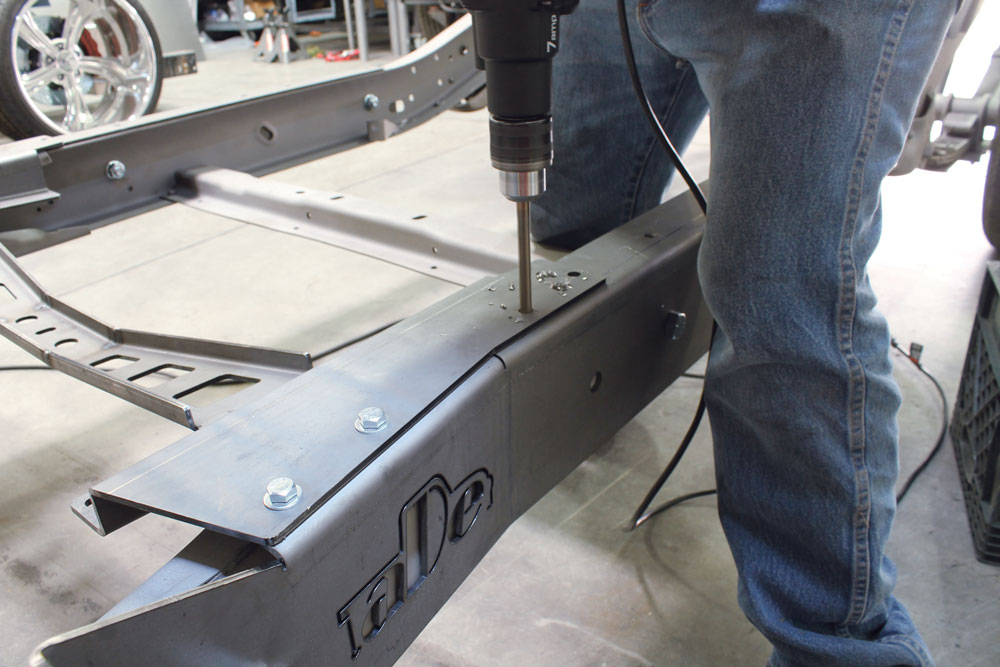
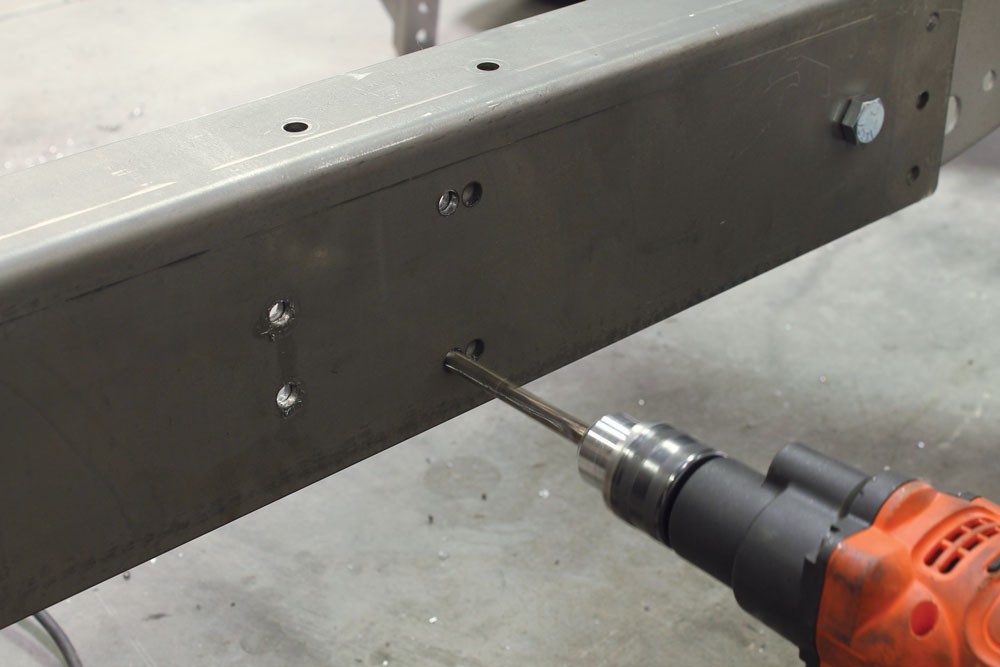
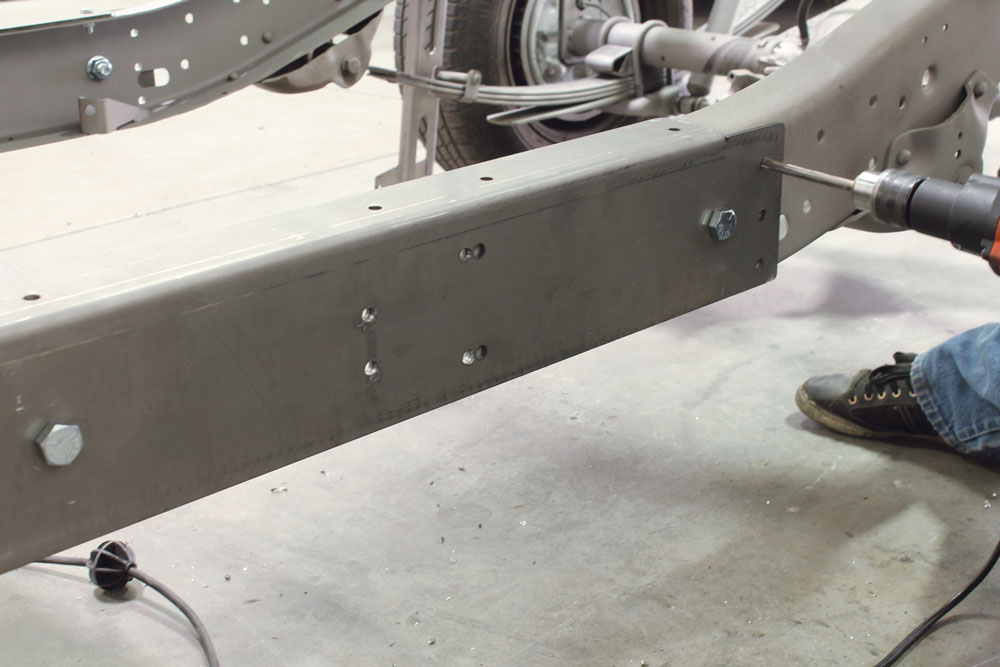
Next we moved towards the rear of the frame rail. The main bracket locates several more holes along the way towards the rear of the truck. The forward two in this photo are for the middle running board bracket. You’ll notice the ones we are drilling in this photo are the two closer to the front of the truck in the set of four. The ones directly behind are for the Suburban mounts, so those did not need to be drilled. There were also several holes along the top of the main bracket that needed to be drilled. These bolt holes are more for attachment strength of the main bracket. The final holes in the main bracket are all the way towards the rear of the truck and will attach the forward bed mount. With all of the new holes drilled, we started attaching more new brackets. These mounts will serve as the middle running board mounts.
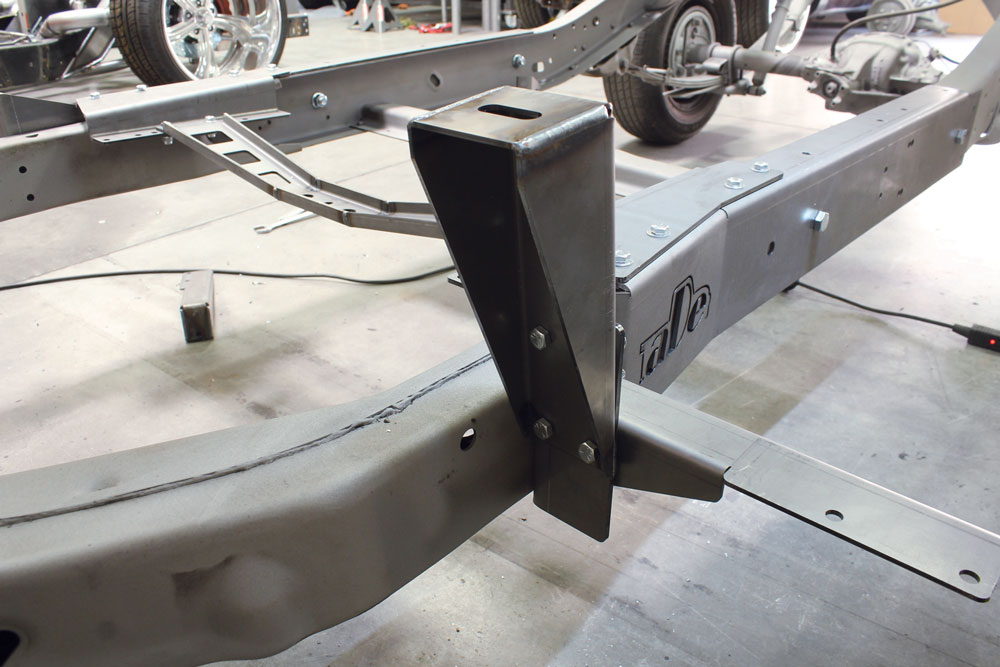
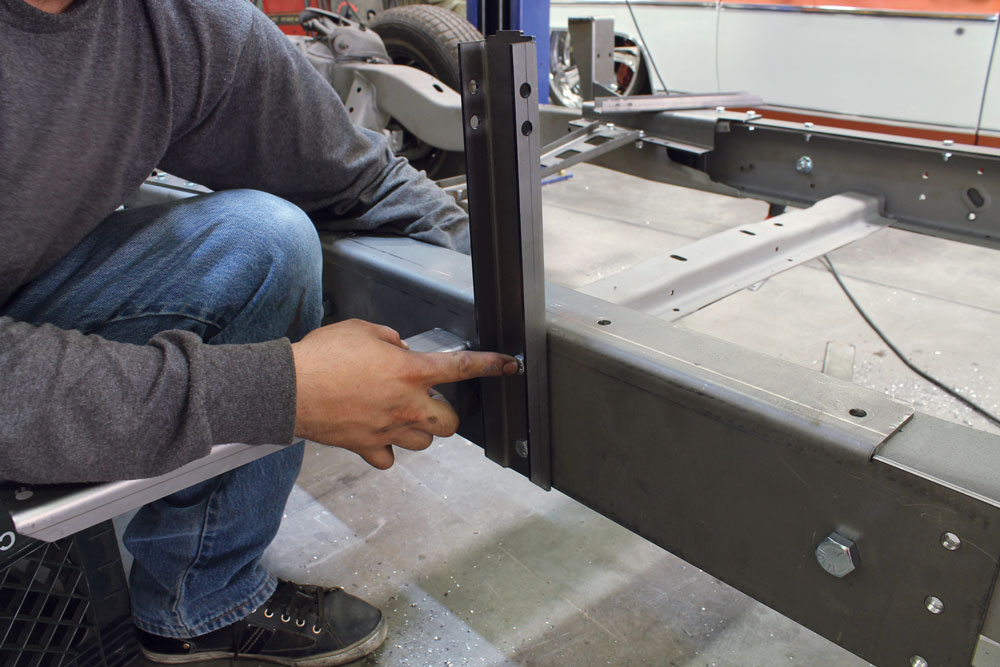
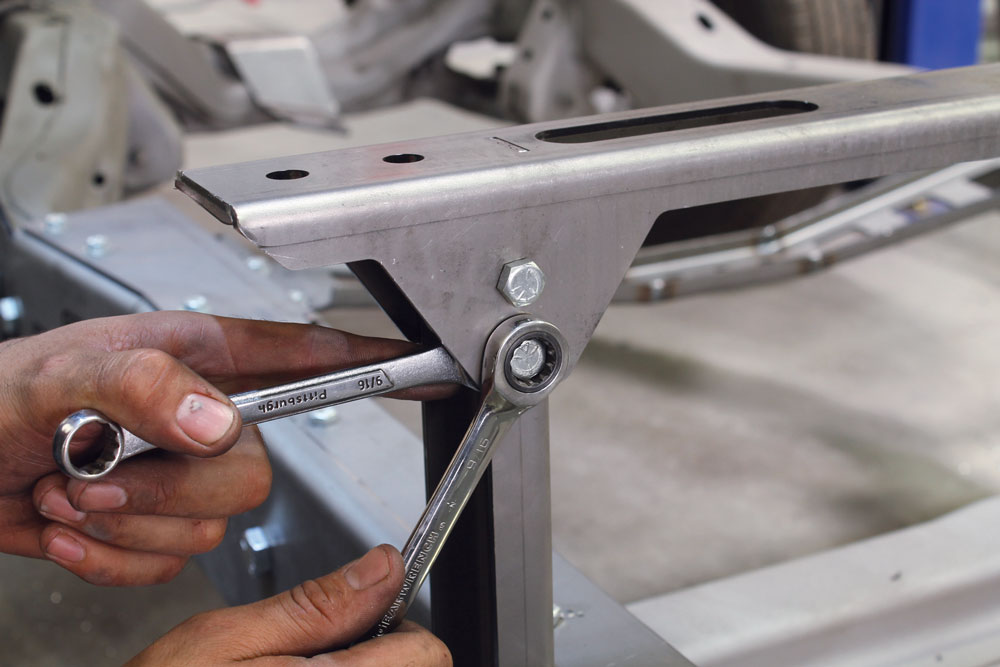
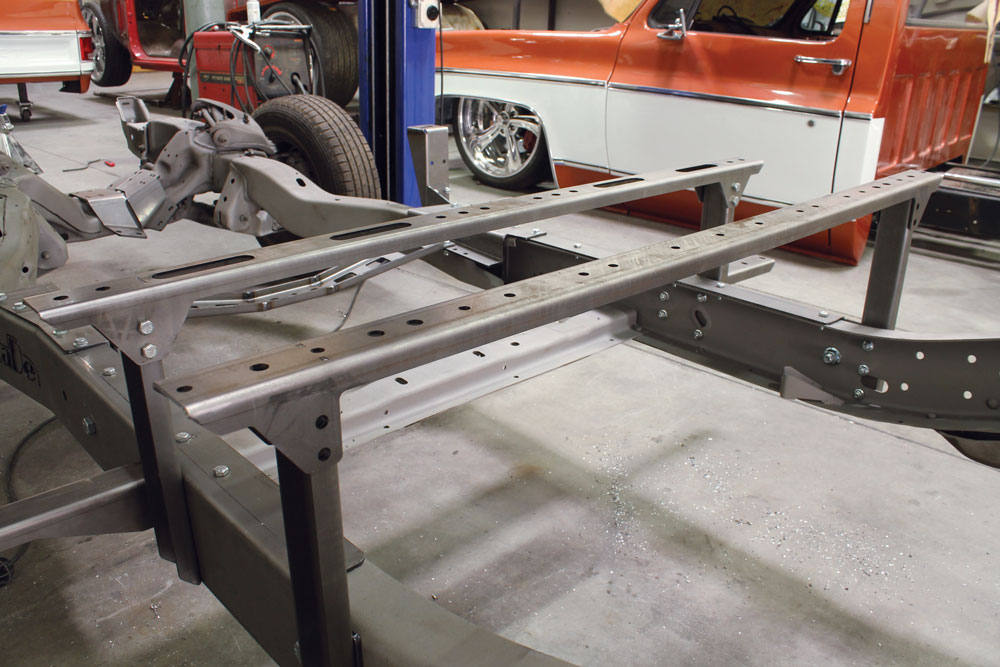
Following up the running board mounts were the rear cab mount brackets. Again, we used the provided hardware and mounted them through the newly drilled holes. The rear cab mount cross member was placed on the vertical mounts that have tabs in them that key into holes cut in the cross member. Four bolts attach the cab mount cross member to the vertical mounts.
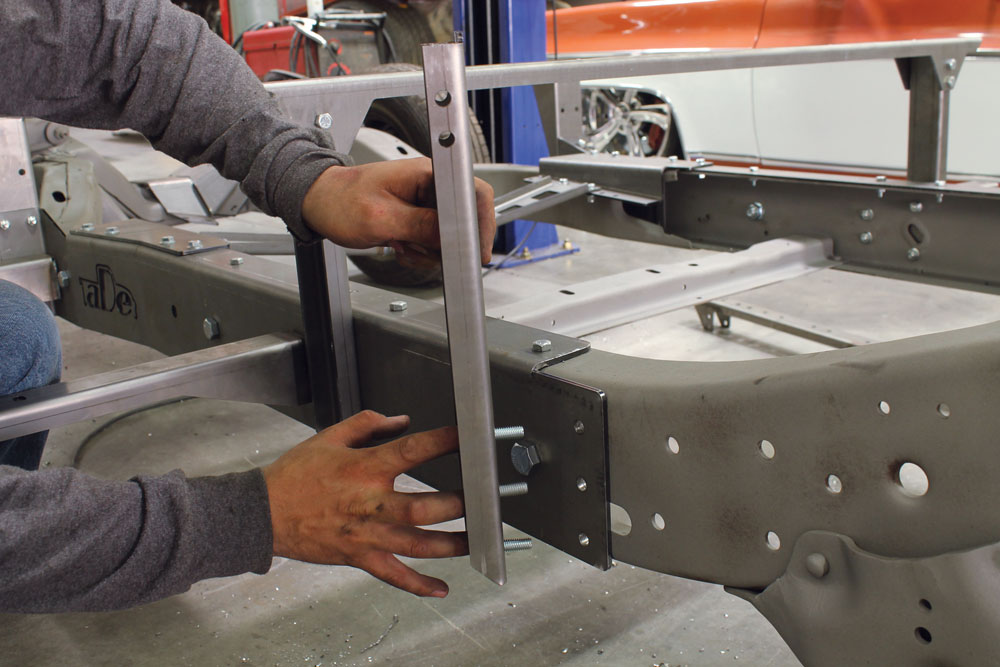
Finishing off the mounts that use the main bracket are the forward bed mounts. The vertical pieces were installed in the same fashion as the rear cab mounts. Just like the rear cab mount, the forward bed mount is comprised of a cross member that bolts to the vertical pieces on each side of the frame. When we unpacked the boxes we were kind of confused as to its purpose. However, once we read through the detailed instructions included with the kit, we learned that it was meant to be used as a jig to drill more holes. Notice the plate is even labeled, so there’s no way we could install it the wrong way. We used the same jig plate on the opposite side of the frame. Once we had all of the new holes drilled through the frame, the jig plate was removed and the remaining bed mounts were installed. These went on just like the first. All of the pieces are keyed together so it’s nearly impossible to get this installation wrong.
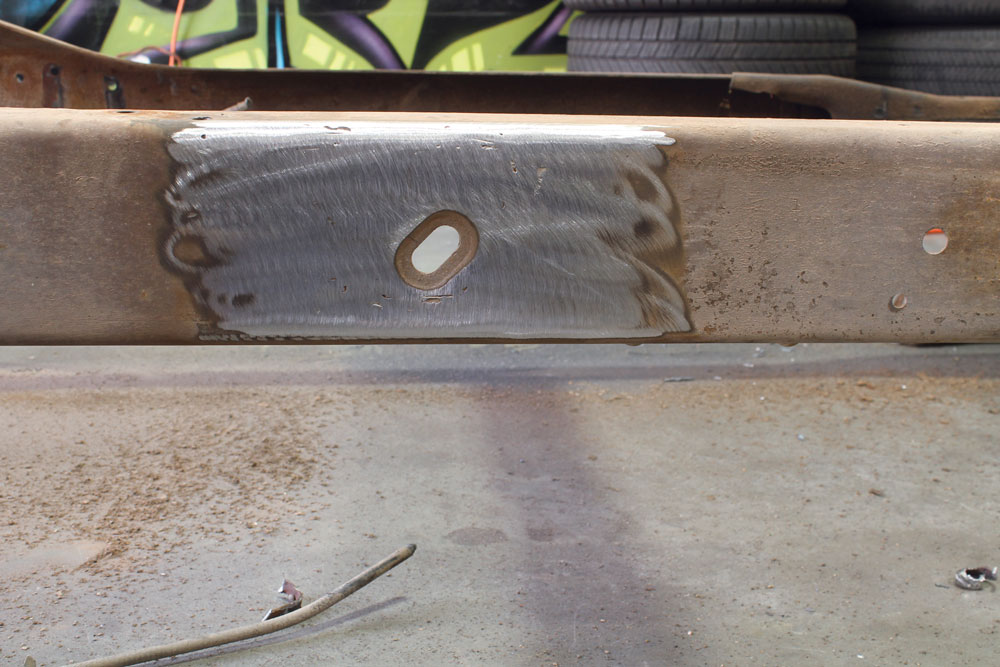
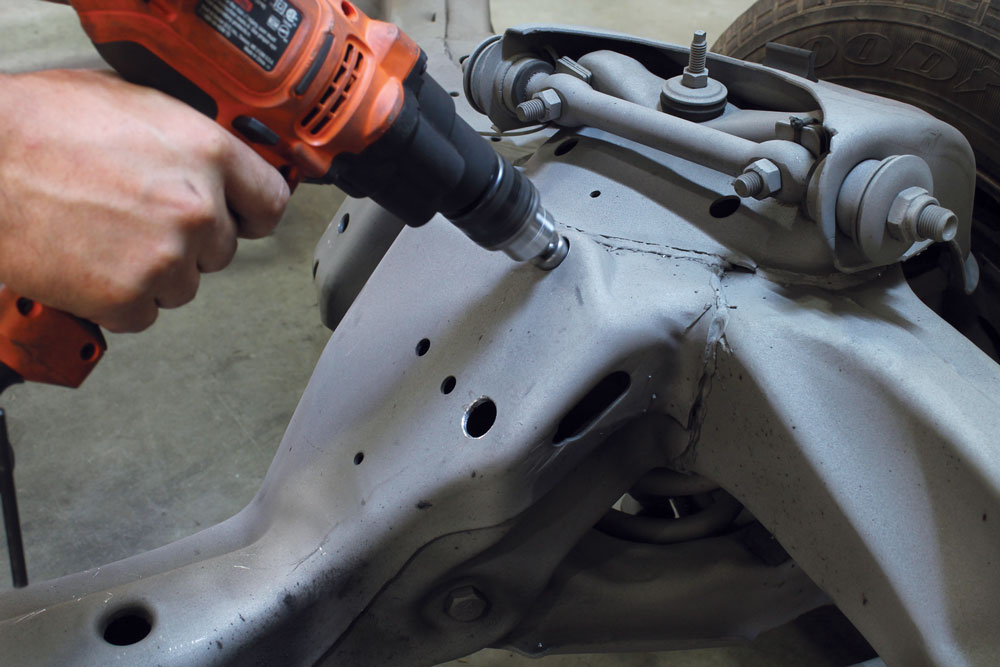
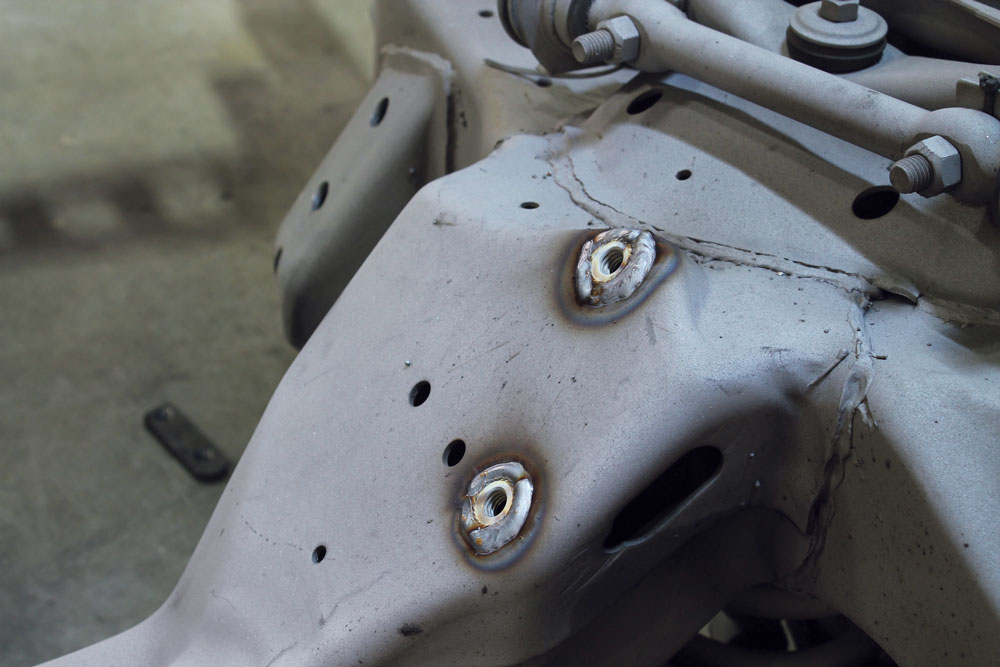
Moving towards the front of the truck again, we began to work on the engine mounts. Robert gave us the idea to drill out the factory engine mount holes and weld in nuts to make installation easier. We decided to go ahead with this plan and began by drilling holes large enough for the flange nuts to sit inside of and be nearly flush with the mounting surface. Once we were happy with the location of the bolts, they were permanently welded in place. In order for the new engine mount plate to sit as flat as possible, the welds were sanded down a bit to flatten them out.
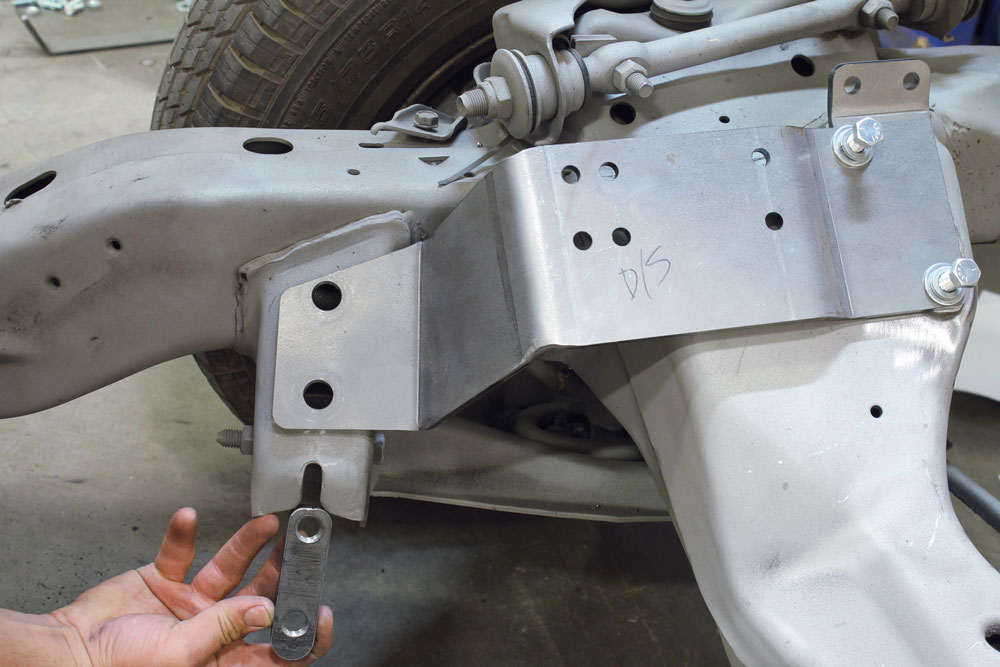
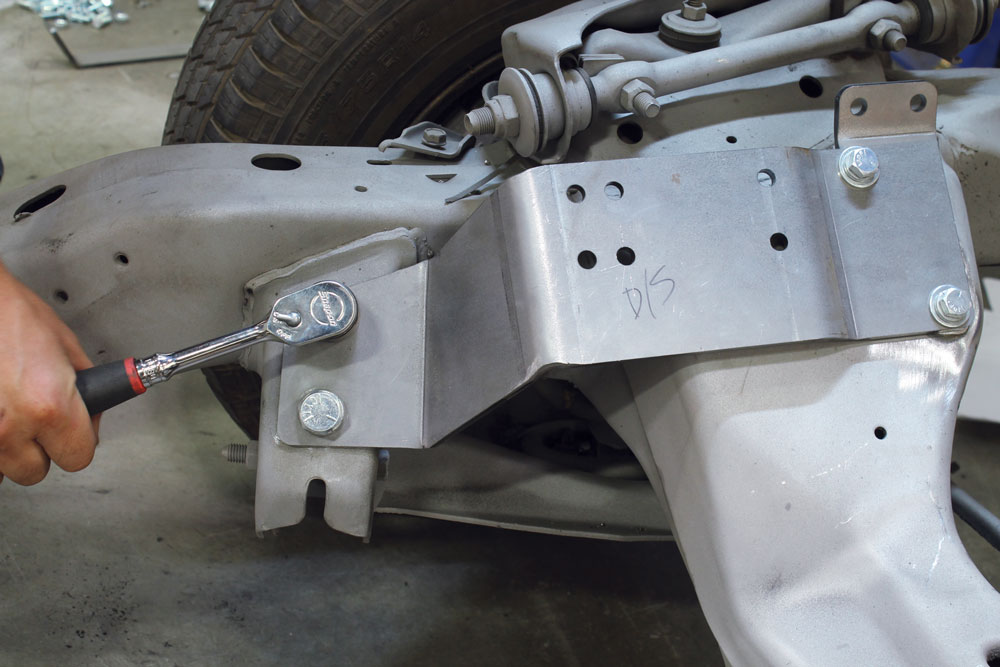
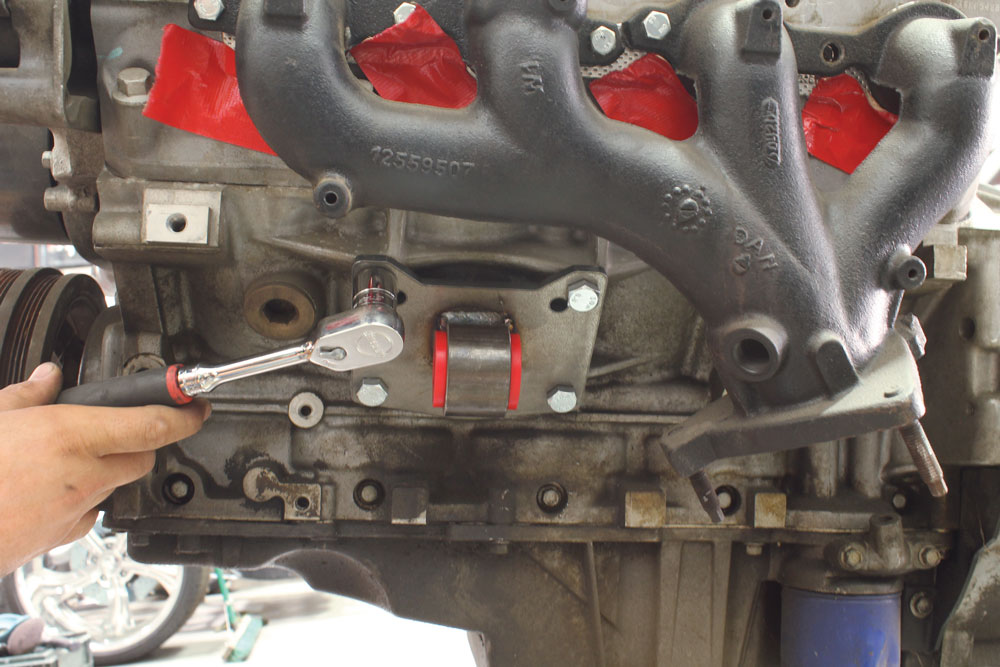
The engine mount is pretty sophisticated. It not only ties into where the factory engine mounts once were, it also uses holes on the rearward lower control arm mount, adding strength to both pieces. Installation on the rearward lower control arm mount is made simple by the use of a threaded plate. The supplied hardware threads into this plate and secures the engine mount plate in its new home. AD-Engineering has several options for engine mounts. We are dropping an LS-based engine in Cindy so we were supplied with these mounts. It appears that these same mounts could also be used with a small-block Chevy. Using the supplied hardware, we attached the engine mounts to the engine block.
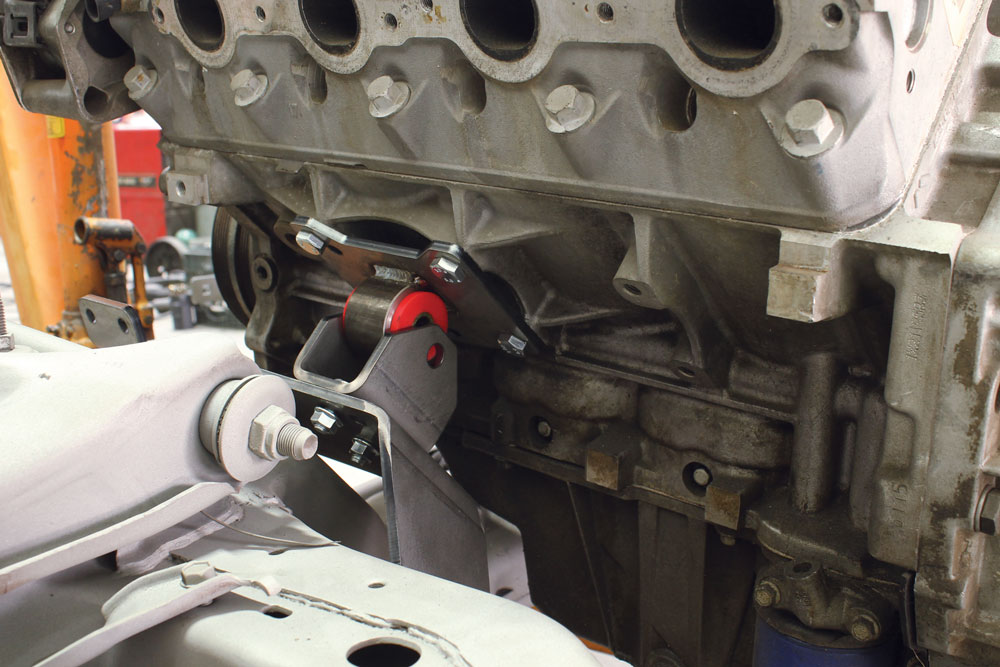
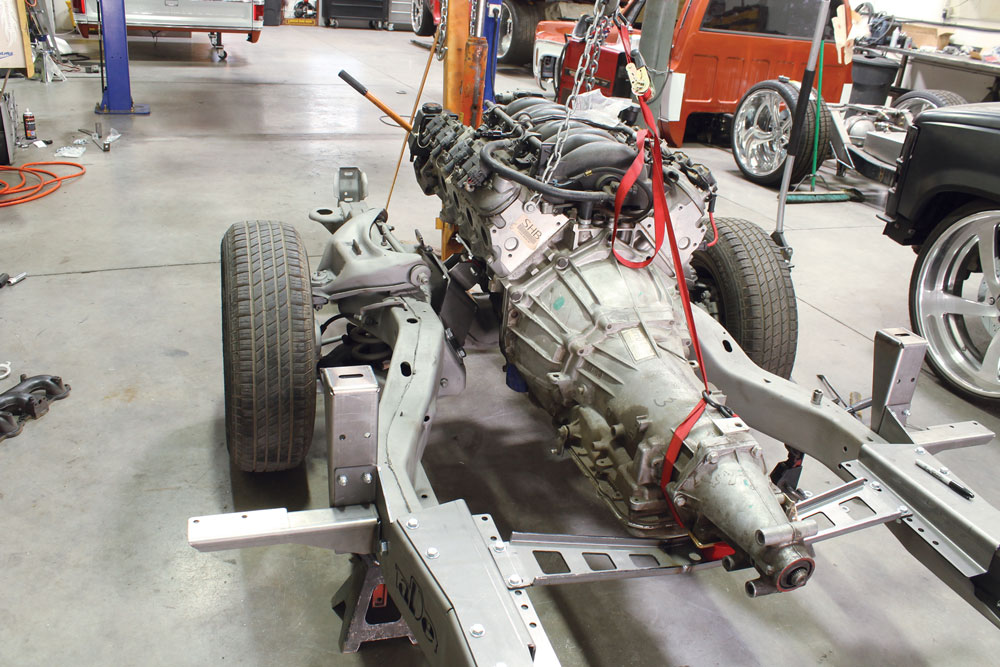
The final part of the three-piece mount is the U-shaped bracket that will sandwich the engine mount bushing. There are two options for holes when mounting our LS-based engine. We decided to go with the furthest rearward mount in order to get closer to a 50/50 weight bias with the overall chassis. With the engine on a hoist, we slid the new mounts together. The engine and transmission were mounted as one unit and dropped in very easily. Locating the transmission mount in the proper bolt holes per the instructions allowed the supplied transmission mount bushing to fall right in place.
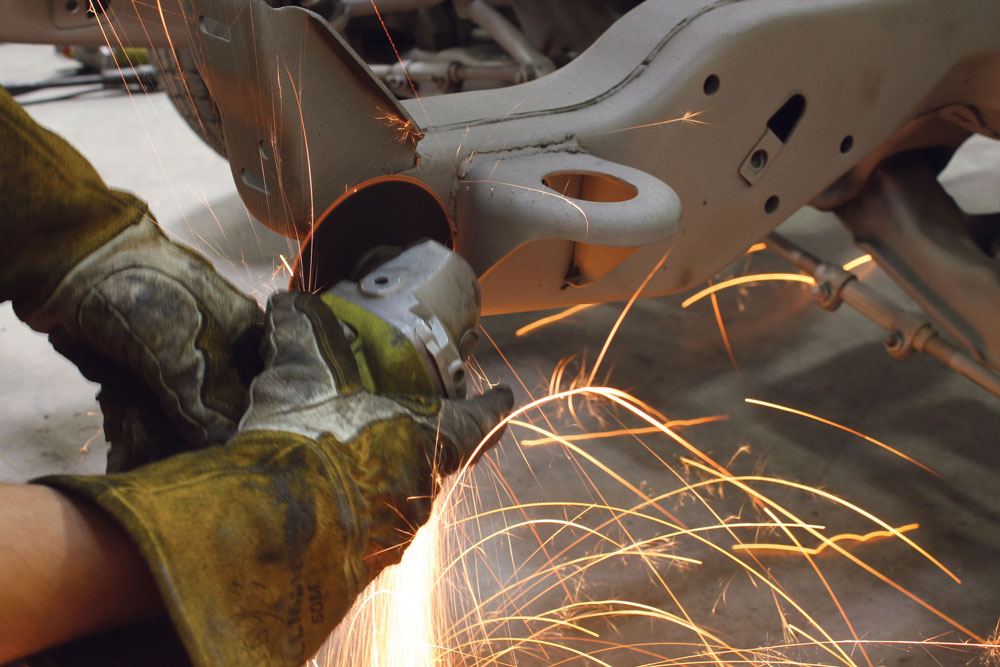
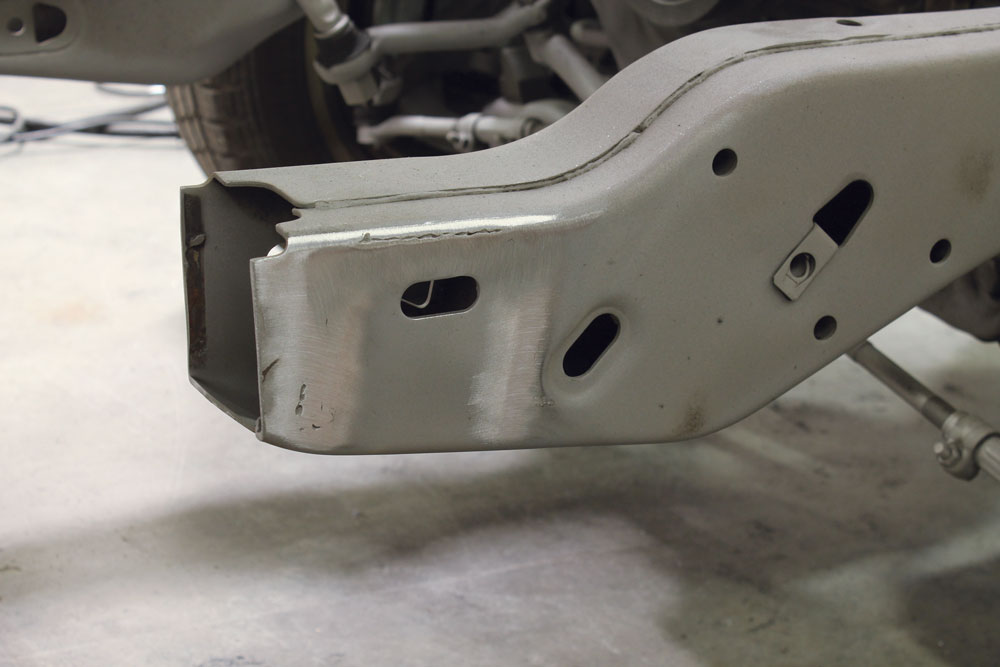
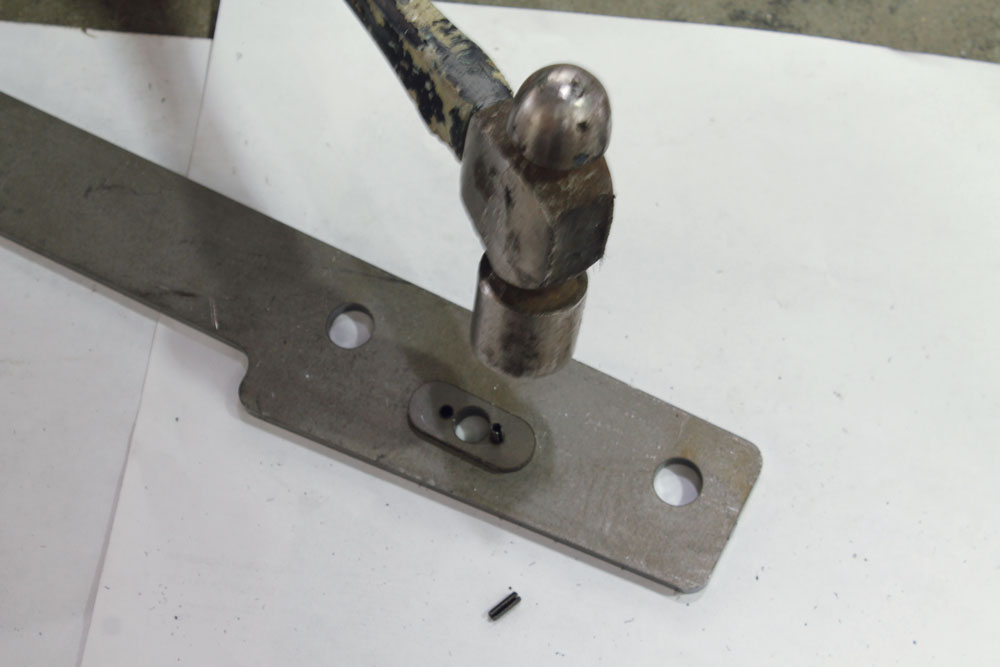
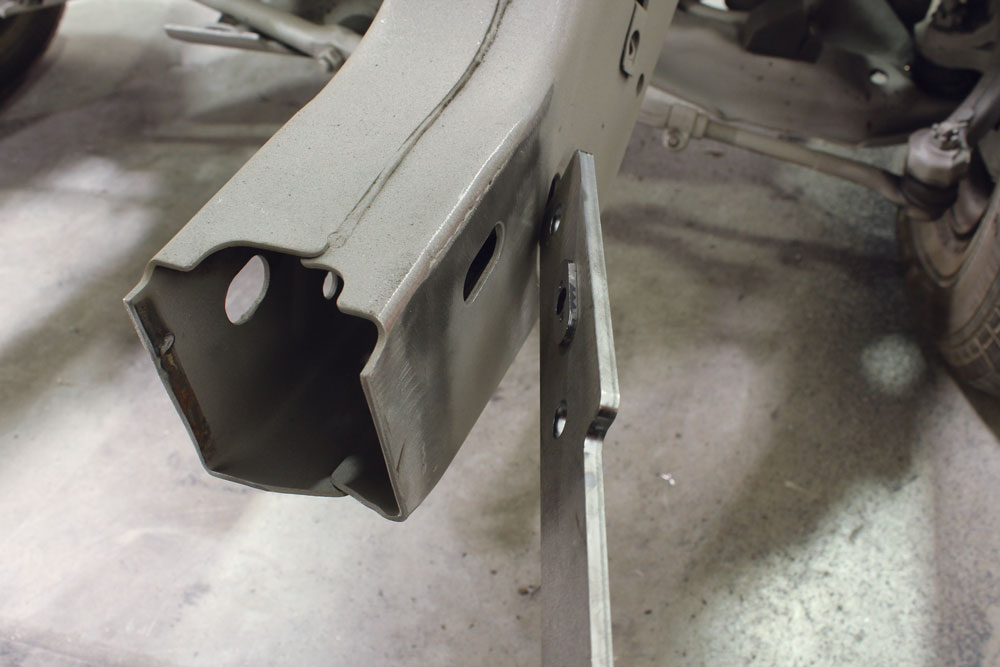
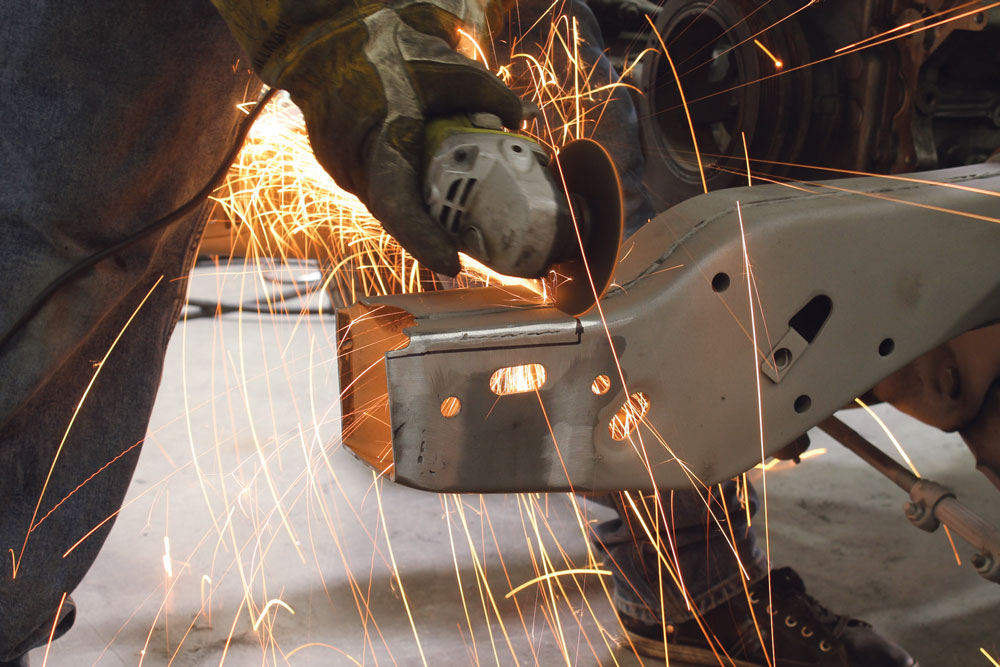
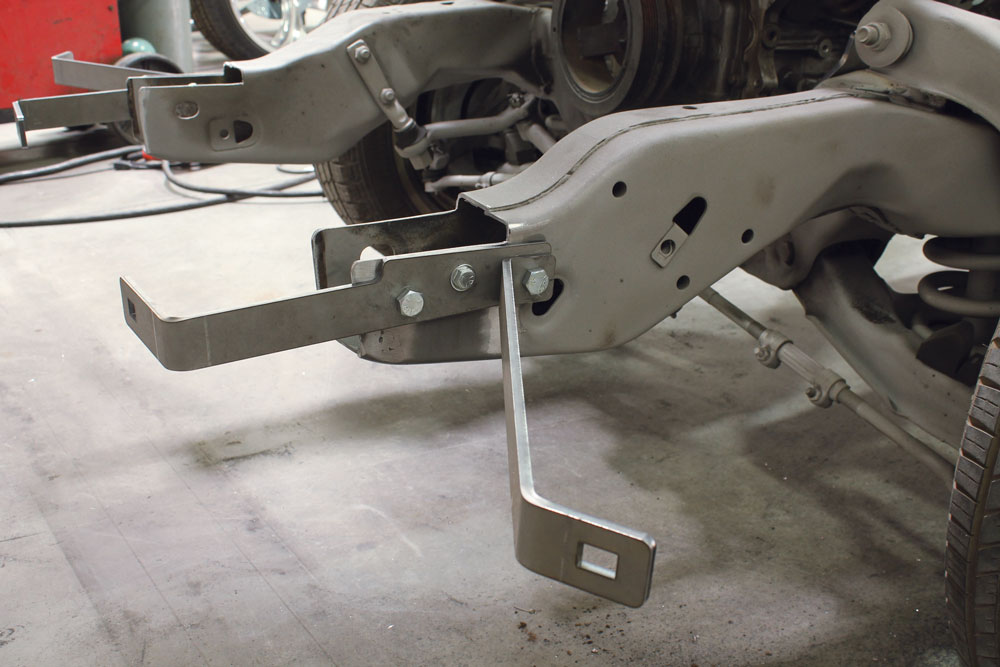
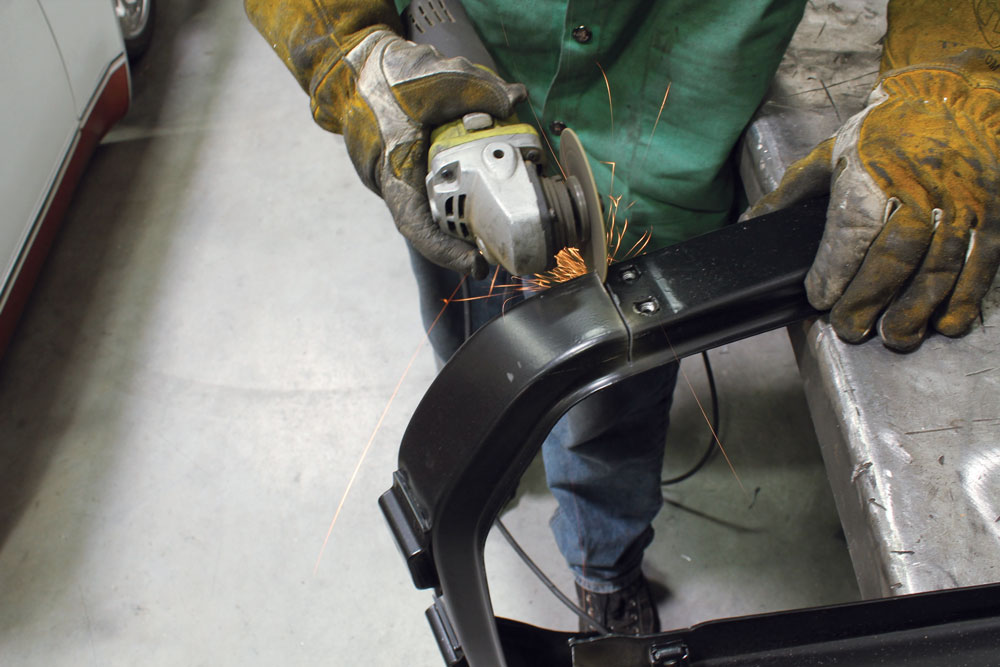
All the way at the front of the truck, we needed to remove more of the factory S-10 mounts. The factory S-10 bumper mounts and radiator support mounts needed to go. A 4.5-inch cut-off wheel on a die grinder was used to remove these two items. We tried to cut right at the welds, which make it easier to clean up the frame. Here’s what it looks like after the mounts are cleaned up with the flap wheel. Make sure you’re not using a rock wheel grinder for this type of clean up because it will leave you with a much rougher and unattractive finish. The first part of the new bumper mounts is another ingenious little idea included with the kit. These pieces fit together snuggly with dowel pins. On the S-10 frame there is a slot, and the mount fits perfectly into it. This locates the bumper mount bracket in perfect alignment with the frame. With the center hole lined up and bolted in place, the outer two bolt holes were drilled and the new hardware was installed.
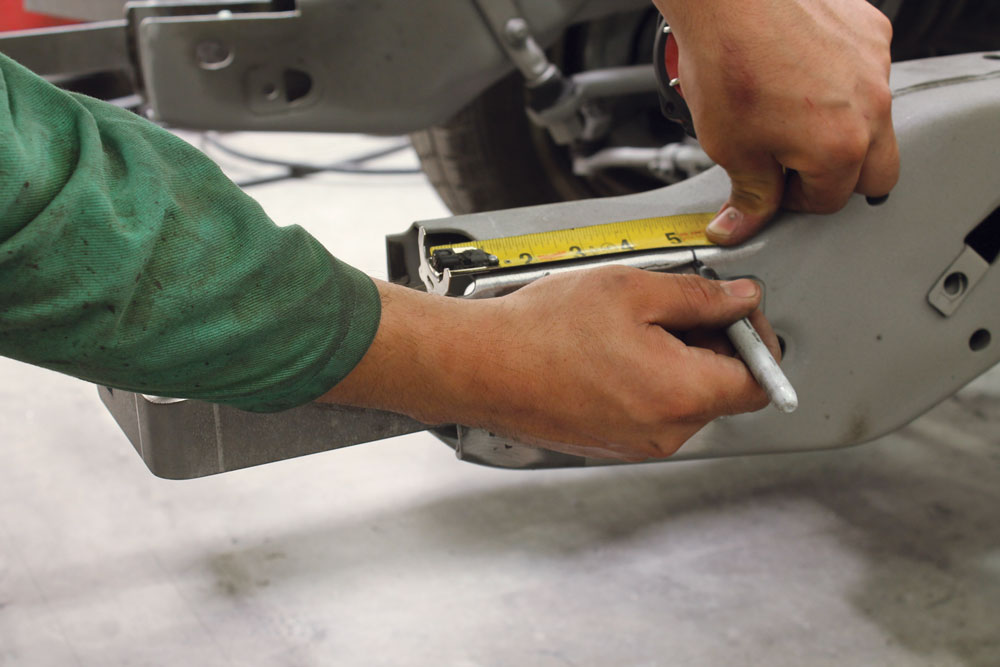
The next step for installing the front bumper mounts is cutting away the top of the frame. Following the instructions, we measured back from the front edge of the frame. Then we used the top of the bumper mount to mark the horizontal cut line and removed the mount to make the cut. To finish this part of the job, we reinstalled the bumper mount with the second part of the mount bolted to the rear most bolt hole.
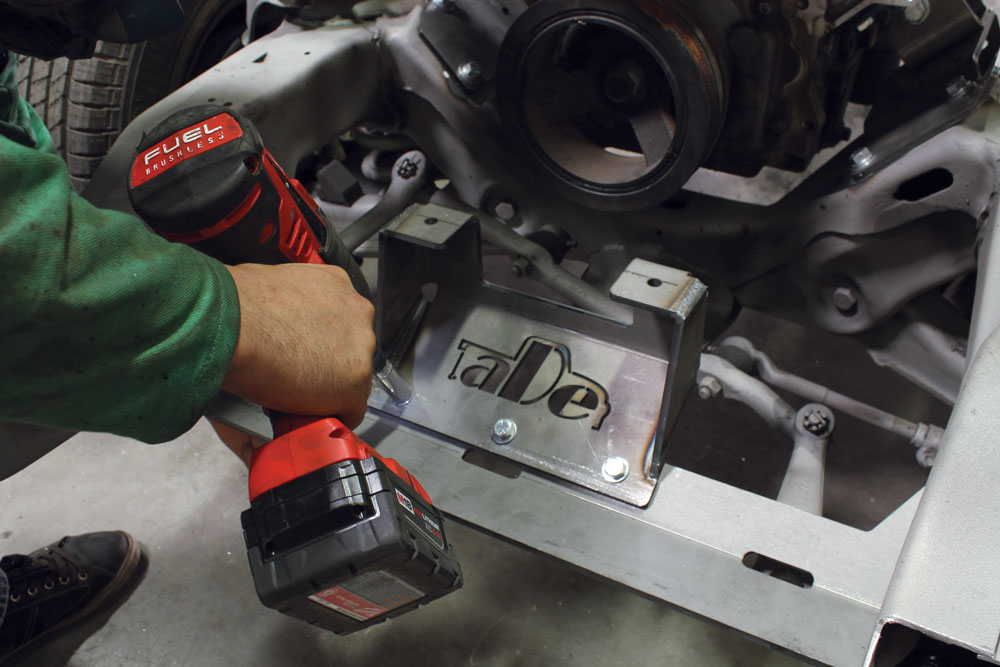
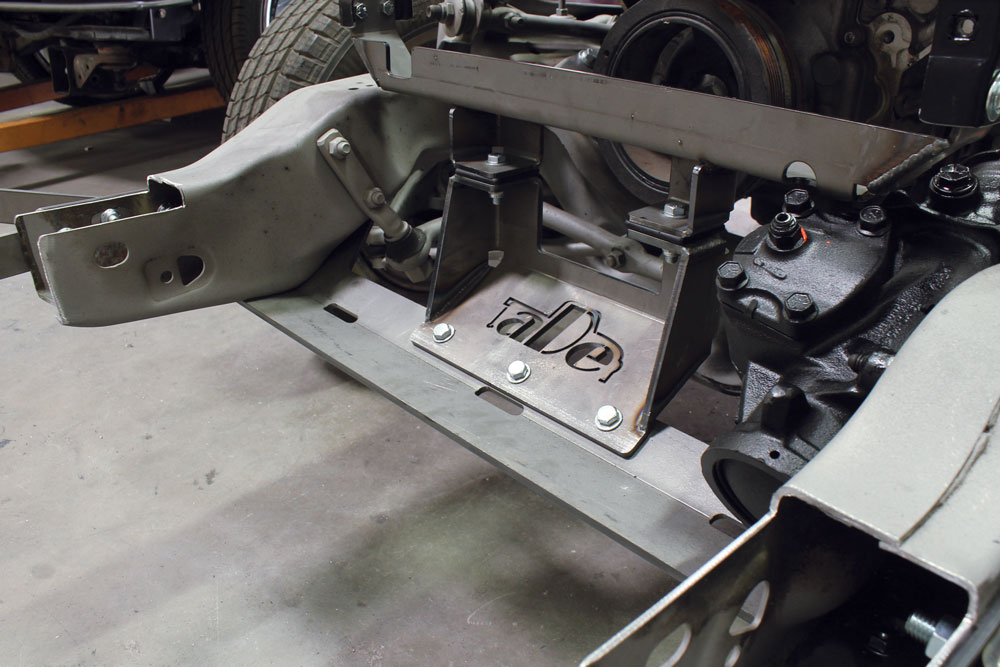
Since we were already at the front of the truck, the new radiator support assembly was tackled next. The first part bolts up using the factory sway bar mount holes. Up next was a piece that’s easily distinguished by the ADE logo. This bolts to the lowest piece with the three supplied bolts and the corresponding hardware. The new radiator support from LMC Truck needed a modification. Actually, the entire bottom of the support is cut off just below the two horizontal bolts. Once we had the modified radiator support mounted to the new lower piece provided with the chassis swap kit, we installed the assembly to the lower mounts. The radiator support is isolated from the lower mounts by urethane bushings.
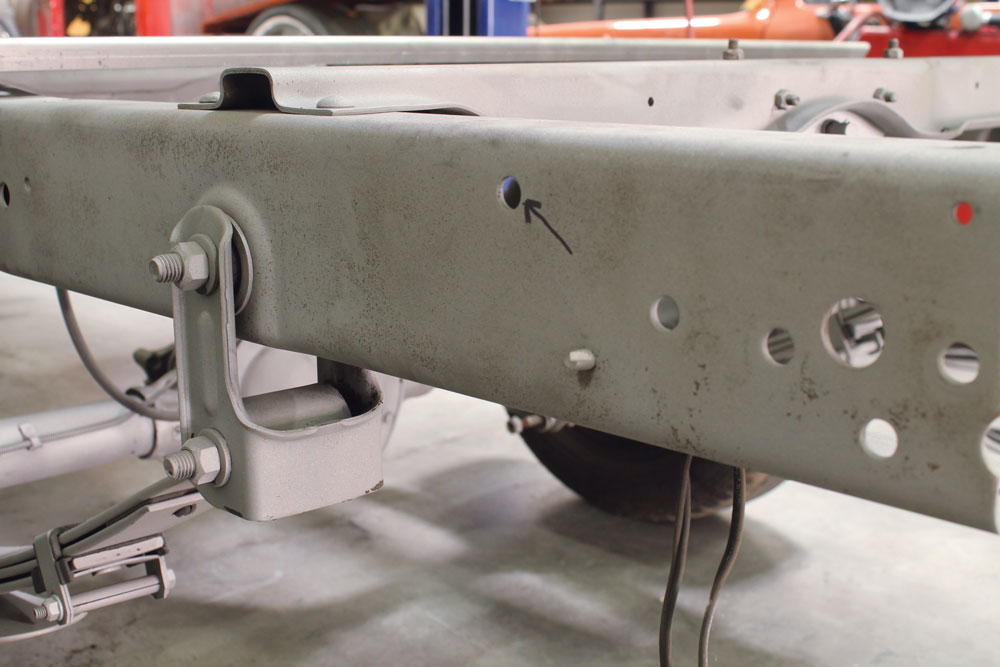
The final modification to the S-10 chassis happened at the rear of the frame. Per the instructions, we located a bolt hole on the side of the frame. We temporarily installed the rear bumper mount using this hole. The new mount is used as a guide for the final holes we need to drill in the S-10 chassis. It also served as a guide for the cut we needed to make in order to remove the tail section of the frame. We removed the mount after marking the rails and used the cut-off wheel to slice through the frame rails. With the frame rail shortened, the mount was reattached with the provided hardware. The outside bolts will act as the attachment point for the factory rear bumper mounts.
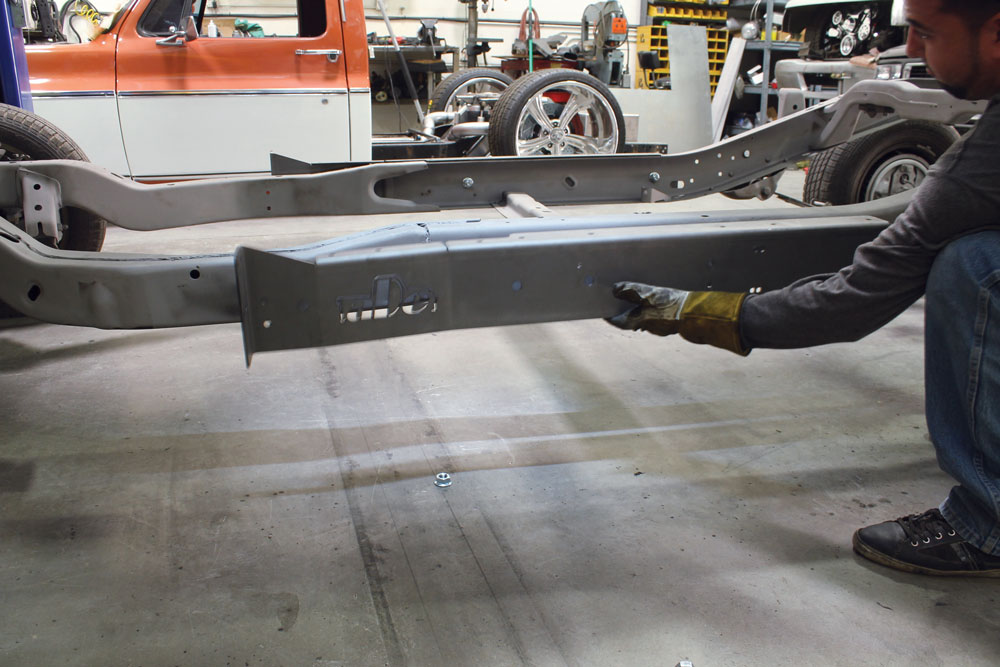
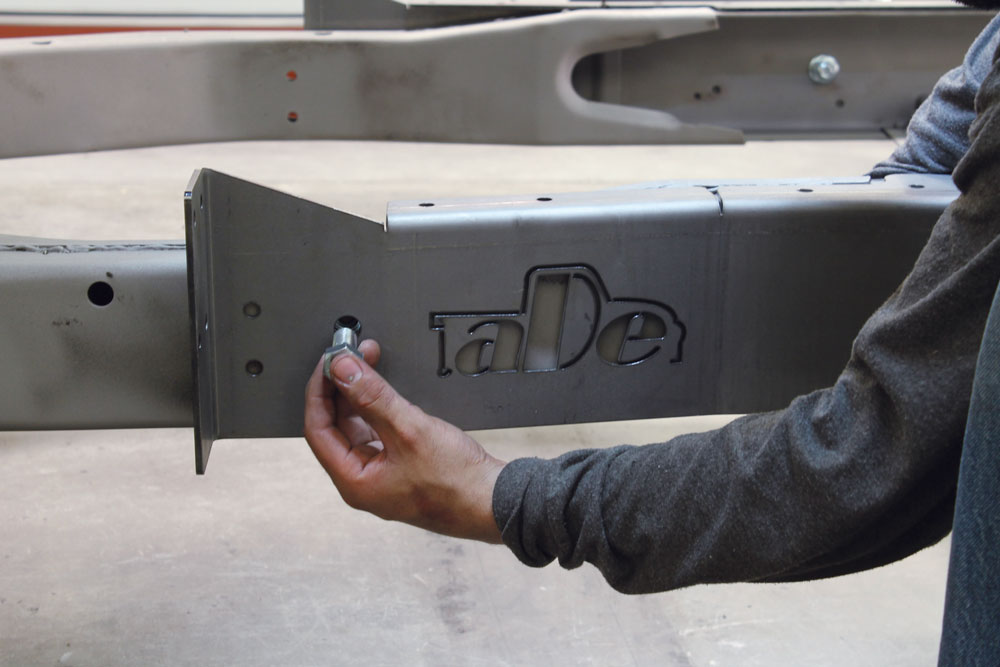
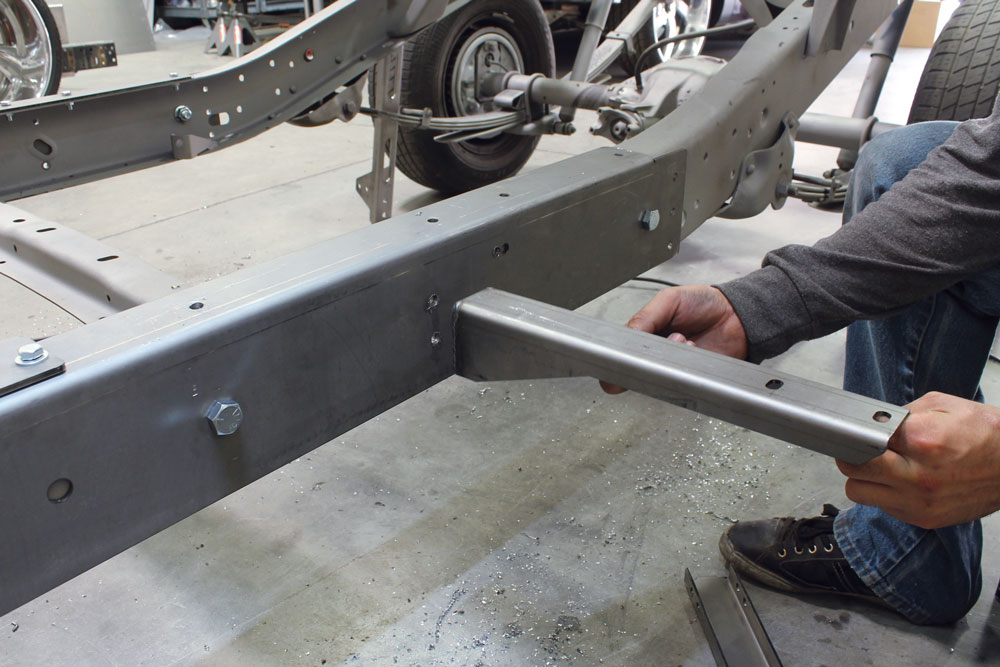
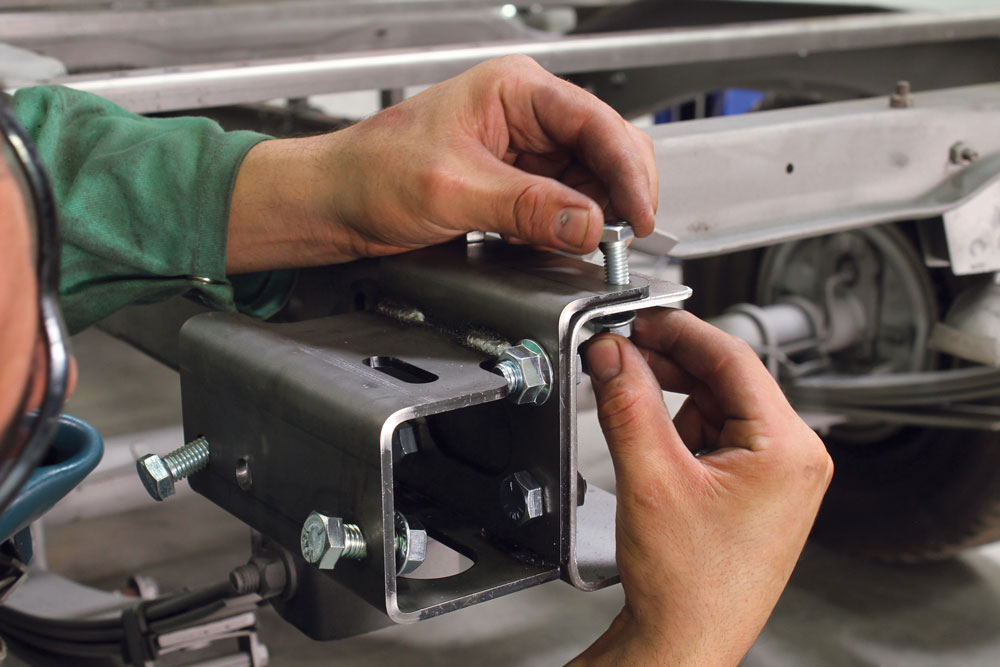
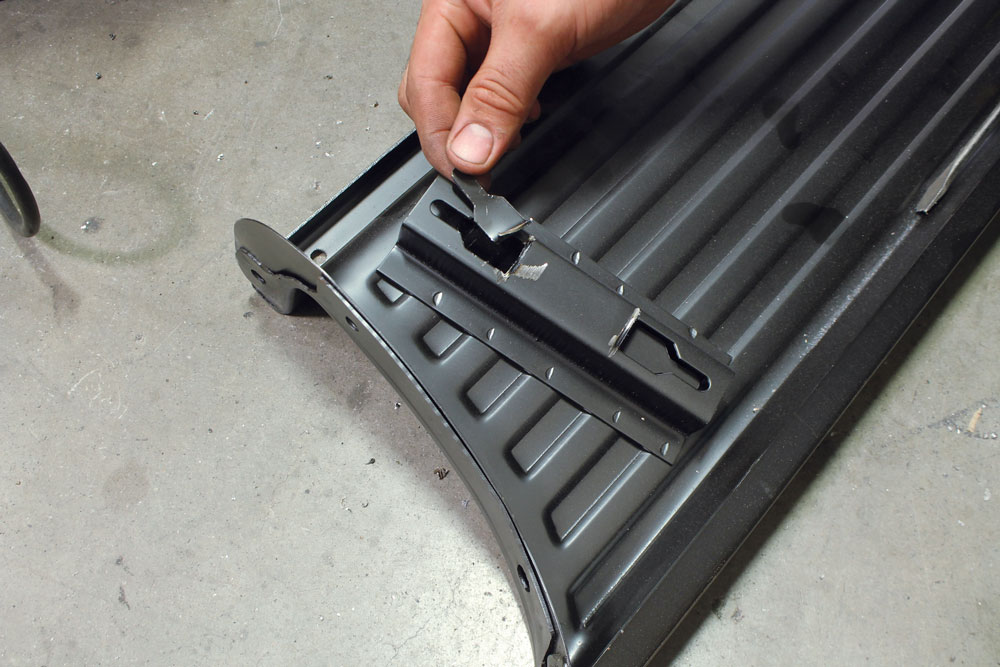
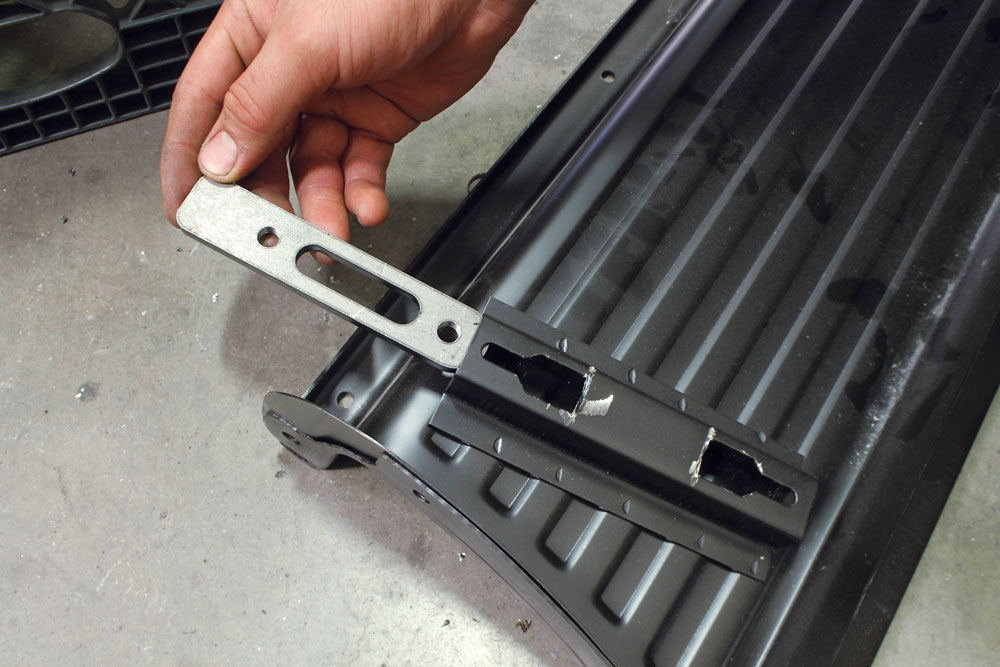
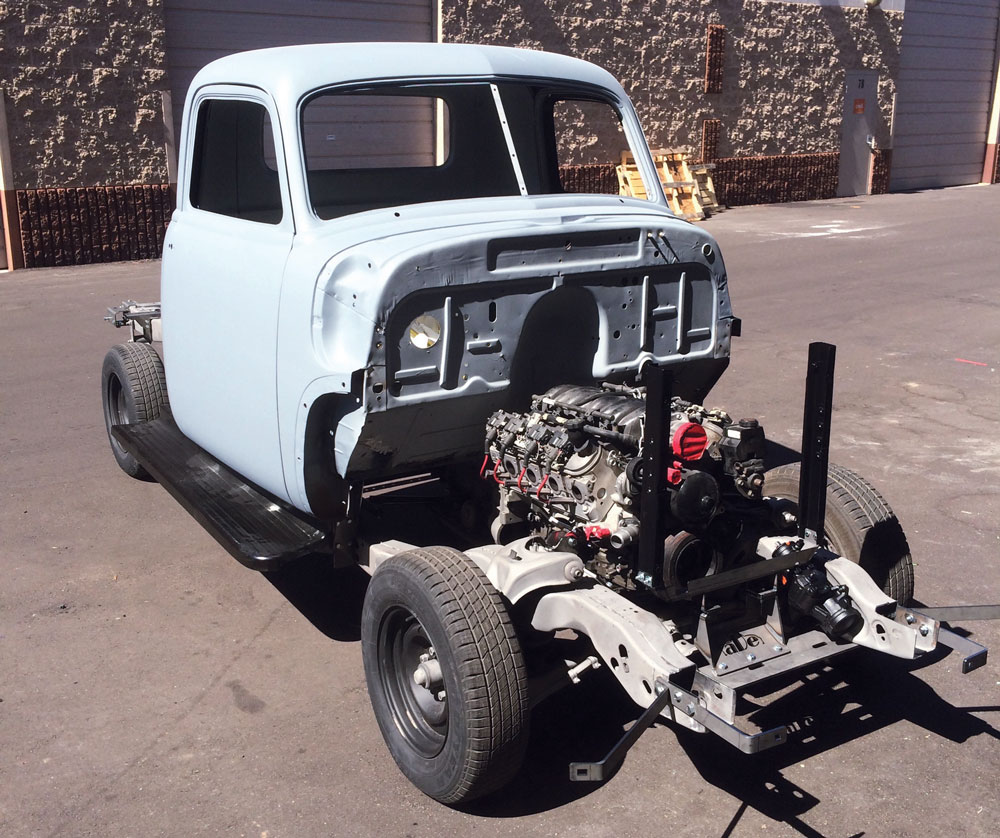
The last pieces included with the kit are for the running boards. We already installed the mounts along the sides of the frame rail, but now we are working on the running boards themselves. This allows for the new plates to slide into the running board. These plates are threaded to accept bolts, which will make mounting the running boards much easier. After only two days of work, one stripping the S-10 frame and one installing the new parts, we had ourselves a new chassis under project Cindy. We rolled the truck outside the shop to get a better look at our quick accomplishment. The following day was spent installing the body panels. Anyone who knows these trucks will vouch for how much work it takes to get all of the front sheet metal installed. It’s not an easy task, but we were able to get things installed and roughly lined up for the body shop to dial in.
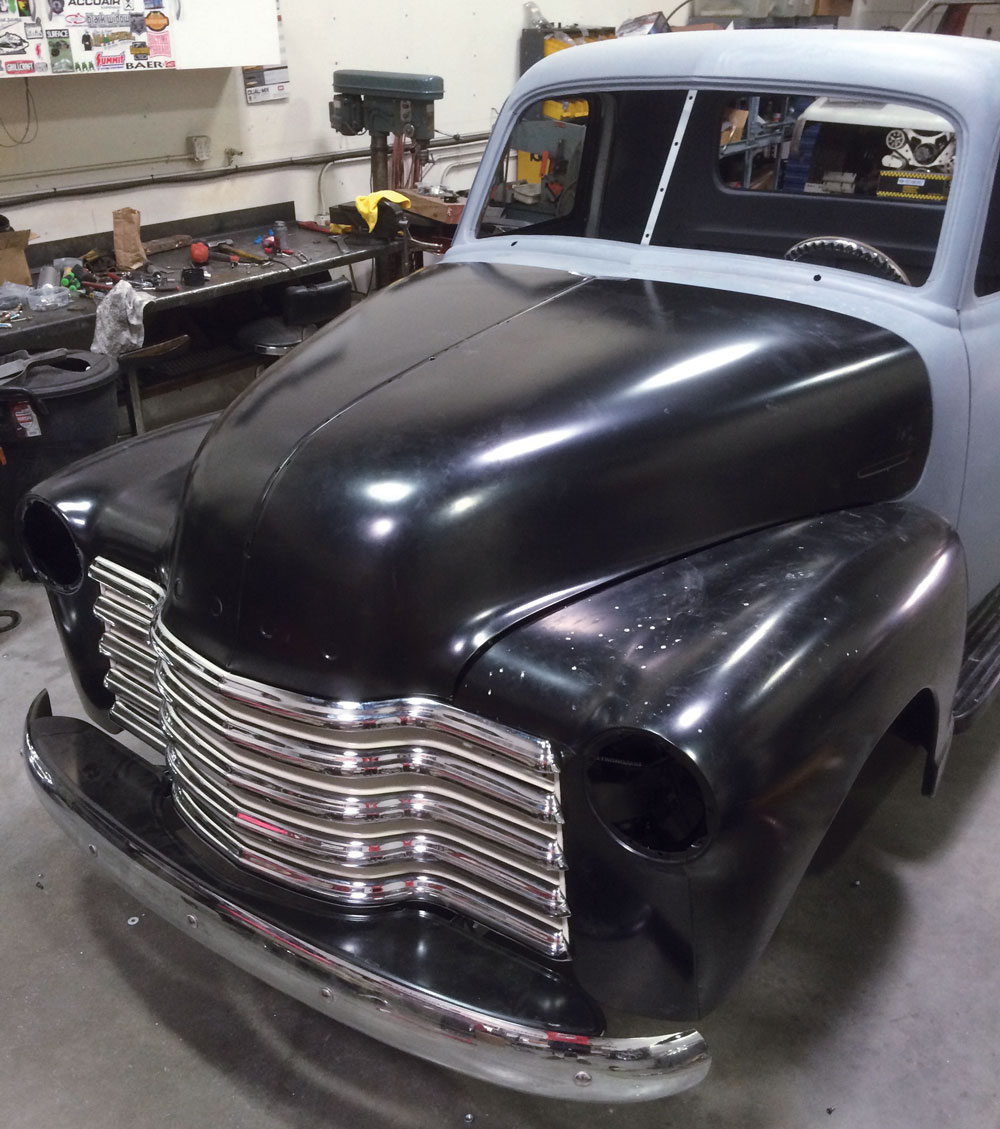
We set the bed on next and jacked the wheel up in the wheel well to ride height. We wanted to make sure the rear wheel was also centered in the rear fender. It’s amazing how close the wheelbase between a ’49 Chevy pickup and an ’86 Chevy S-10 are. With all of the body panels mocked up and the new suspension installed, Cindy is on her way back to the body shop.
Remember, while this kit simplifies the process, a successful S10 frame swap still demands a solid understanding of both the tools and techniques involved, alongside the patience to tackle unexpected challenges. If it’s not fun, re-evaluating your hobby choice might be in order.
What technical skills are necessary for a successful S10 frame swap?
The swap demands a range of technical skills, including design, fabrication, and welding expertise. These skills are essential to address the customizations and modifications required throughout the process.
What additional modifications and decisions are necessary during an S10 frame swap?
Decisions need to be made regarding the choice of gas tank and radiator, as well as figuring out how to clear the S10 steering box and route the exhaust effectively. These choices are crucial for the swap’s success.
What compatibility issues may arise with an S10 frame swap?
Compatibility issues can include fitting challenges with the cab, front fenders, radiator core support, front and rear bumpers, running boards, and the bed. These elements may not seamlessly align with the S10 frame, requiring additional modifications.
What are some common pitfalls or misconceptions about S10 frame swap projects?
Many projects are marketed as “almost done” or “easy to finish,” but in reality, they can be far from complete. This highlights a common misconception about the ease of completing such swaps.
How difficult and effort-intensive is an S10 frame swap?
An S10 frame swap is notably labor-intensive and requires a lot of work to achieve the desired outcome. It’s not a quick or simple task, demanding significant attention to detail and patience.
What are the common issues and skills required when performing an S10 frame swap?
While looking into chassis and suspension upgrades for our ’49 Chevy 3100 Advance Design pickup, we came across Robert Hertz from ADEngineering. There are several options out there for these trucks, from brand-new chassis to weld-in Mustang-II-style front cross members, and some people have even cut the front frame off and clipped them with Camaro or other Chevy-car-style front suspensions. Robert actually approached us to inform us of a chassis swap kit he produces for the 1947-55 first series pickups and Suburbans. We were definitely intrigued and started talking about using the kit for project Cindy.
After exchanging a few emails with Robert, we were sold on the chassis swap kit. The complete kit comes with everything we would need to swap the chassis, engine, transmission, and steering. AD-Engineering has spent a lot of time perfecting the kit, both on the computer-generated plans as well as on vehicles. We selected the options we would need for our project and the parts were soon headed our way.
While the kit provided a structured approach, performing an S10 frame swap isn’t without its challenges. It’s imperative to have some design, fabrication, and welding skills. These are crucial when tackling the complexities of mounting components like the cab, front fenders, radiator core support, and bumpers. Missteps here can lead to alignment issues or even structural instability.
Additionally, selecting compatible components requires careful consideration. For instance, choosing the right gas tank and radiator that fit with the S10 frame can be tricky. Exhaust routing around the steering box also poses a challenge that demands both creativity and precision.
The market is flooded with “projects” advertised as “almost done” or “easy to finish,” but they often hide unresolved issues. Before starting such a project, be prepared for a thorough commitment to overcoming these hurdles.
Here’s the donor truck. This 1986 standard cab long-bed S-10 was the perfect candidate for our chassis swap. We picked it up for $450, and it was still running and driving. It did have a blown head gasket, but that didn’t stop us from attempting to completely blow up the engine with a nice burnout.
First, we stripped the donor truck down to a rolling chassis, and then we began prepping the frame for the new mounts. The rear cab mount and forward bed mount were the first to go. A plasma cutter made quick work of the bulk of the material. We then came back with a cut-off wheel to remove the smaller parts of the mount. Finally, we finished cleaning up the frame with a flap disc sander.
The same process was performed on the front mounts as well. There’re also a couple of smaller items, like the rear bump stops, that can be removed at this time as well. After a total of about five hours here’s what we ended up with: the complete rolling chassis, cleaned up and ready for some new brackets and hardware.
The main bracket for the chassis swap almost completely covers the side of the frame rail. The piece is held against the side of the frame rail, and three bolts secure it to the frame through factory S-10 frame holes. Next up, we set the transmission cross member mounts in place and loosely bolted up the forward two bolts.
The transmission cross member was placed between the mounts and loosely bolted in place. Once we had the three pieces bolted together and aligned properly, we drilled the rearward two holes through the mount and the top of the frame rails. The loosely installed bolts were then tightened, locking the transmission cross member in place.
Moving towards the front end of the main bracket, we drilled new holes in the frame for the front running board mounts. The running board mount was then bolted in place with the two bolts that pass through the S-10 frame rails. These bolts were probably the most difficult part of the installation. Make sure you have someone with long skinny arms that can get their hands far enough up the opening of the frame to hold a wrench on the back of the bolt. If you don’t have someone like that to help you out, you could drill an access hole for a socket on the boxed section of the frame.
The front cab mount shares a couple of bolts with the running board mount. We were impressed with how these pieces fit together even though we were mounting several pieces together at once.
Next, we moved towards the rear of the frame rail. The main bracket locates several more holes along the way towards the rear of the truck. The forward two in this photo are for the middle running board bracket. You’ll notice the ones we are drilling in this photo are the two closer to the front of the truck in the set of four. The ones directly behind are for the Suburban mounts, so those did not need to be drilled.
There were also several holes along the top of the main bracket that needed to be drilled. These bolt holes are more for attachment strength of the main bracket. The final holes in the main bracket are all the way towards the rear of the truck and will attach the forward bed mount.
With all of the new holes drilled, we started attaching more new brackets. These mounts will serve as the middle running board mounts.
Moving towards the front of the truck again, we began to work on the engine mounts. Robert gave us the idea to drill out the factory engine mount holes and weld in nuts to make installation easier. We decided to go ahead with this plan and began by drilling holes large enough for the flange nuts to sit inside of and be nearly flush with the mounting surface.
Once we were happy with the location of the bolts, they were permanently welded in place. In order for the new engine mount plate to sit as flat as possible, the welds were sanded down a bit to flatten them out.
The engine mount is pretty sophisticated. It not only ties into where the factory engine mounts once were, it also uses holes on the rearward lower control arm mount, adding strength to both pieces. Installation on the rearward lower control arm mount is made simple by the use of a threaded plate. The supplied hardware threads into this plate and secures the engine mount plate in its new home.
AD-Engineering has several options for engine mounts. We are dropping an LS-based engine in Cindy so we were supplied with these mounts. It appears that these same mounts could also be used with a small-block Chevy. Using the supplied hardware, we attached the engine mounts to the engine block.
The final part of the three-piece mount is the U-shaped bracket that will sandwich the engine mount bushing. There are two options for holes when mounting our LS-based engine. We decided to go with the furthest rearward mount in order to get closer to a 50/50 weight bias with the overall chassis. With the engine on a hoist, we slid the new mounts together.
The engine and transmission were mounted as one unit and dropped in very easily. Locating the transmission mount in the proper bolt holes per the instructions allowed the supplied transmission mount bushing to fall right in place.
All the way at the front of the truck, we needed to remove more of the factory S-10 mounts. The factory S-10 bumper mounts and radiator support mounts needed to go. A 4.5-inch cut-off wheel on a die grinder was used to remove these two items. We tried to cut right at the welds, which make it easier to clean up the frame.
Here’s what it looks like after the mounts are cleaned up with the flap wheel. Make sure you’re not using a rock wheel grinder for this type of clean up because it will leave you with a much rougher and unattractive finish.
The last pieces included with the kit are for the running boards. We already installed the mounts along the sides of the frame rail, but now we are working on the running boards themselves. This allows for the new plates to slide into the running board. These plates are threaded to accept bolts, which will make mounting the running boards much easier.
After only two days of work, one stripping the S-10 frame and one installing the new parts, we had ourselves a new chassis under project Cindy. We rolled the truck outside the shop to get a better look at our quick accomplishment.
The following day was spent installing the body panels. Anyone who knows these trucks will vouch for how much work it takes to get all of the front sheet metal installed. It’s not an easy task, but we were able to get things installed and roughly lined up for the body shop to dial in.
We set the bed on next and jacked the wheel up in the wheel well to ride height. We wanted to make sure the rear wheel was also centered in the rear fender. It’s amazing how close the wheelbase between a ’49 Chevy pickup and an ’86 Chevy S-10 are. With all of the body panels mocked up and the new suspension installed, Cindy is on her way back to the body shop. I know you’re asking yourself about the new lowered height also; we’ll get to that next time.
Whichever way you go with an S10 frame swap, remember this: if you’re not having fun, you might be in the wrong hobby. Embrace the challenges and enjoy the journey.
What are some alternative options to an S10 frame swap for improving a vintage truck’s chassis?
While looking into chassis and suspension upgrades for our ’49 Chevy 3100 Advance Design pickup, we came across Robert Hertz from ADEngineering. There are several options out there for these trucks, from brand-new chassis to weld-in Mustang-II-style front cross members, and some people have even cut the front frame off and clipped them with Camaro or other Chevy-car-style front suspensions.
For those exploring alternatives to the popular S10 frame swap, it’s worth considering maintaining the original stock frame. This option allows for modifications such as an Independent Front Suspension (IFS) or an open rear swap, which can be more straightforward than a full chassis replacement. The Mustang-II cross member is a standout choice, offering a seamless way to upgrade the front suspension while preserving the truck’s authenticity.
Additionally, installing an aftermarket rear leaf spring kit to accommodate a Camaro rear end can efficiently complete the chassis transformation in a weekend. This approach not only simplifies the process but also eliminates the need to address complex issues like mounting the cab, front fenders, and other components that may arise with an S10 frame swap.
While the S10 swap remains a popular choice, it’s important to be aware of the design, fabrication, and welding skills required. This swap can present challenges such as deciding on a suitable gas tank, radiator compatibility, and exhaust routing.
Ultimately, the path you choose should align with your skills and enthusiasm for the project, ensuring that the journey is as enjoyable as the destination. After all, if you’re not having fun, you might be in the wrong hobby.
What is the potential for resale or investment value in these upgrades?
These trucks can be seen as investments, even in a slow market. Properly executed upgrades can enhance their appeal and value, making them attractive to potential buyers while enjoying the hobby.
What is the feasibility of completing these upgrades in terms of time and complexity?
Utilizing a Mustang-II cross member and rear leaf spring kit can streamline the upgrade process, potentially allowing you to complete the chassis work over a weekend, making it a feasible option for those with limited time.
What alternative suspension upgrade options exist instead of a full chassis swap?
Alternatives include using a Mustang-II cross member on the stock frame and an aftermarket rear leaf spring kit. This approach allows for significant improvement without the complexities of a full chassis swap.
What are the specific challenges and considerations involved in an S10 frame swap?
An S10 frame swap requires more fabrication work than many anticipate, including design and welding skills. You’ll face challenges such as selecting compatible parts like gas tanks and radiators, and dealing with exhaust routing, all while ensuring everything fits properly.
What are the benefits of keeping the stock frame?
Retaining the stock frame can simplify your project significantly. It eliminates the need to modify or figure out mounting solutions for components like the cab, fenders, bumpers, and more, which can be challenging with a frame swap.
Share Link